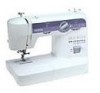
Brother International XL 5500 Users Manual - English - Page 15
Stitch Width Dial, Reverse Sewing Lever, Drop Feed Lever if the machine is, equipped with a drop - threading
 |
View all Brother International XL 5500 manuals
Add to My Manuals
Save this manual to your list of manuals |
Page 15 highlights
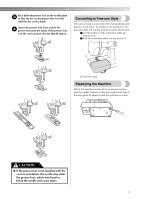
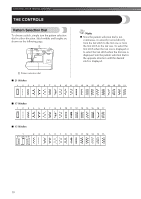
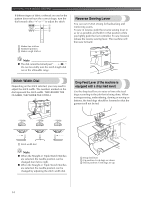
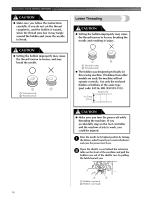
KNOWING YOUR SEWING MACHINE If different types of fabric or thread are used or the pattern does not have the correct shape, turn the dial toward either "+" or "-" to adjust the stitch. - 1 SS 2 + 3 • • • • 4 3 1 Makes fine stitches 2 Standard position 3 Makes rough stitches Reverse Sewing Lever You can use reverse sewing for backtacking and reinforcing seams. To sew in reverse, push the reverse sewing lever in as far as possible and hold it in that position while you lightly push the foot controller. To sew forward, release the reverse sewing lever. The machine will then sew forward. Note ● The dial cannot be turned past SS -". Do not forcefully turn the stitch length dial out of the allowable range. . Stitch Width Dial Depending on the stitch selected, you may need to adjust the stitch width. The numbers marked on the dial represent the stitch width. THE HIGHER THE NUMBER, THE WIDER THE STITCH. 1 Drop Feed Lever (if the machine is equipped with a drop feed lever) Use the drop feed lever to raise or lower the feed dogs according to the job that is being done. When monogramming, embroidering, darning or sewing on buttons, the feed dogs should be lowered so that the garment will not be fed. 1 Stitch width dial Note ● When the Straight or Triple Stretch Stitches are selected, the needle position can be changed from left to right. ● When the Straight or Triple Stretch Stitches are selected, the needle position can be changed by adjusting the stitch width dial. . 1 2 3 1 Drop feed lever 2 Up position: Feed dogs are down. 3 Down position: Feed dogs are up. 14
-
 1
1 -
2
-
3
-
4
-
5
-
6
-
7
-
8
-
9
-
 10
10 -
 11
11 -
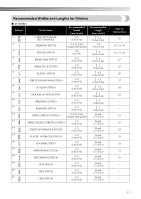 12
12 -
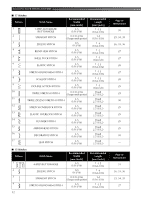 13
13 -
 14
14 -
 15
15 -
 16
16 -
 17
17 -
 18
18 -
 19
19 -
 20
20 -
21
-
22
-
23
-
24
-
25
-
26
-
27
-
28
-
29
-
30
-
31
-
32
-
33
-
34
-
35
-
36
-
37
-
38
-
39
-
40
-
41
-
42
-
43
-
44
-
45
-
46
 |
 |
