Brother International XL 5500 Users Manual - English - Page 36
Gathering, Darning
 |
View all Brother International XL 5500 manuals
Add to My Manuals
Save this manual to your list of manuals |
Page 36 highlights
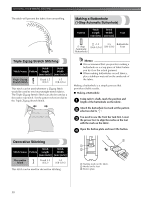
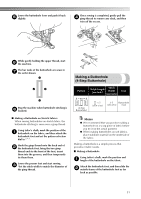
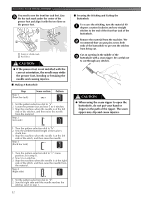
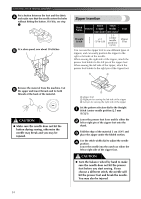
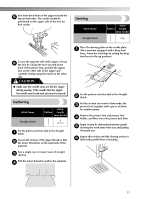
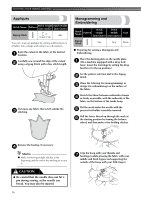
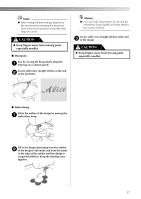
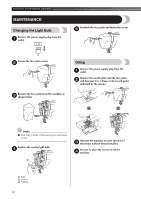
Sew from the bottom of the zipper toward the 5 top on both sides. The needle should be positioned on the zipper side of the foot for best results. Darning Stitch Name Straight Stitch Stitch Pattern Length [mm (inch)] Any To sew the opposite side of the zipper, release 6 the foot by raising the lever located at the back of the presser foot, position the zipper foot on the other side of the zipper and continue sewing using the notch on the other side. CAUTION ● Make sure the needle does not hit the zipper during sewing. If the needle hits the zipper, the needle may break and you may be injured. Gathering Stitch Name Straight Stitch Stitch Pattern Length [mm (inch)] 4 (3/16) Set the pattern selection dial to the Straight 1 Stitch. Loosen the tension of the upper thread so that 2 the lower thread lies on the underside of the material. Sew a single row (or many rows) of straight 3 stitches. Pull the lower threads to gather the material. 4 Place the darning plate on the needle plate. 1 (On a machine equipped with a drop feed lever, lower the feed dogs by setting the drop feed lever to the up position.) Set the pattern selection dial to the Straight 2 Stitch. Put the section you want to darn under the 3 presser foot, together with a piece of fabric for reinforcement. Remove the presser foot and presser foot 4 holder, and then lower the presser foot lifter. Begin sewing by alternating between gently 5 drawing the work away from you and pulling it toward you. Repeat this motion until the darning section is 6 filled with parallel lines of stitching. 35
-
 1
1 -
2
-
3
-
4
-
5
-
6
-
7
-
8
-
9
-
10
-
11
-
12
-
13
-
14
-
15
-
16
-
17
-
18
-
19
-
20
-
21
-
22
-
23
-
24
-
25
-
26
-
27
-
28
-
29
-
30
-
 31
31 -
 32
32 -
 33
33 -
 34
34 -
 35
35 -
 36
36 -
 37
37 -
 38
38 -
 39
39 -
 40
40 -
 41
41 -
42
-
43
-
44
-
45
-
46
 |
 |
