Brother International XL 5500 Users Manual - English - Page 35
Zipper Insertion - zipper foot
 |
View all Brother International XL 5500 manuals
Add to My Manuals
Save this manual to your list of manuals |
Page 35 highlights
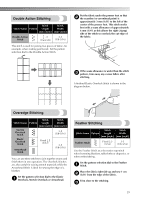
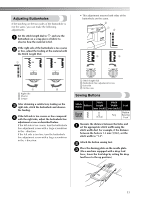
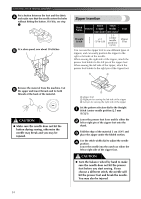
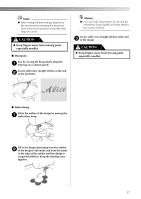
KNOWING YOUR SEWING MACHINE Put a button between the foot and the fabric 4 and make sure that the needle enters the holes without hitting the button. If it hits, see step 1. At a slow speed, sew about 10 stitches. 5 Zipper Insertion Stitch Stitch Stitch Name Pattern Length Width [mm (inch)] [mm (inch)] Straight Stitch 2-3 (1/16-1/8) 2.5 (center needle position) (3/32) Foot Zipper Foot You can use the zipper foot to sew different types of zippers, and can easily position the zipper to the right or left side of the needle. When sewing the right side of the zipper, attach the presser foot holder to the left pin of the zipper foot. When sewing the left side of the zipper, attach the presser foot holder to the right pin of the zipper foot. 1 2 Remove the material from the machine. Cut 6 the upper and lower threads and tie both threads at the back of the material. CAUTION ● Make sure the needle does not hit the button during sewing, otherwise the needle may break and you may be injured. 3 1 Zipper foot 2 Right pin for sewing the left side of the zipper 3 Left pin for sewing the right side of the zipper Set the pattern selection dial to the Straight 1 Stitch (center needle position (2.5 mm (3/32")). Lower the presser foot lever and fix either the 2 left or right pin of the zipper foot onto the shank. Fold the edge of the material 2 cm (3/4") and 3 place the zipper under the folded section. Use the stitch width dial to adjust the needle 4 position. Lower the needle into the notch on either the left or right side of the zipper foot. CAUTION ● Turn the balance wheel by hand to make sure the needle does not hit the presser foot before you start sewing. If you choose a different stitch, the needle will hit the presser foot and break the needle. You may also be injured. 34
-
 1
1 -
2
-
3
-
4
-
5
-
6
-
7
-
8
-
9
-
10
-
11
-
12
-
13
-
14
-
15
-
16
-
17
-
18
-
19
-
20
-
21
-
22
-
23
-
24
-
25
-
26
-
27
-
28
-
29
-
 30
30 -
 31
31 -
 32
32 -
 33
33 -
 34
34 -
 35
35 -
 36
36 -
 37
37 -
 38
38 -
 39
39 -
 40
40 -
41
-
42
-
43
-
44
-
45
-
46
 |
 |
