Canon Color imageCLASS MF8380Cdw imageCLASS MF8380Cdw/8080Cw Basic Operation G - Page 156
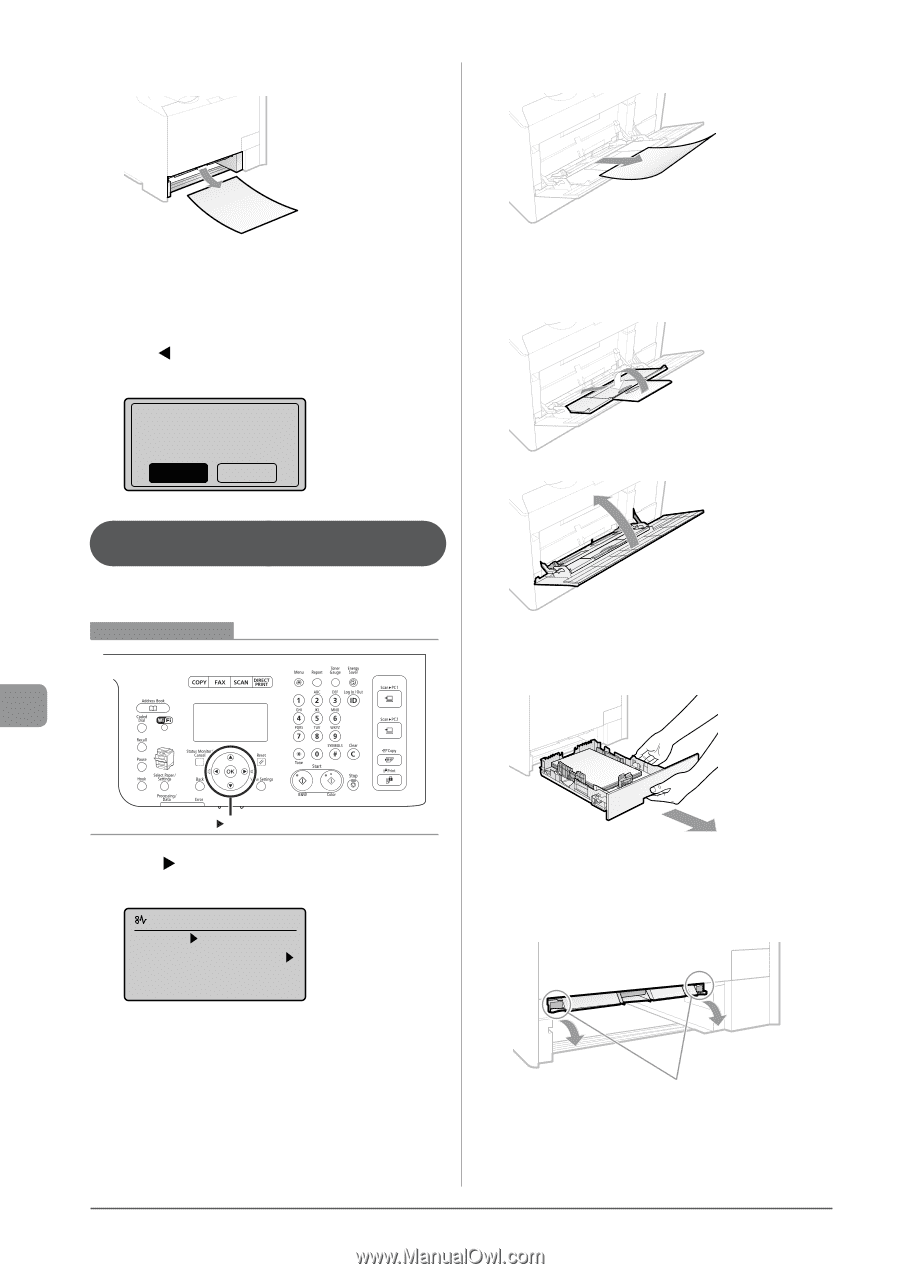
Paper Jams in the Multi-purpose Tray (MF8380Cdw Only), and then press [OK].
 |
View all Canon Color imageCLASS MF8380Cdw manuals
Add to My Manuals
Save this manual to your list of manuals |
Page 156 highlights
3 Remove the paper by pulling it gently. 2 Remove the paper by pulling it gently. Troubleshooting 4 Insert the paper cassette into the machine. If the optional paper cassette (Cassette 2) is installed in MF8380Cdw, close the optional paper cassette also. 5 When the following screen appears, select with [ ], and then press [OK]. The machine is ready to print. Is all of the jammed paper removed? Yes No If the jammed paper cannot be removed easily Do not try to remove it forcefully but proceed to Step 3. 3 Close the multi-purpose tray. Paper Jams in the Multi-purpose Tray (MF8380Cdw Only) Referring to the procedure on the display, follow the steps below to remove jammed paper. Keys to be used for this operation 4 Pull out the paper cassette. Hold the paper cassette with both hands. OK 1 Press [ ]. Press [OK] to exit the operation screen. Paper jam. Press [ ] to display steps. (End: Press OK) 5 Lower the manual feed transport guide. (1) Hold the green tabs (A) on both sides. (2) Push them down. (A) 9-6
-
 1
1 -
2
-
3
-
4
-
5
-
6
-
7
-
8
-
9
-
10
-
11
-
12
-
13
-
14
-
15
-
16
-
17
-
18
-
19
-
20
-
21
-
22
-
23
-
24
-
25
-
26
-
27
-
28
-
29
-
30
-
31
-
32
-
33
-
34
-
35
-
36
-
37
-
38
-
39
-
40
-
41
-
42
-
43
-
44
-
45
-
46
-
47
-
48
-
49
-
50
-
51
-
52
-
53
-
54
-
55
-
56
-
57
-
58
-
59
-
60
-
61
-
62
-
63
-
64
-
65
-
66
-
67
-
68
-
69
-
70
-
71
-
72
-
73
-
74
-
75
-
76
-
77
-
78
-
79
-
80
-
81
-
82
-
83
-
84
-
85
-
86
-
87
-
88
-
89
-
90
-
91
-
92
-
93
-
94
-
95
-
96
-
97
-
98
-
99
-
100
-
101
-
102
-
103
-
104
-
105
-
106
-
107
-
108
-
109
-
110
-
111
-
112
-
113
-
114
-
115
-
116
-
117
-
118
-
119
-
120
-
121
-
122
-
123
-
124
-
125
-
126
-
127
-
128
-
129
-
130
-
131
-
132
-
133
-
134
-
135
-
136
-
137
-
138
-
139
-
140
-
141
-
142
-
143
-
144
-
145
-
146
-
147
-
148
-
149
-
150
-
 151
151 -
 152
152 -
 153
153 -
 154
154 -
 155
155 -
 156
156 -
 157
157 -
 158
158 -
 159
159 -
 160
160 -
 161
161 -
162
-
163
-
164
-
165
-
166
-
167
-
168
-
169
-
170
-
171
-
172
-
173
-
174
-
175
-
176
-
177
-
178
-
179
-
180
-
181
-
182
-
183
-
184
-
185
-
186
-
187
-
188
-
189
-
190
-
191
-
192
 |
 |