Canon EOS 10D EOS DIGITAL Software Instruction Manual (EOS Viewer Utility 1.2. - Page 33
Deleting Images, Checking the Image Information and Entering Comments
 |
UPC - 750845811339
View all Canon EOS 10D manuals
Add to My Manuals
Save this manual to your list of manuals |
Page 33 highlights
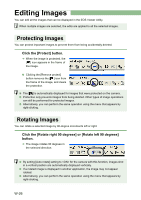
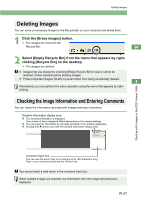
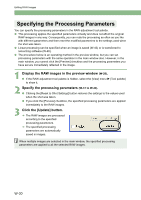
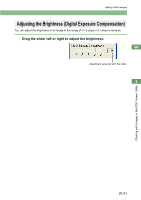
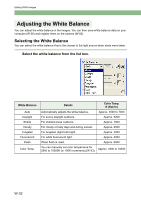
Editing Images Deleting Images You can move unnecessary images to the Recycle Bin on your computer and delete them. 1 Click the [Erase images] button. ¿ The images are moved to the Recycle Bin. W 2 Select [Empty Recycle Bin] from the menu that appears by rightclicking [Recycle Bin] on the desktop. ¿ The images are deleted. O Images that you deleted by selecting [Empty Recycle Bin] in step 2 cannot be restored. Check carefully before deleting images. O Protect important images (W-26) to prevent them from being accidentally deleted. 3 Alternatively, you can perform the same operation using the menu that appears by rightclicking. Checking the Image Information and Entering Comments You can check the information recorded with images and input comments. Detailed Information display area O The shooting information is displayed. The number of items displayed differs depending on the camera settings. O You can copy the information as text data and paste it into another application. O Clicking the [T] button can hide the Detailed Information display area. Working with Images in the EOS Viewer Utility Comment input box You can use this box to type in a comment up to 120 characters long. Type in your comment and press the key. You cannot insert a hard return in the comment input box. When multiple images are selected, the information from the image selected last is displayed. W-27
-
 1
1 -
2
-
3
-
4
-
5
-
6
-
7
-
8
-
9
-
10
-
11
-
12
-
13
-
14
-
15
-
16
-
17
-
18
-
19
-
20
-
21
-
22
-
23
-
24
-
25
-
26
-
27
-
 28
28 -
 29
29 -
 30
30 -
 31
31 -
 32
32 -
 33
33 -
 34
34 -
 35
35 -
 36
36 -
 37
37 -
 38
38 -
39
-
40
-
41
-
42
-
43
-
44
-
45
-
46
-
47
-
48
-
49
-
50
-
51
-
52
-
53
-
54
-
55
-
56
-
57
-
58
-
59
-
60
-
61
-
62
-
63
-
64
-
65
-
66
-
67
-
68
-
69
-
70
-
71
-
72
-
73
-
74
-
75
-
76
-
77
-
78
-
79
-
80
-
81
-
82
-
83
-
84
-
85
-
86
-
87
-
88
-
89
-
90
-
91
-
92
-
93
-
94
-
95
-
96
-
97
-
98
-
99
-
100
-
101
-
102
-
103
-
104
-
105
-
106
-
107
-
108
-
109
-
110
-
111
-
112
-
113
-
114
-
115
-
116
-
117
-
118
-
119
-
120
-
121
-
122
-
123
-
124
-
125
-
126
-
127
-
128
-
129
-
130
-
131
-
132
-
133
-
134
-
135
-
136
-
137
-
138
-
139
-
140
-
141
-
142
-
143
-
144
-
145
-
146
-
147
-
148
-
149
-
150
-
151
-
152
-
153
-
154
-
155
-
156
-
157
-
158
-
159
-
160
-
161
-
162
-
163
-
164
-
165
-
166
-
167
-
168
-
169
-
170
-
171
-
172
-
173
-
174
-
175
-
176
-
177
-
178
-
179
-
180
-
181
-
182
-
183
-
184
-
185
-
186
-
187
-
188
-
189
-
190
-
191
-
192
-
193
-
194
-
195
-
196
-
197
-
198
-
199
-
200
-
201
-
202
-
203
-
204
-
205
-
206
-
207
-
208
-
209
-
210
-
211
-
212
-
213
-
214
-
215
-
216
-
217
-
218
-
219
-
220
-
221
-
222
 |
 |
