Canon EOS C300 Mark II CINEMA RAW DEVELOPMENT INSTRUCTION MANUAL Version 1.4 M - Page 6
Changing the file view format, Icons displayed in the thumbnail, Adding RAW Clips to the Media Pool
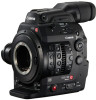 |
View all Canon EOS C300 Mark II manuals
Add to My Manuals
Save this manual to your list of manuals |
Page 6 highlights
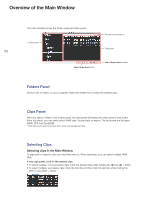
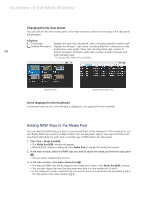
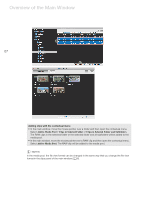
Overview of the Main Window Changing the file view format You can click the file view format button in the main window to switch how the clips in the clips panel are displayed. „ Options Thumbnails Displays the each clip's thumbnail, name, recording date/time and file type*. Detailed Information Displays the file type*, clip's name, recording date/time, starting time code, ending time code, length, frame rate, shooting frame rate, number of 06 frames, resolution, bit depth, audio type, number of audio channels and audio sampling rate. * The file type will be RAW, DPX or OpenEXR. Thumbnail view Detailed information view Icons displayed in the thumbnail In thumbnail view, an icon of the file type is displayed to the upper left of the thumbnail. Adding RAW Clips to the Media Pool You can select the RAW clips you plan to use and add them to the media pool. In the media pool, you can display RAW clips saved in multiple folders. You can play back, export, view clip information and view frame information for such clips in a similar way to RAW clips in the clips panel. 1. Click View > Media Pool/EDL. • The Media Pool/EDL window will appear. • When the EDL screen is displayed, click Media Pool to display the media pool screen. 2. In the main window, select the RAW clips you wish to add to the media pool from the clips panel (³). • You can select multiple clips at once. 3. In the main window, click Add to Media Pool (·). • The selected RAW clips will be added to the media pool screen of the Media Pool/EDL window. • You can also drag a clip from the clips panel and drop it on the media pool to add it. • In the media pool screen, select the clip you want to use in the same way that you select a clip in the clips panel of the main window (0 5).
-
 1
1 -
 2
2 -
 3
3 -
 4
4 -
 5
5 -
 6
6 -
 7
7 -
 8
8 -
 9
9 -
 10
10 -
 11
11 -
 12
12 -
13
-
14
-
15
-
16
-
17
-
18
-
19
-
20
-
21
-
22
-
23
-
24
-
25
-
26
-
27
-
28
-
29
-
30
-
31
-
32
-
33
-
34
-
35
-
36
 |
 |
