Canon FAXPHONE B95 FAXPHONE B95 User's Guide - Page 95
Remove the new BJ Cartridge, from its package, then remove the orange protective cap
 |
View all Canon FAXPHONE B95 manuals
Add to My Manuals
Save this manual to your list of manuals |
Page 95 highlights
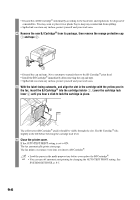
• Discard the old BJ Cartridge® immediately according to the local laws and regulations for disposal of consumables. You may want to place it in a plastic bag to keep any residual ink from spilling. • Spilled ink can stain any surface; protect yourself and your work area. 4 Remove the new BJ Cartridge® from its package, then remove the orange protective cap a and tape b. 1 2 • Discard the cap and tape. Never attempt to reattach them to the BJ Cartridge® print head. • Install the BJ Cartridge® immediately after removing the cap and tape. • Spilled ink can stain any surface; protect yourself and your work area. 5 With the label facing outwards, and align the slot in the cartridge with the yellow post in the fax, insert the BJ Cartridge® into the cartridge holder a. Lower the cartridge lock lever b until you hear a click to lock the cartridge in place. 2 1 The yellow post (BJ Cartridge® guide) should be visible through the slot. The BJ Cartridge® tilts slightly to the left before lowering the cartridge lock lever. 6 Close the printer cover. If the AUTO TEST PRINT setting is set to ON: The fax automatically prints a test page. The fax prints a test page every time you insert a BJ Cartridge®. • Load the paper in the multi-purpose tray before you replace the BJ Cartridge®. • You can turn off automatic test printing by changing the AUTO TEST PRINT setting. See SYSTEM SETTINGS, p. 8-5. 9-6
-
 1
1 -
2
-
3
-
4
-
5
-
6
-
7
-
8
-
9
-
10
-
11
-
12
-
13
-
14
-
15
-
16
-
17
-
18
-
19
-
20
-
21
-
22
-
23
-
24
-
25
-
26
-
27
-
28
-
29
-
30
-
31
-
32
-
33
-
34
-
35
-
36
-
37
-
38
-
39
-
40
-
41
-
42
-
43
-
44
-
45
-
46
-
47
-
48
-
49
-
50
-
51
-
52
-
53
-
54
-
55
-
56
-
57
-
58
-
59
-
60
-
61
-
62
-
63
-
64
-
65
-
66
-
67
-
68
-
69
-
70
-
71
-
72
-
73
-
74
-
75
-
76
-
77
-
78
-
79
-
80
-
81
-
82
-
83
-
84
-
85
-
86
-
87
-
88
-
89
-
 90
90 -
 91
91 -
 92
92 -
 93
93 -
 94
94 -
 95
95 -
 96
96 -
 97
97 -
 98
98 -
 99
99 -
 100
100 -
101
-
102
-
103
-
104
-
105
-
106
-
107
-
108
-
109
-
110
-
111
-
112
-
113
-
114
-
115
-
116
 |
 |
