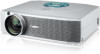
Canon LV-5200 Owners Manual - Page 8
Setting-up The Projector - projector lamp
 |
View all Canon LV-5200 manuals
Add to My Manuals
Save this manual to your list of manuals |
Page 8 highlights
PREPARATION SETTING-UP THE PROJECTOR CONNECTING AC POWER CORD This projector uses nominal input voltages of 100-120 V or 200-240 V AC. This projector automatically selects the correct input voltage. It is designed to work with single-phase power systems having a grounded neutral conductor. To reduce the risk of electric shock, do not plug into any other type of power system. Consult your authorized dealer or service station if you are not sure of the type of power supply being supplied. Connect the projector with all peripheral equipment before turning the projector on. (Refer to pages 11 ~ 13 for connection.) CAUTION For safety, unplug the AC Power Cord when the projector is not in use. When this projector is connected to the AC outlet with the AC Power Cord, it is in Stand-by Mode and consumes a little electric power. Connect the AC Power Cord (supplied) to the projector. The AC outlet must be near this equipment and must be easily accessible. NOTE ON THE POWER CORD The AC Power Cord must meet the requirements of the country where you use the projector. Confirm the AC plug type with the chart below. The proper AC power cord must be used. If the supplied AC Power Cord does not match the AC outlet, contact your sales dealer. Projector side AC Outlet side For the U.S.A. and Canada Ground For Continental Europe To the POWER CORD CONNECTOR on the projector. To the AC Outlet. (120 V AC) To the AC Outlet. (200 - 240 V AC) INSTALLING THE PROJECTOR IN PROPER POSITION Install the projector properly. Improper installation may reduce the lamp lifetime and cause fire hazard. 20˚ Do not tilt the projector more than 20 degrees above and below. Do not point the projector down to project an image. 20˚ NO DOWNWARD Do not point the projector up to project an image. Do not put the projector on either side to project an image. NO UPWARD NO SIDEWAYS 8
-
 1
1 -
2
-
 3
3 -
 4
4 -
 5
5 -
 6
6 -
 7
7 -
 8
8 -
 9
9 -
 10
10 -
 11
11 -
 12
12 -
 13
13 -
14
-
15
-
16
-
17
-
18
-
19
-
20
-
21
-
22
-
23
-
24
-
25
-
26
-
27
-
28
-
29
-
30
-
31
-
32
-
33
-
34
-
35
-
36
-
37
-
38
-
39
-
40
-
41
-
42
-
43
-
44
-
45
-
46
-
47
-
48
 |
 |
