Canon MX310 MX310 series Quick Start Guide - Page 33
Setting on the Machine, Displaying the PictBridge Settings Screen and Specifying the Settings
 |
UPC - 013803081282
View all Canon MX310 manuals
Add to My Manuals
Save this manual to your list of manuals |
Page 33 highlights
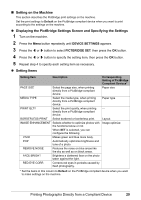
„ Setting on the Machine This section describes the PictBridge print settings on the machine. Set the print settings to Default on the PictBridge compliant device when you want to print according to the settings on the machine. z Displaying the PictBridge Settings Screen and Specifying the Settings 1 Turn on the machine. 2 Press the Menu button repeatedly until DEVICE SETTINGS appears. 3 Press the [ or ] button to select PICTBRIDGE SET, then press the OK button. 4 Press the [ or ] button to specify the setting item, then press the OK button. 5 Repeat step 4 to specify each setting item as necessary. z Setting Items Setting Item Description PAGE SIZE Select the page size, when printing directly from a PictBridge compliant device. MEDIA TYPE Select the media type, when printing directly from a PictBridge compliant device. PRINT QLTY Select the print quality, when printing directly from a PictBridge compliant device. BORDERLESS PRINT Select bordered or borderless print. IMAGE ENHANCEMENT Selects whether to optimize photos with the functions below or not. When SET is selected, you can configure the following. VIVID Makes green and blue more lively. POP Automatically optimizes brightness and tone of a photo. REMOVE NOISE Reduces the noise on blue areas like the sky as well as on black areas. FACE BRIGHT Brightens a darkened face on the photo taken against the light. RED EYE CORR Corrects red eyes in portraits caused by flash photography. Corresponding Setting of PictBridge Compliant Devices* Paper size Paper type - Layout Image optimize * Set the items in this column to Default on the PictBridge compliant device when you want to make settings on the machine. Printing Photographs Directly from a Compliant Device 29
-
 1
1 -
2
-
3
-
4
-
5
-
6
-
7
-
8
-
9
-
10
-
11
-
12
-
13
-
14
-
15
-
16
-
17
-
18
-
19
-
20
-
21
-
22
-
23
-
24
-
25
-
26
-
27
-
 28
28 -
 29
29 -
 30
30 -
 31
31 -
 32
32 -
 33
33 -
 34
34 -
 35
35 -
 36
36 -
 37
37 -
 38
38 -
39
-
40
-
41
-
42
-
43
-
44
-
45
-
46
-
47
-
48
-
49
-
50
-
51
-
52
-
53
-
54
-
55
-
56
-
57
-
58
-
59
-
60
-
61
-
62
-
63
-
64
-
65
-
66
-
67
-
68
-
69
-
70
-
71
-
72
-
73
-
74
-
75
-
76
-
77
-
78
-
79
-
80
-
81
-
82
-
83
-
84
-
85
-
86
-
87
-
88
-
89
-
90
-
91
-
92
-
93
-
94
-
95
-
96
-
97
-
98
-
99
-
100
-
101
-
102
-
103
-
104
-
105
-
106
-
107
-
108
-
109
-
110
-
111
-
112
-
113
-
114
-
115
-
116
-
117
-
118
-
119
-
120
-
121
-
122
-
123
-
124
 |
 |
