Canon MX310 MX310 series Quick Start Guide - Page 46
Sending Faxes, Step 1
 |
UPC - 013803081282
View all Canon MX310 manuals
Add to My Manuals
Save this manual to your list of manuals |
Page 46 highlights
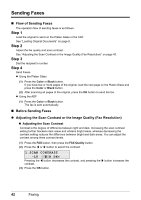
Sending Faxes „ Flow of Sending Faxes The operation flow of sending faxes is as follows. Step 1 Load the original to send on the Platen Glass or the ADF. See "Loading Original Documents" on page 8. Step 2 Adjust the fax quality and scan contrast. See "Adjusting the Scan Contrast or the Image Quality (Fax Resolution)" on page 42. Step 3 Dial the recipient's number. Step 4 Send Faxes. z Using the Platen Glass (1) Press the Color or Black button. If you have two or more pages of the original, load the next page on the Platen Glass and press the Color or Black button. (2) After scanning all pages of the original, press the OK button to send the fax. z Using the ADF (1) Press the Color or Black button. The fax is sent automatically. „ Before Sending Faxes z Adjusting the Scan Contrast or the Image Quality (Fax Resolution) z Adjusting the Scan Contrast Contrast is the degree of difference between light and dark. Increasing the scan contrast setting further blackens dark areas and whitens bright areas, whereas decreasing the contrast setting reduces the difference between bright and dark areas. You can adjust the contrast among three contrast levels. (1) Press the FAX button, then press the FAX Quality button. (2) Press the [ or ] button to select the contrast. 1.SCAN CONTRAST -LT DK+ Pressing the [ button decreases the contrast, and pressing the ] button increases the contrast. (3) Press the OK button. 42 Faxing
-
 1
1 -
2
-
3
-
4
-
5
-
6
-
7
-
8
-
9
-
10
-
11
-
12
-
13
-
14
-
15
-
16
-
17
-
18
-
19
-
20
-
21
-
22
-
23
-
24
-
25
-
26
-
27
-
28
-
29
-
30
-
31
-
32
-
33
-
34
-
35
-
36
-
37
-
38
-
39
-
40
-
 41
41 -
 42
42 -
 43
43 -
 44
44 -
 45
45 -
 46
46 -
 47
47 -
 48
48 -
 49
49 -
 50
50 -
 51
51 -
52
-
53
-
54
-
55
-
56
-
57
-
58
-
59
-
60
-
61
-
62
-
63
-
64
-
65
-
66
-
67
-
68
-
69
-
70
-
71
-
72
-
73
-
74
-
75
-
76
-
77
-
78
-
79
-
80
-
81
-
82
-
83
-
84
-
85
-
86
-
87
-
88
-
89
-
90
-
91
-
92
-
93
-
94
-
95
-
96
-
97
-
98
-
99
-
100
-
101
-
102
-
103
-
104
-
105
-
106
-
107
-
108
-
109
-
110
-
111
-
112
-
113
-
114
-
115
-
116
-
117
-
118
-
119
-
120
-
121
-
122
-
123
-
124
 |
 |