Canon PowerShot A95 PowerShot A95 Camera User Guide - Page 29
Icons Displayed in Shooting Mode - reviews
 |
View all Canon PowerShot A95 manuals
Add to My Manuals
Save this manual to your list of manuals |
Page 29 highlights
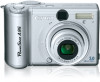
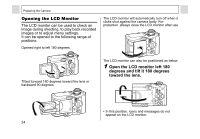
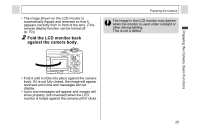
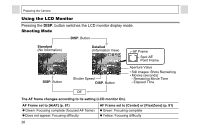
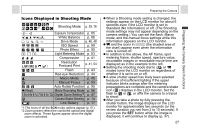
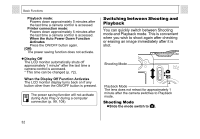
Icons Displayed in Shooting Mode Shooting Mode p. 39, 76 Exposure Compensation p. 85 White Balance p. 86 Drive Mode p. 46, 48 ISO Speed p. 89 Photo Effect p. 90 Light Metering Mode p. 83 Compression p. 41 Resolution Postcard Print p. 41, 54 Flash p. 43 Red-eye Reduction p. 44 Macro Mode p. 45 Manual Focus p. 93 Auto Rotate Function p. 95 z(Red) Movie Recording Mode p. 56 3.8x 4.9x 6.1x 7.6x 9.3x 12x Digital Zoom Setting*2 p. 47 Camera Shake Warning p. 14 Low Battery p. 17 *1:The icons of all the SCN mode options appear (p. 51). *2:Zoom powers reflect the combined optical and digital zoom effects. These figures appear when the digital zoom is activated. Preparing the Camera z When a Shooting mode setting is changed, the settings appear on the LCD monitor for about 6 seconds even if the LCD monitor is set to Standard (No Information) or off. (The Shooting mode settings may not appear depending on the camera setting.) You can set the flash, Macro mode, and the manual focus settings while this information appears on the LCD monitor. z and the icons in (the shaded area of the chart) appear even when the information view is turned off. z In addition to the above, the AF frame, spot metering frame, shutter speed, aperture value, recordable images or recordable movie time are displayed as in the example to the left. z Setting the shooting mode dial to or modes turns the LCD monitor on regardless of whether it is set to on or off. z A slow shutter speed has likely been selected because of insufficient lighting if the upper indicator blinks orange after the metering preparations are complete and the camera shake icon ( ) displays in the LCD monitor. Set the flash to or , or affix the camera to a tripod to shoot. z After you take a photo by fully pressing the shutter button, the image displays on the LCD monitor for approximately two seconds (or the review duration you set from 2 to 10 seconds). If you press the SET button while the image is displayed, it will continue to display (p. 37). 27 Preparing the Camera, Basic Functions
-
 1
1 -
2
-
3
-
4
-
5
-
6
-
7
-
8
-
9
-
10
-
11
-
12
-
13
-
14
-
15
-
16
-
17
-
18
-
19
-
20
-
21
-
22
-
23
-
 24
24 -
 25
25 -
 26
26 -
 27
27 -
 28
28 -
 29
29 -
 30
30 -
 31
31 -
 32
32 -
 33
33 -
 34
34 -
35
-
36
-
37
-
38
-
39
-
40
-
41
-
42
-
43
-
44
-
45
-
46
-
47
-
48
-
49
-
50
-
51
-
52
-
53
-
54
-
55
-
56
-
57
-
58
-
59
-
60
-
61
-
62
-
63
-
64
-
65
-
66
-
67
-
68
-
69
-
70
-
71
-
72
-
73
-
74
-
75
-
76
-
77
-
78
-
79
-
80
-
81
-
82
-
83
-
84
-
85
-
86
-
87
-
88
-
89
-
90
-
91
-
92
-
93
-
94
-
95
-
96
-
97
-
98
-
99
-
100
-
101
-
102
-
103
-
104
-
105
-
106
-
107
-
108
-
109
-
110
-
111
-
112
-
113
-
114
-
115
-
116
-
117
-
118
-
119
-
120
-
121
-
122
-
123
-
124
-
125
-
126
-
127
-
128
-
129
-
130
-
131
-
132
-
133
-
134
-
135
-
136
-
137
-
138
-
139
-
140
-
141
-
142
-
143
-
144
-
145
-
146
-
147
-
148
-
149
-
150
-
151
-
152
-
153
-
154
-
155
-
156
-
157
-
158
-
159
-
160
-
161
-
162
-
163
 |
 |