Canon PowerShot SD500 PowerShot SD500/DIGITAL IXUS 700 Camera User Guide - Page 79
Embedding the Date in the Image Data - instructions
 |
View all Canon PowerShot SD500 manuals
Add to My Manuals
Save this manual to your list of manuals |
Page 79 highlights
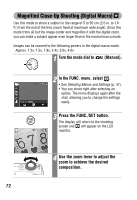
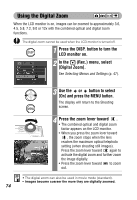
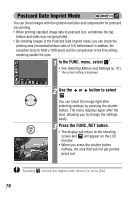
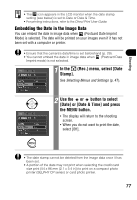
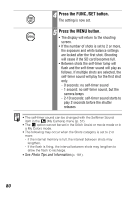
Shooting • The icon appears in the LCD monitor when the date stamp setting (see below) is set to Date or Date & Time. • For printing instructions, refer to the Direct Print User Guide. Embedding the Date in the Image Data You can embed the date in image data when (Postcard Date Imprint Mode) is selected. The date will be printed on your images even if it has not been set with a computer or printer. • Ensure that the camera's date/time is set beforehand (p. 29). • You cannot embed the date in image data when (Postcard Date Imprint mode) is not selected. 1 In the (Rec.) menu, select [Date Stamp]. See Selecting Menus and Settings (p. 47). 2 Use the or button to select [Date] or [Date & Time] and press the MENU button. • The display will return to the shooting screen. • When you do not want to print the date, select [Off]. • The date stamp cannot be deleted from the image data once it has been set. • A portion of the date may not print when selecting the credit card size print (54 x 86 mm (2.1 x 3.4 in)) to print on a compact photo printer (SELPHY CP series) or card photo printer. 77
-
 1
1 -
2
-
3
-
4
-
5
-
6
-
7
-
8
-
9
-
10
-
11
-
12
-
13
-
14
-
15
-
16
-
17
-
18
-
19
-
20
-
21
-
22
-
23
-
24
-
25
-
26
-
27
-
28
-
29
-
30
-
31
-
32
-
33
-
34
-
35
-
36
-
37
-
38
-
39
-
40
-
41
-
42
-
43
-
44
-
45
-
46
-
47
-
48
-
49
-
50
-
51
-
52
-
53
-
54
-
55
-
56
-
57
-
58
-
59
-
60
-
61
-
62
-
63
-
64
-
65
-
66
-
67
-
68
-
69
-
70
-
71
-
72
-
73
-
 74
74 -
 75
75 -
 76
76 -
 77
77 -
 78
78 -
 79
79 -
 80
80 -
 81
81 -
 82
82 -
 83
83 -
 84
84 -
85
-
86
-
87
-
88
-
89
-
90
-
91
-
92
-
93
-
94
-
95
-
96
-
97
-
98
-
99
-
100
-
101
-
102
-
103
-
104
-
105
-
106
-
107
-
108
-
109
-
110
-
111
-
112
-
113
-
114
-
115
-
116
-
117
-
118
-
119
-
120
-
121
-
122
-
123
-
124
-
125
-
126
-
127
-
128
-
129
-
130
-
131
-
132
-
133
-
134
-
135
-
136
-
137
-
138
-
139
-
140
-
141
-
142
-
143
-
144
-
145
-
146
-
147
-
148
-
149
-
150
-
151
-
152
-
153
-
154
-
155
-
156
-
157
-
158
-
159
-
160
-
161
-
162
-
163
-
164
-
165
-
166
-
167
-
168
-
169
-
170
-
171
-
172
-
173
-
174
-
175
-
176
-
177
-
178
-
179
-
180
-
181
-
182
-
183
-
184
-
185
-
186
-
187
-
188
-
189
-
190
-
191
-
192
-
193
-
194
-
195
 |
 |