Canon S820D S820D User's Guide - Page 89
is now complete., leave it out in the open. An ink tank left out in the open and then
 |
View all Canon S820D manuals
Add to My Manuals
Save this manual to your list of manuals |
Page 89 highlights
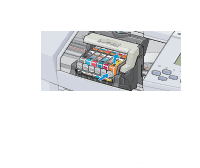
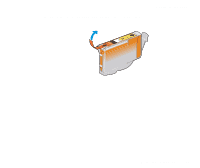
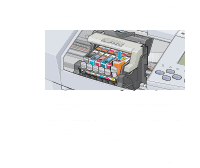
Routine Maintenance 5 Insert the ink tank in the print head holder. Press on the "PUSH" mark until the ink tank snaps firmly into place. Note 6 Close the front cover. The print head holder moves to the right. The ink tank installation process is now complete. ® • To maintain optimal print quality, use an ink tank within six months of first use. • Once an ink tank has been used, do not remove it from the printer and leave it out in the open. An ink tank left out in the open and then reinstalled in the printer may not function. Replacing an Ink Tank 89
-
 1
1 -
2
-
3
-
4
-
5
-
6
-
7
-
8
-
9
-
10
-
11
-
12
-
13
-
14
-
15
-
16
-
17
-
18
-
19
-
20
-
21
-
22
-
23
-
24
-
25
-
26
-
27
-
28
-
29
-
30
-
31
-
32
-
33
-
34
-
35
-
36
-
37
-
38
-
39
-
40
-
41
-
42
-
43
-
44
-
45
-
46
-
47
-
48
-
49
-
50
-
51
-
52
-
53
-
54
-
55
-
56
-
57
-
58
-
59
-
60
-
61
-
62
-
63
-
64
-
65
-
66
-
67
-
68
-
69
-
70
-
71
-
72
-
73
-
74
-
75
-
76
-
77
-
78
-
79
-
80
-
81
-
82
-
83
-
 84
84 -
 85
85 -
 86
86 -
 87
87 -
 88
88 -
 89
89 -
 90
90 -
 91
91 -
 92
92 -
 93
93 -
 94
94 -
95
-
96
-
97
-
98
-
99
-
100
-
101
-
102
-
103
-
104
-
105
-
106
-
107
-
108
-
109
-
110
-
111
-
112
-
113
-
114
-
115
-
116
-
117
-
118
-
119
-
120
-
121
-
122
-
123
-
124
-
125
-
126
-
127
-
128
-
129
-
130
-
131
-
132
-
133
-
134
-
135
-
136
-
137
-
138
-
139
-
140
-
141
-
142
-
143
-
144
-
145
-
146
-
147
-
148
-
149
-
150
-
151
-
152
-
153
-
154
-
155
-
156
-
157
-
158
-
159
-
160
-
161
-
162
-
163
-
164
-
165
-
166
-
167
-
168
-
169
-
170
-
171
-
172
-
173
-
174
-
175
-
176
-
177
-
178
-
179
-
180
-
181
-
182
-
183
-
184
-
185
-
186
-
187
-
188
-
189
-
190
-
191
-
192
-
193
-
194
-
195
 |
 |

Replacing an Ink Tank
89
Routine Maintenance
5
Insert the ink tank in the print head holder.
Press on the "PUSH" mark until the ink tank snaps firmly into place.
6
Close the front cover.
The print head holder moves to the right. The ink tank installation process
is now complete.
Note
• To maintain optimal print quality, use an ink tank within six months of first
use.
• Once an ink tank has been used, do not remove it from the printer and
leave it out in the open. An ink tank left out in the open and then
reinstalled in the printer may not function.