Canon UHD DIGISUPER 90 manual for UJ27x6.5B - Page 47
Back Focus Adjustment, 3 Removing and, Installing the Lens, Shroud, 4 Iris Gain Adjustment
 |
View all Canon UHD DIGISUPER 90 manuals
Add to My Manuals
Save this manual to your list of manuals |
Page 47 highlights
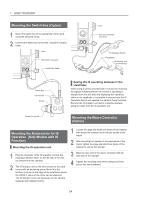
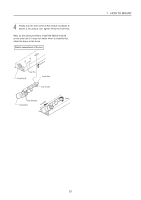
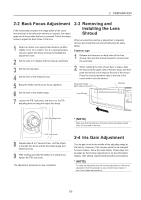
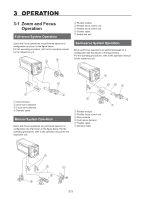
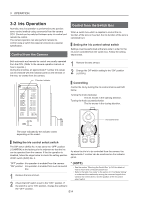
2 PREPARATION 2-2 Back Focus Adjustment If the relationship between the image plane of the zoom lens and that of the television camera is incorrect, the object goes out of focus when the lens is zoomed. Follow the steps below to adjust the back focus of the lens. 1 Select an object at an appropriate distance (UJ90x/ UJ86x: 10 to 15 m, UJ27x: 3 to 5 m recommended). Use any object with sharp contrast to facilitate the adjustment work. 2 Set the lens to 1x [status without using an extender]. 3 Set the iris fully open. 4 Set the lens to the telephoto end. 5 Bring the object into focus by focus operation. 6 Set the lens to the widest angle. 7 Loosen the F.B. lock knob, and then turn the F.B. adjusting knob to bring the object into focus. 2-3 Removing and Installing the Lens Shroud When any electrical setting or adjustment is required, remove and install the lens shroud following the steps below. Fastener type 1 Release the fasteners on both sides of the lens shroud, then pull the shroud forward to remove from the lens body. 2 When installing the lens shroud back in place, align the shroud to the guide rails of the lens body, and then push the shroud until it stops at the end of the mount. Press the shroud fasteners near to the end of the mount side to lock the shroud. Recessed Handle (Both sides of the lens) Fastener Lens Shroud F.B. Adjusting Knob F.B. Lock Knob 8 Repeat steps 4 to 7 several times, until the object is brought into focus at both the widest angle and telephoto ends. 9 After making sure that the object is in sharp focus, tighten the F.B. lock knob. The adjustment procedure is now completed. * (NOTE) Make sure that the fasteners of the lens shroud are always locked when it is mounted on the lens. 2-4 Iris Gain Adjustment The iris gain is set to the middle of the adjusting range at the factory. However, if the iris gain needs to be changed for some reason, follow the steps below. These steps can be taken by the trimmer adjustment or on the information display. (The setting implemented last takes precedence) * (NOTE) For other iris adjustment such as iris ends adjustment or video level adjustment when the extender is used, contact Canon dealer or your Canon sales representative. E9
-
 1
1 -
2
-
3
-
4
-
5
-
6
-
7
-
8
-
9
-
10
-
11
-
12
-
13
-
14
-
15
-
16
-
17
-
18
-
19
-
20
-
21
-
22
-
23
-
24
-
25
-
26
-
27
-
28
-
29
-
30
-
31
-
32
-
33
-
34
-
35
-
36
-
37
-
38
-
39
-
40
-
41
-
 42
42 -
 43
43 -
 44
44 -
 45
45 -
 46
46 -
 47
47 -
 48
48 -
 49
49 -
 50
50 -
 51
51 -
 52
52 -
53
-
54
-
55
-
56
-
57
-
58
-
59
-
60
-
61
-
62
-
63
-
64
-
65
-
66
-
67
-
68
-
69
-
70
-
71
-
72
-
73
-
74
-
75
-
76
-
77
-
78
-
79
-
80
-
81
-
82
-
83
-
84
-
85
-
86
-
87
-
88
-
89
-
90
-
91
-
92
-
93
-
94
-
95
-
96
-
97
-
98
-
99
-
100
-
101
-
102
-
103
-
104
-
105
-
106
-
107
-
108
-
109
-
110
-
111
-
112
-
113
-
114
-
115
-
116
-
117
-
118
-
119
-
120
-
121
-
122
-
123
-
124
-
125
-
126
-
127
-
128
-
129
-
130
-
131
-
132
-
133
-
134
-
135
-
136
-
137
-
138
-
139
-
140
-
141
-
142
-
143
-
144
 |
 |
