Canon VB-S800D User Manual - Page 137
Setting the Day/Night Mode, Selecting the External Device Output, Registering Custom Settings, Auto]
 |
View all Canon VB-S800D manuals
Add to My Manuals
Save this manual to your list of manuals |
Page 137 highlights
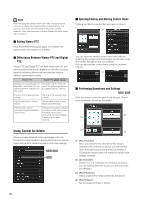
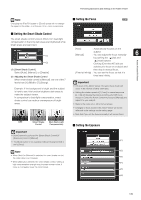
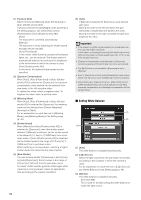
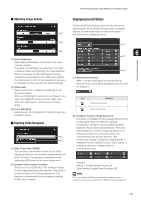
Performing Operations and Settings in the Admin Viewer Example of setting method: Illuminate a white subject (white paper, etc.) using the light source, making sure the subject fills the entire screen, and then execute [One-shot WB]. [R Gain], [B Gain] When setting the white balance manually, set the values of red and blue gain in the range 0 to 1023 to match the light source. (2) [Day Mode] Color video can be viewed in the normal mode. (3) [Night Mode] Video is shown in black and white. Important If the viewer is exited in [Day Mode] or [Night Mode], auto day/ night stays disabled even if [Auto] is set in the setting page. To set auto day/night to enable, be sure to exit the viewer after setting [Auto]. Note 6 Though the camera has an infrared filter, there is no effect on lighting due to infrared light as the camera does not have an insertion/removal mechanism for the filter. Admin Viewer/VB Viewer Important • Since the light source selection options are based on representative characteristics, proper colors may not be achieved depending on the applicable light source. In this case, use the [One-shot WB] function. • If the subject looks greenish under mercury lamps in the [Auto] mode, select the [Mercury Lamp] mode under light source. If the video is still not shown in appropriate colors under mercury lamps when the [Mercury Lamp] mode is selected under light source, use [One-shot WB]. • When the subject has only one color, illumination is low, or when sodium lamps, mercury lamps and certain other fluorescent lighting are used, colors may not be adjusted appropriately. • When [Day/Night] is set to [Night Mode] (including when it is set to [Auto] and night mode is judged to be applicable), the white balance function cannot be used. • Notes on capturing video continuously day and night If a subject that seldom changes is captured in a location where the light source changes gradually, such as when capturing a subject continuously day and night, appropriate colors may not be achieved. In the above case, applying changes to the video to capture will achieve the appropriate colors. „ Setting the Day/Night Mode (1) (2) (3) „ Selecting the External Device Output You can control external device output and display the current output status using an icon. Output can be activated and deactivated by clicking this icon. Icon Meaning Output inactive state Output active state „ Registering Custom Settings By registering settings for camera position, exposure, white balance, etc. beforehand, you can load settings using manual or automatic control. Note • In custom settings, the setting values for the following items in the Control for Admin menu can be saved. [Smart Shade Control], [Exposure], [White Balance], [Image Quality Adjustment], [Day/Night] [Pan/Tilt/Zoom] [Focus] (1) [Auto] The camera automatically switches to day mode or night mode depending on ambient brightness. 137
-
 1
1 -
2
-
3
-
4
-
5
-
6
-
7
-
8
-
9
-
10
-
11
-
12
-
13
-
14
-
15
-
16
-
17
-
18
-
19
-
20
-
21
-
22
-
23
-
24
-
25
-
26
-
27
-
28
-
29
-
30
-
31
-
32
-
33
-
34
-
35
-
36
-
37
-
38
-
39
-
40
-
41
-
42
-
43
-
44
-
45
-
46
-
47
-
48
-
49
-
50
-
51
-
52
-
53
-
54
-
55
-
56
-
57
-
58
-
59
-
60
-
61
-
62
-
63
-
64
-
65
-
66
-
67
-
68
-
69
-
70
-
71
-
72
-
73
-
74
-
75
-
76
-
77
-
78
-
79
-
80
-
81
-
82
-
83
-
84
-
85
-
86
-
87
-
88
-
89
-
90
-
91
-
92
-
93
-
94
-
95
-
96
-
97
-
98
-
99
-
100
-
101
-
102
-
103
-
104
-
105
-
106
-
107
-
108
-
109
-
110
-
111
-
112
-
113
-
114
-
115
-
116
-
117
-
118
-
119
-
120
-
121
-
122
-
123
-
124
-
125
-
126
-
127
-
128
-
129
-
130
-
131
-
 132
132 -
 133
133 -
 134
134 -
 135
135 -
 136
136 -
 137
137 -
 138
138 -
 139
139 -
 140
140 -
 141
141 -
 142
142 -
143
-
144
-
145
-
146
-
147
-
148
-
149
-
150
-
151
-
152
-
153
-
154
-
155
-
156
-
157
-
158
-
159
-
160
-
161
-
162
-
163
-
164
-
165
-
166
-
167
-
168
-
169
-
170
-
171
-
172
-
173
-
174
-
175
-
176
 |
 |
