Canon XA25 Instruction Manual - Page 151
HDMI Time Code], HDMI Status], Output Onscreen Displays], Distance Units], GPS Auto Time Setting],
 |
View all Canon XA25 manuals
Add to My Manuals
Save this manual to your list of manuals |
Page 151 highlights
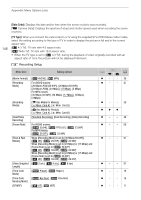
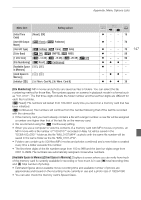
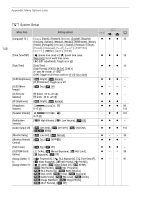
Appendix: Menu Options Lists [HDMI Time Code]: When set to [i On], the HDMI signal output from the camcorder includes the camcorder's time code. [HDMI Status]: Displays a screen where you can verify the standard of the output signal from the HDMI OUT terminal. [Output Onscreen Displays]: When set to [i On], the camcorder's onscreen displays will appear also on the screen of a TV or monitor connected to the camcorder. [Distance Units]: Selects the units to use for the focusing distance display while focusing manually. This setting also affects units for GPS information when using the optional GP-E2 GPS Receiver. [GPS Auto Time Setting]: When the optional GP-E2 GPS Receiver is attached to the camcorder, you can have the camcorder automatically set the time based on the information acquired from GPS. For more details, refer to Setting Time from GPS on the Camera in the receiver's instruction manual. [GPS Information Display]: When the optional GP-E2 GPS Receiver is attached to the camcorder, this function allows you to view GPS information. For more details, refer to Viewing GPS Information in the receiver's instruction manual. [Demo Mode]: The demonstration mode displays the camcorder's main features. It starts automatically when the camcorder is powered with the compact power adapter if you leave it turned on without a memory card for more than 5 minutes. • To cancel the demo mode once it has started, press any button or turn off the camcorder. [Firmware]: You can verify the current version of the camcorder's firmware. This menu option is usually unavailable. [Reset All]: Resets all of the camcorder's settings. 151
-
 1
1 -
2
-
3
-
4
-
5
-
6
-
7
-
8
-
9
-
10
-
11
-
12
-
13
-
14
-
15
-
16
-
17
-
18
-
19
-
20
-
21
-
22
-
23
-
24
-
25
-
26
-
27
-
28
-
29
-
30
-
31
-
32
-
33
-
34
-
35
-
36
-
37
-
38
-
39
-
40
-
41
-
42
-
43
-
44
-
45
-
46
-
47
-
48
-
49
-
50
-
51
-
52
-
53
-
54
-
55
-
56
-
57
-
58
-
59
-
60
-
61
-
62
-
63
-
64
-
65
-
66
-
67
-
68
-
69
-
70
-
71
-
72
-
73
-
74
-
75
-
76
-
77
-
78
-
79
-
80
-
81
-
82
-
83
-
84
-
85
-
86
-
87
-
88
-
89
-
90
-
91
-
92
-
93
-
94
-
95
-
96
-
97
-
98
-
99
-
100
-
101
-
102
-
103
-
104
-
105
-
106
-
107
-
108
-
109
-
110
-
111
-
112
-
113
-
114
-
115
-
116
-
117
-
118
-
119
-
120
-
121
-
122
-
123
-
124
-
125
-
126
-
127
-
128
-
129
-
130
-
131
-
132
-
133
-
134
-
135
-
136
-
137
-
138
-
139
-
140
-
141
-
142
-
143
-
144
-
145
-
 146
146 -
 147
147 -
 148
148 -
 149
149 -
 150
150 -
 151
151 -
 152
152 -
 153
153 -
 154
154 -
 155
155 -
 156
156 -
157
-
158
-
159
-
160
-
161
-
162
-
163
-
164
-
165
-
166
-
167
-
168
-
169
-
170
-
171
-
172
-
173
-
174
-
175
-
176
-
177
-
178
-
179
-
180
-
181
-
182
-
183
-
184
-
185
-
186
-
187
 |
 |