Canon XA25 Instruction Manual - Page 43
Intelligent IS - hd camcorder
 |
View all Canon XA25 manuals
Add to My Manuals
Save this manual to your list of manuals |
Page 43 highlights
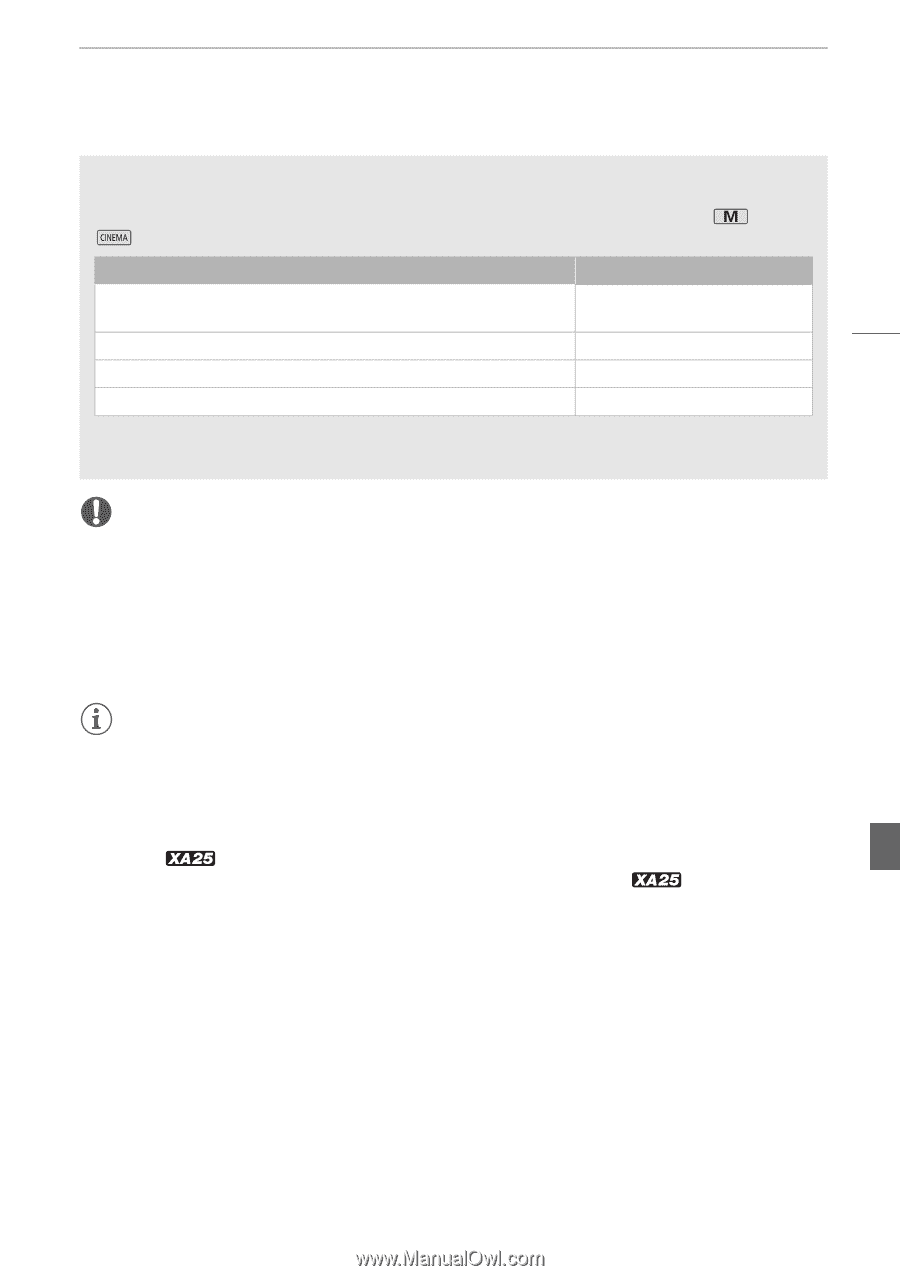
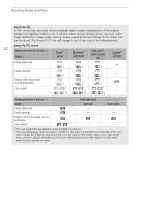
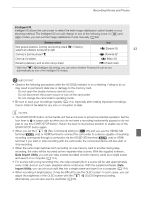
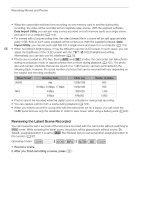
Recording Movies and Photos Intelligent IS Intelligent IS allows the camcorder to select the best image stabilization option based on your shooting method. The Intelligent IS icon will change to one of the following icons. In and modes, you can set the image stabilization mode manually (A 64). Shooting method Icon Most general situations; Zooming out (zooming toward T); Following subjects at a distance moving left or right Ä (Dynamic IS) 43 Zooming in (zooming toward S) È (Powered IS)* Close-up of a subject  (Macro IS) Remaining stationary, such as when using a tripod à (Tripod mode) * With the p > [Intelligent IS] setting, you can select whether Powered IS can be set automatically as one of the Intelligent IS modes. IMPORTANT • Observe the following precautions while the ACCESS indicator is on or flashing. Failing to do so may result in permanent data loss or damage to the memory card. - Do not open the double memory card slot cover. - Do not disconnect the power source or turn off the camcorder. - Do not change the camcorder's operating mode. • Be sure to save your recordings regularly (A 114), especially after making important recordings. Canon shall not be liable for any loss or corruption of data. NOTES • The START/STOP button on the handle unit has a lock lever to prevent accidental operation. Set the lock lever to C in cases such as when you do not want a recording inadvertently paused or do not plan to use this START/STOP button. Return the lever to its previous position to enable use of the START/STOP button again. • When you set the q > [Rec Command] setting to [i On] and you use the HD/SD-SDI terminal ( only) or HDMI terminal to connect the camcorder to a device capable of receiving recording commands through a connection via the HD/SD-SDI terminal ( only) or HDMI terminal, if you start or stop recording with the camcorder, the connected device will also start or stop recording. • When the camcorder switches form recording on one memory card to another during relay recording, the video will be recorded as two separate relay scenes. With the supplied software, Data Import Utility, you can join relay scenes recorded on both memory cards as a single scene and save it on a computer (A 114). • For scenes with a long recording time, the video (stream) file in a scene will be split approximately every 4 GB. Even in such case, playback will be continuous. With the supplied software, Data Import Utility, you can join such split files into a single scene and save it on a computer (A 114). • When recording in bright places, it may be difficult to use the OLED screen. In such cases, you can adjust the brightness of the OLED screen with the q > [OLED Brightness] setting. Alternatively, you can also use the viewfinder (A 25).
-
 1
1 -
2
-
3
-
4
-
5
-
6
-
7
-
8
-
9
-
10
-
11
-
12
-
13
-
14
-
15
-
16
-
17
-
18
-
19
-
20
-
21
-
22
-
23
-
24
-
25
-
26
-
27
-
28
-
29
-
30
-
31
-
32
-
33
-
34
-
35
-
36
-
37
-
 38
38 -
 39
39 -
 40
40 -
 41
41 -
 42
42 -
 43
43 -
 44
44 -
 45
45 -
 46
46 -
 47
47 -
 48
48 -
49
-
50
-
51
-
52
-
53
-
54
-
55
-
56
-
57
-
58
-
59
-
60
-
61
-
62
-
63
-
64
-
65
-
66
-
67
-
68
-
69
-
70
-
71
-
72
-
73
-
74
-
75
-
76
-
77
-
78
-
79
-
80
-
81
-
82
-
83
-
84
-
85
-
86
-
87
-
88
-
89
-
90
-
91
-
92
-
93
-
94
-
95
-
96
-
97
-
98
-
99
-
100
-
101
-
102
-
103
-
104
-
105
-
106
-
107
-
108
-
109
-
110
-
111
-
112
-
113
-
114
-
115
-
116
-
117
-
118
-
119
-
120
-
121
-
122
-
123
-
124
-
125
-
126
-
127
-
128
-
129
-
130
-
131
-
132
-
133
-
134
-
135
-
136
-
137
-
138
-
139
-
140
-
141
-
142
-
143
-
144
-
145
-
146
-
147
-
148
-
149
-
150
-
151
-
152
-
153
-
154
-
155
-
156
-
157
-
158
-
159
-
160
-
161
-
162
-
163
-
164
-
165
-
166
-
167
-
168
-
169
-
170
-
171
-
172
-
173
-
174
-
175
-
176
-
177
-
178
-
179
-
180
-
181
-
182
-
183
-
184
-
185
-
186
-
187
 |
 |