Canon XA25 Instruction Manual - Page 46
Reviewing the Latest Scene Recorded
 |
View all Canon XA25 manuals
Add to My Manuals
Save this manual to your list of manuals |
Page 46 highlights
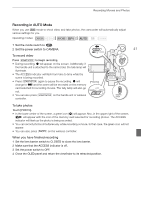
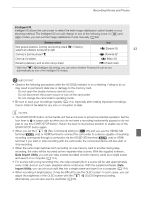
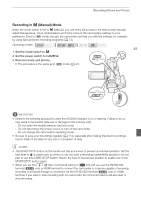
Recording Movies and Photos • When the camcorder switches form recording on one memory card to another during relay recording, the video will be recorded as two separate relay scenes. With the supplied software, Data Import Utility, you can join relay scenes recorded on both memory cards as a single scene and save it on a computer (A 114). • For scenes with a long recording time, the video (stream) file in a scene will be split approximately every 4 GB. Even in such case, playback will be continuous. With the supplied software, Data Import Utility, you can join such split files into a single scene and save it on a computer (A 114). 46 • When recording in bright places, it may be difficult to use the OLED screen. In such cases, you can adjust the brightness of the OLED screen with the q > [OLED Brightness] setting. Alternatively, you can also use the viewfinder (A 25). • Photos are recorded as JPG files. During and modes, the camcorder can take photos during record pause mode or capture photos from a movie during playback (A 102). The photo size and number of photos that can be saved on a 1 GB memory card are summarized in the following table. However, the actual number of photos that can be recorded will vary depending on the subject and shooting conditions. Movie Format Recording mode Photo size Number of photos AVCHD Any 1920x1080 660 35 Mbps, 24 Mbps, 17 Mbps 1920x1080 660 MP4 4 Mbps 1280x720 1,490 3 Mbps 640x360 5,800 • Photos cannot be recorded while the digital zoom is activated or during dual recording. • You can capture a photo from a scene during playback (A 102). • When you need to record for a long time with the camcorder set on a tripod, you can close the OLED panel and use only the viewfinder in order to save power when using a battery pack (A 25). Reviewing the Latest Scene Recorded You can review the last 4 seconds of the last scene recorded with the camcorder without switching to mode. While reviewing the latest scene, the picture will be played back without sound. By default, assignable button 5 is set to [ Rec Review] but you can set another assignable button to this function (A 97). Operating modes: 1 Record a scene. 2 After you finish recording a scene, press .
-
 1
1 -
2
-
3
-
4
-
5
-
6
-
7
-
8
-
9
-
10
-
11
-
12
-
13
-
14
-
15
-
16
-
17
-
18
-
19
-
20
-
21
-
22
-
23
-
24
-
25
-
26
-
27
-
28
-
29
-
30
-
31
-
32
-
33
-
34
-
35
-
36
-
37
-
38
-
39
-
40
-
 41
41 -
 42
42 -
 43
43 -
 44
44 -
 45
45 -
 46
46 -
 47
47 -
 48
48 -
 49
49 -
 50
50 -
 51
51 -
52
-
53
-
54
-
55
-
56
-
57
-
58
-
59
-
60
-
61
-
62
-
63
-
64
-
65
-
66
-
67
-
68
-
69
-
70
-
71
-
72
-
73
-
74
-
75
-
76
-
77
-
78
-
79
-
80
-
81
-
82
-
83
-
84
-
85
-
86
-
87
-
88
-
89
-
90
-
91
-
92
-
93
-
94
-
95
-
96
-
97
-
98
-
99
-
100
-
101
-
102
-
103
-
104
-
105
-
106
-
107
-
108
-
109
-
110
-
111
-
112
-
113
-
114
-
115
-
116
-
117
-
118
-
119
-
120
-
121
-
122
-
123
-
124
-
125
-
126
-
127
-
128
-
129
-
130
-
131
-
132
-
133
-
134
-
135
-
136
-
137
-
138
-
139
-
140
-
141
-
142
-
143
-
144
-
145
-
146
-
147
-
148
-
149
-
150
-
151
-
152
-
153
-
154
-
155
-
156
-
157
-
158
-
159
-
160
-
161
-
162
-
163
-
164
-
165
-
166
-
167
-
168
-
169
-
170
-
171
-
172
-
173
-
174
-
175
-
176
-
177
-
178
-
179
-
180
-
181
-
182
-
183
-
184
-
185
-
186
-
187
 |
 |