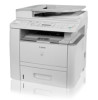
Canon imageCLASS D1150 imageCLASS D1180/D1170/D1150/D1120 Starter Guide - Page 14
Set Date and Time - e manual
 |
View all Canon imageCLASS D1150 manuals
Add to My Manuals
Save this manual to your list of manuals |
Page 14 highlights
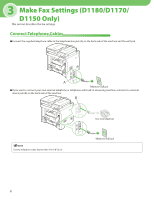
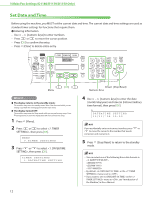
3 Make Fax Settings (D1180/D1170/D1150 Only) Set Date and Time Before using the machine, you MUST set the current date and time. The current date and time settings are used as standard timer settings for functions that require them. ● Entering Information ‒ Use - [numeric keys] to enter numbers. ‒ Press or to move the cursor position. ‒ Press [OK] to confirm the entry. ‒ Press [Clear] to delete entire entry. ● The display returns to the standby mode: The machine may enter the standby mode (Auto Clear function) while you are setting it up. Make the setting again from the main menu. ● The display turned OFF: The machine may enter the Sleep mode while you are performing setup. Press [Energy Saver] to turn the display back ON and continue the setup. 1 Press [Menu]. 2 Press or to select , then press [OK]. MENU 7.TIMER SETTINGS 3 Press or to select , then press [OK]. TIMER SETTINGS 1.DATE&TIME SETTING 12 4 Use - [numeric keys] to enter the date (month/day/year) and time (in 24-hour/military time format), then press [OK]. Ex. DATE&TIME SETTING 12/31/'08 15:50 If you accidentally enter an incorrect number, press or to move the cursor to the number that needs correction and overwrite it. 5 Press [Stop/Reset] to return to the standby mode. - You can select one of the following three date formats in . - By default, in the menu is set to . - If you want to set in the menu to , see "Introduction of the Machine," in the e-Manual.
-
 1
1 -
2
-
3
-
4
-
5
-
6
-
7
-
8
-
 9
9 -
 10
10 -
 11
11 -
 12
12 -
 13
13 -
 14
14 -
 15
15 -
 16
16 -
 17
17 -
 18
18 -
 19
19 -
20
-
21
-
22
-
23
-
24
-
25
-
26
-
27
-
28
-
29
-
30
-
31
-
32
-
33
-
34
-
35
 |
 |
