Canon imageCLASS D1150 imageCLASS D1180/D1170/D1150/D1120 Starter Guide - Page 24
Network Connection, MF Drivers Installation
 |
View all Canon imageCLASS D1150 manuals
Add to My Manuals
Save this manual to your list of manuals |
Page 24 highlights
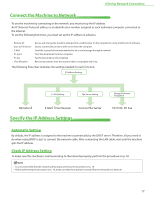
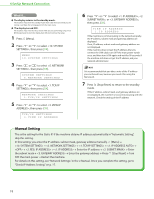
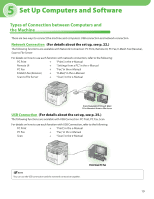
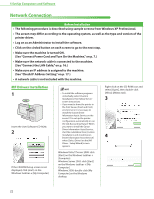
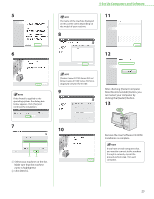
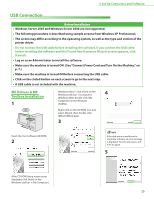
5 Set Up Computers and Software Network Connection Before Installation • The following procedure is described using sample screens from Windows XP Professional. • The screen may differ according to the operating system, as well as the type and version of the printer driver. • Log on as an Administrator to install the software. • Click on the circled button on each screen to go to the next step. • Make sure the machine is turned ON. (See "Connect Power Cord and Turn On the Machine," on p. 7.) • Make sure the network cable is connected to the machine. (See "Connect the LAN Cable," on p. 16.) • Make sure an IP address is assigned to the machine. (See "Check IP Address Setting," on p. 17.) • A network cable is not included with the machine. MF Drivers Installation 1 Insert the User Software CD-ROM. 2 If the CD-ROM Setup screen is not displayed, click [start] on the Windows task bar → [My Computer]. - To install the software programs individually, select [Custom Installation], then follow the onscreen instructions. - If you want to share the printer in the Print Server (Point and Print) environment, it is necessary to install the Canon Driver Information Assist Service on the server PC to set up the printer configuration automatically or use the Job Accounting feature. When you want to install the Canon Driver Information Assist Service, start the installation from [Custom Installation], and check [Canon Driver Information Assist Service] when [Select Driver] on the [MF Driver - Setup Wizard] screen appears. Windows Vista/7/Server 2008: click [Start] on the Windows task bar → [Computer]. Windows Server 2003: click [Start] on the Windows task bar → [My Computer]. Windows 2000: double-click [My Computer] on the Windows desktop. Right-click on the CD-ROM icon and select [Open], then double-click [MInst] ([MInst.exe]). 3 4 22
-
 1
1 -
2
-
3
-
4
-
5
-
6
-
7
-
8
-
9
-
10
-
11
-
12
-
13
-
14
-
15
-
16
-
17
-
18
-
 19
19 -
 20
20 -
 21
21 -
 22
22 -
 23
23 -
 24
24 -
 25
25 -
 26
26 -
 27
27 -
 28
28 -
 29
29 -
30
-
31
-
32
-
33
-
34
-
35
 |
 |
