Canon imageCLASS MF4450 imageCLASS D550 Basic Operation Guide - Page 66
Basic Operation Methods for Scanning - windows 7
 |
View all Canon imageCLASS MF4450 manuals
Add to My Manuals
Save this manual to your list of manuals |
Page 66 highlights
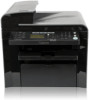
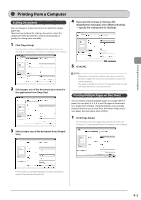
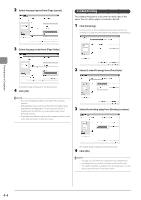
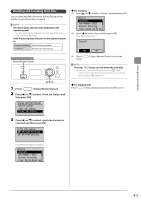
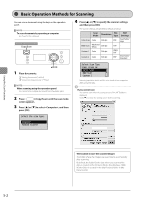
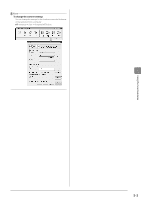
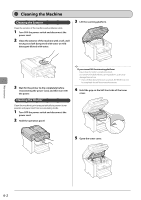
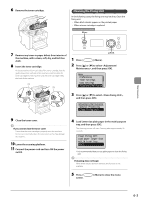
Basic Operation Methods for Scanning You can scan a document using the keys on the operation panel. NOTE To scan documents by operating a computer See "Scan" in the e-Manual. Keys to be used for this operation Copy/Scan 4 Press [ ] or [ ] to specify the scanner settings and then press [OK]. The scanner settings are specified by default as follows. Scan Mode Resolution File Type PDF Settings Color Scan Color 300 dpi PDF Searchable/ High B&W Scan Black and White 300 dpi TIFF - Custom 1 Color 300 dpi JPEG/ Exif - Custom 2 Color 300 dpi PDF Searchable/ Standard OK 1 Place documents. "Placing Documents" (ˠP.2-4) "Document Requirements " (ˠP.2-2) NOTE When scanning using the operation panel You cannot scan multiple documents from the platen glass. 2 Press [ ] (Copy/Scan) until the scan mode screen appears. 3 Press [ ] or [ ] to select , and then press [OK]. Select Scan Type Scan: Press OK Color Scan B&W Scan Custom 1 Scanning operation starts, and the scan mode screen reappears after saving the data. If you cannot scan You cannot scan when the setting screen of the MF Toolbox is displayed. Click [ ] to close the setting screen before scanning. Select the scan type. Computer Remote Scanner Using the Scan Functions 5-2 The location to save the scanned images The folder where the images are saved opens automatically after scanning. By default, the folder for the date when you scanned the data is created in the [Pictures] folder. (For Windows 2000/ XP, the folder is created in the [My Pictures] folder in [My Documents].)
-
 1
1 -
2
-
3
-
4
-
5
-
6
-
7
-
8
-
9
-
10
-
11
-
12
-
13
-
14
-
15
-
16
-
17
-
18
-
19
-
20
-
21
-
22
-
23
-
24
-
25
-
26
-
27
-
28
-
29
-
30
-
31
-
32
-
33
-
34
-
35
-
36
-
37
-
38
-
39
-
40
-
41
-
42
-
43
-
44
-
45
-
46
-
47
-
48
-
49
-
50
-
51
-
52
-
53
-
54
-
55
-
56
-
57
-
58
-
59
-
60
-
 61
61 -
 62
62 -
 63
63 -
 64
64 -
 65
65 -
 66
66 -
 67
67 -
 68
68 -
 69
69 -
 70
70 -
 71
71 -
72
-
73
-
74
-
75
-
76
-
77
-
78
-
79
-
80
-
81
-
82
-
83
-
84
-
85
-
86
-
87
-
88
-
89
-
90
-
91
-
92
-
93
-
94
-
95
-
96
-
97
-
98
-
99
-
100
-
101
-
102
-
103
-
104
-
105
-
106
-
107
-
108
-
109
-
110
-
111
-
112
-
113
-
114
-
115
-
116
 |
 |