Canon imageCLASS MF6530 imageCLASS MF6500 Series Basic Guide - Page 114
Press [COPY]., Press [Image Quality] repeatedly to select the document type.
 |
View all Canon imageCLASS MF6530 manuals
Add to My Manuals
Save this manual to your list of manuals |
Page 114 highlights
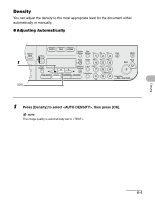
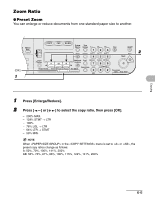
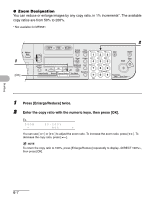
Copying Scan Settings Before pressing [Start] to begin copying, you can adjust the settings to better suit the document to be scanned. These settings return to the default values if Auto Clear function is activated or if you press [Reset]. Image Quality 1 ded Address al Book 2 04 08 2 COPY FAX SCAN System Monitor View Settings @./ 1 ABC 2 DEF 3 Reset Collate GHI 4 JKL MNO 56 Paper Select Additional 2 on 1 PQRS TUV WXYZ OK Functions 789 Frame Erase Image Quality Density Enlarge/Reduce Two-Sided SYMBOLS 0# Tone Clear C ON/OFF Stop Start Processing/ Data Error Power 1 Press [COPY]. 2 Press [Image Quality] repeatedly to select the document type. : For text documents. : For documents that contain fine text or photos. : For documents that contain text and photos. NOTE Copy density automatically changes to manual mode when or is set. 6-3
-
 1
1 -
2
-
3
-
4
-
5
-
6
-
7
-
8
-
9
-
10
-
11
-
12
-
13
-
14
-
15
-
16
-
17
-
18
-
19
-
20
-
21
-
22
-
23
-
24
-
25
-
26
-
27
-
28
-
29
-
30
-
31
-
32
-
33
-
34
-
35
-
36
-
37
-
38
-
39
-
40
-
41
-
42
-
43
-
44
-
45
-
46
-
47
-
48
-
49
-
50
-
51
-
52
-
53
-
54
-
55
-
56
-
57
-
58
-
59
-
60
-
61
-
62
-
63
-
64
-
65
-
66
-
67
-
68
-
69
-
70
-
71
-
72
-
73
-
74
-
75
-
76
-
77
-
78
-
79
-
80
-
81
-
82
-
83
-
84
-
85
-
86
-
87
-
88
-
89
-
90
-
91
-
92
-
93
-
94
-
95
-
96
-
97
-
98
-
99
-
100
-
101
-
102
-
103
-
104
-
105
-
106
-
107
-
108
-
 109
109 -
 110
110 -
 111
111 -
 112
112 -
 113
113 -
 114
114 -
 115
115 -
 116
116 -
 117
117 -
 118
118 -
 119
119 -
120
-
121
-
122
-
123
-
124
-
125
-
126
-
127
-
128
-
129
-
130
-
131
-
132
-
133
-
134
-
135
-
136
-
137
-
138
-
139
-
140
-
141
-
142
-
143
-
144
-
145
-
146
-
147
-
148
-
149
-
150
-
151
-
152
-
153
-
154
-
155
-
156
-
157
-
158
-
159
-
160
-
161
-
162
-
163
-
164
-
165
-
166
-
167
-
168
-
169
-
170
-
171
-
172
-
173
-
174
-
175
-
176
-
177
-
178
-
179
-
180
-
181
-
182
-
183
-
184
-
185
-
186
-
187
-
188
-
189
-
190
-
191
-
192
-
193
-
194
-
195
-
196
-
197
-
198
-
199
-
200
-
201
-
202
-
203
-
204
-
205
-
206
-
207
-
208
-
209
-
210
-
211
-
212
-
213
-
214
 |
 |