Canon imageFORMULA CR-L1 User Manual - Page 6
Connecting the Scanner to a Computer
 |
View all Canon imageFORMULA CR-L1 manuals
Add to My Manuals
Save this manual to your list of manuals |
Page 6 highlights
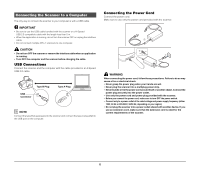
Connecting the Scanner to a Computer The only way to connect the scanner to your computer is with a USB cable. IMPORTANT • Be sure to use the USB cable bundled with the scanner or a Hi-Speed USB 2.0 compatible cable with the length less than 5 m. • When the application is running, do not turn the scanner OFF or unplug the interface cable. • Do not connect multiple CR-L1 scanners to one computer. CAUTION • Do not turn OFF the scanner or remove the interface cable when an application is running. • Turn OFF the computer and the scanner before changing the cable. USB Connections Connect the scanner and the computer with the cable provided or a Hi-Speed USB 2.0 cable. Type B Plug USB Connector Type A Plug NOTE Connect the type B plug (square) to the scanner and connect the type A plug (flat) to the USB port on the computer. Connecting the Power Cord Connect the power cord. Make sure to use only the power cord provided with the scanner. WARNING When connecting the power cord, follow these precautions. Failure to do so may cause a fire or electrical shock. • Never grasp the power plug when your hands are wet. • Never plug the scanner into a multiplug power strip. • Never bundle or tie the power cord around itself or another object. Connect the power plug securely into the power outlet. • Use only the power cord and power plug provided with the scanner. • Before you connect the power cord, make sure to turn OFF the power switch. • Connect only to a power outlet of the rated voltage and power supply frequency (either 120V, 60 Hz or 220-240V, 50/60 Hz, depending on your region). • Do not plug the scanner into a power outlet shared with another device. If you use an extension cord, make sure that the extension cord is rated for the current requirements of the scanner. 6
-
 1
1 -
 2
2 -
 3
3 -
 4
4 -
 5
5 -
 6
6 -
 7
7 -
 8
8 -
 9
9 -
 10
10 -
 11
11 -
 12
12 -
13
-
14
-
15
-
16
-
17
-
18
-
19
-
20
-
21
-
22
-
23
-
24
-
25
-
26
-
27
-
28
-
29
-
30
-
31
-
32
-
33
-
34
-
35
-
36
-
37
-
38
-
39
-
40
-
41
-
42
-
43
-
44
-
45
-
46
-
47
-
48
 |
 |
