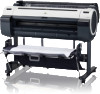
Canon imagePROGRAF iPF765 Setup Guide - Page 9
IP Address Speci - reviews
 |
View all Canon imagePROGRAF iPF765 manuals
Add to My Manuals
Save this manual to your list of manuals |
Page 9 highlights
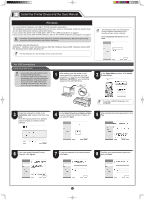
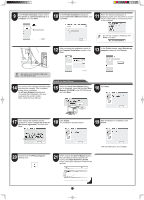
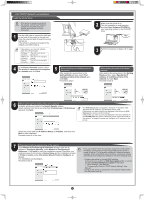
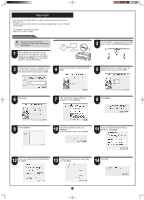
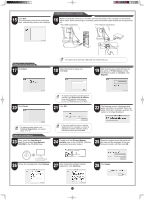
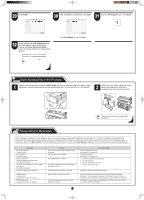
8 When entering the printer's IP address manually In the IP Address Specification window, select either IPv4 Address or IPv6 Address to enter the printer's IP address • Ask your network administrator for the IP address, as needed. and click Install. The installation process begins. • IPv6 Address is displayed in Windows MEMO 7, Windows Vista, Windows Server 2008 R2, and Windows Server 2008. 9 After reviewing the installation results in the Complete Installation window, click Next. 10 In the Finish window, select Restart my computer now and click Restart. 11 The printer driver settings take effect after the computer restarts. This completes printer driver installation. An iPFxxxx Support desktop icon is created after installation. (iPFxxxx represents the printer model.) Install the User Manual 12 Next, follow steps 15-21 on page 7 to Install the User Manual ▲ ▲ ▲ ▲ When the printer cannot be found on the network If your printer cannot be found when connecting to the network for the first time, setup an IP address for the printer and then configure it on the printer. 1 When ink fills the system for the first time, after printhead adjustment is finished, specify the IP address on the printer's control panel. • When ink fills the system for the first time, do not operate the printer until printhead adjustment is finished. On the tab selection screen of the control panel, press the and keys to select (settings/adj. tab) and press OK. No Paper Loaded OK:Setting/Adj. Menu Maint. cart. Remaining Amount 㪈㪇㪇㩼 2 Use the ▲ and ▼ keys to select Interface Setup and press OK. 3 Use the ▲ and ▼ keys to select TCP/IP and press OK. 4 Enter the IP address. Navigate through the following menus using the ▲ and ▼ keys on the control panel. 1.Select IPv4 and press OK. 2.Select IPv4 Settings and press OK. 3.Select IP Address and press OK. 4.Enter the IP address. How to enter IP addresses MEMO 1. Press the and keys to select a field for inputting values. 2. Use the ▲ and ▼ keys to input values. • Pressing ▲ increases the value by one. • Pressing ▼ decreases the value by one. • Holding down either the ▲ or ▼ keys continually increases or decreases the value. 3. Press OK once you have finished. 5 Press Menu. 6 Press OK on the registration confirmation message that appears. The IP address is set on the printer. Next, restart installation of the printer driver. 7 In the Search Results window, select Specify the IP address of available printers in the network and click Next. When the IP Address Specifications window appears, follow the instructions of "When entering the printer's IP address manually" in step 8 to 12 on page 9 to complete the installation of the printer driver and the User Manual. • If the following screen appears, click MEMO Retry and select Specify the IP address of available printers in the network on the next screen that appears. 9
-
 1
1 -
2
-
3
-
 4
4 -
 5
5 -
 6
6 -
 7
7 -
 8
8 -
 9
9 -
 10
10 -
 11
11 -
 12
12
 |
 |
