Canon imageRUNNER ADVANCE C5250 imageRUNNER ADVANCE C5200 Srs Basic Operation - Page 105
Routine Cleaning
 |
View all Canon imageRUNNER ADVANCE C5250 manuals
Add to My Manuals
Save this manual to your list of manuals |
Page 105 highlights
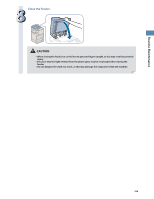
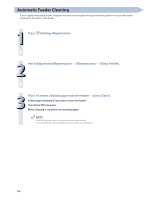
Routine Maintenance Routine Cleaning If the original is not copied clearly or streaks appear on printed output, clean the following parts of the machine. For highquality printouts, we recommend cleaning these parts once or twice a month. ˔ Platen glass ˔ Underside of the feeder/platen cover ˔ Feeder's rollers ˔ Inside of the main unit ˔ Dust proof glass • When cleaning the machine, first turn OFF the main power switch, and disconnect the power cord. Failure to observe these steps may result in a fire or electrical shock. • Disconnect the power cord from the power outlet regularly, and clean the area around the base of the power plug's metal pins and the power outlet with a dry cloth to ensure that all dust and grime is removed. If the power cord is connected for a long period of time in a damp, dusty, or smoky location, dust can build up around the power plug and become damp. This may cause a short circuit and result in a fire. • When cleaning with a cloth, do not dampen it too much, as this may damage the original or break the machine. • Do not use alcohol, benzene, paint thinner, or other solvents for cleaning. Doing so may result in damage to the plastic parts. Platen Glass and Underside of the Feeder/Platen Cover If the platen glass or the underside of the feeder/platen cover is dirty, the original may not be scanned clearly, or the size of the original may be detected incorrectly. Clean the platen glass and the underside of the feeder/platen cover by following the procedure below. 1 Clean the platen glass and the underside of the feeder/platen cover with a cloth which is wrung after being dampened in water, and then wipe them clean with a soft, dry cloth. 1. Clean the platen glass. 2. Clean the underside of the feeder/platen cover. 2 1 If stains won't come out, use detergent instead of water. 105
-
 1
1 -
2
-
3
-
4
-
5
-
6
-
7
-
8
-
9
-
10
-
11
-
12
-
13
-
14
-
15
-
16
-
17
-
18
-
19
-
20
-
21
-
22
-
23
-
24
-
25
-
26
-
27
-
28
-
29
-
30
-
31
-
32
-
33
-
34
-
35
-
36
-
37
-
38
-
39
-
40
-
41
-
42
-
43
-
44
-
45
-
46
-
47
-
48
-
49
-
50
-
51
-
52
-
53
-
54
-
55
-
56
-
57
-
58
-
59
-
60
-
61
-
62
-
63
-
64
-
65
-
66
-
67
-
68
-
69
-
70
-
71
-
72
-
73
-
74
-
75
-
76
-
77
-
78
-
79
-
80
-
81
-
82
-
83
-
84
-
85
-
86
-
87
-
88
-
89
-
90
-
91
-
92
-
93
-
94
-
95
-
96
-
97
-
98
-
99
-
 100
100 -
 101
101 -
 102
102 -
 103
103 -
 104
104 -
 105
105 -
 106
106 -
 107
107 -
 108
108 -
 109
109 -
 110
110 -
111
-
112
-
113
-
114
-
115
-
116
-
117
-
118
-
119
-
120
-
121
-
122
-
123
-
124
-
125
-
126
-
127
-
128
-
129
-
130
-
131
-
132
-
133
-
134
-
135
-
136
-
137
-
138
-
139
-
140
-
141
-
142
-
143
-
144
-
145
-
146
-
147
-
148
-
149
-
150
-
151
-
152
-
153
-
154
-
155
-
156
-
157
-
158
-
159
-
160
-
161
-
162
-
163
-
164
-
165
-
166
-
167
-
168
-
169
-
170
-
171
-
172
-
173
-
174
-
175
-
176
-
177
-
178
-
179
-
180
-
181
-
182
-
183
-
184
-
185
-
186
-
187
-
188
-
189
-
190
-
191
-
192
-
193
-
194
-
195
-
196
-
197
-
198
-
199
-
200
-
201
-
202
-
203
-
204
 |
 |
