Canon imageRUNNER ADVANCE C5250 imageRUNNER ADVANCE C5200 Srs Basic Operation - Page 178
Displaying/Printing the TX, the Scan and Send Basic Features
 |
View all Canon imageRUNNER ADVANCE C5250 manuals
Add to My Manuals
Save this manual to your list of manuals |
Page 178 highlights
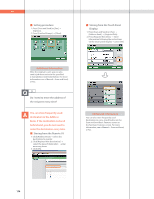
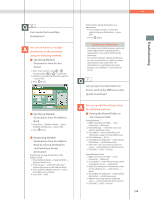
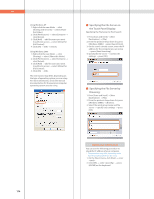
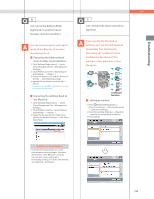
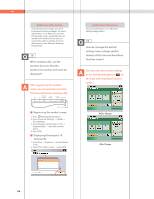
Q&A Additional Information • To perform this procedure, you must have administrator privileges. For more information, see e-Manual > Security. • If frequently used e-mail addresses are stored in the Address Book, you can specify the address quickly. For more information, see e-Manual> Settings/ Registration. 10 When sending a fax, can the machine be set so that the sender's fax number and name be displayed? After registering the sender's name, you can specify to print the TX Terminal ID when sending a fax. I-Fax Address or Sender's Destination Date Time Fax Number Name (TTI) Name Page Number 09/05/2012 TUE 15:00 FAX (404)XXX-XXXX CANON SALES Atlanta office 001/001 Sender Information ˙ Registering the sender's name: 1. Press (Settings/Registration). 2. Press [Function Settings] [Send] [Fax Settings]. 3. Press [Register Sender Name (TTI)] [Register/Edit] enter the sender's name. 4. Press [OK]. ˙ Displaying/Printing the TX Terminal ID: 1. Press [Fax] [Options] [Sender Name (TTI)]. 2. Select the sender's name press [OK]. Additional Information For more information, see e-Manual > Settings/Registration. 11 How do I change the default settings (scan settings and file format) of the Scan and Send Basic Features screen? You can store the current settings as the default settings from on the Scan and Send Basic Features screen. Before Change After Change 178
-
 1
1 -
2
-
3
-
4
-
5
-
6
-
7
-
8
-
9
-
10
-
11
-
12
-
13
-
14
-
15
-
16
-
17
-
18
-
19
-
20
-
21
-
22
-
23
-
24
-
25
-
26
-
27
-
28
-
29
-
30
-
31
-
32
-
33
-
34
-
35
-
36
-
37
-
38
-
39
-
40
-
41
-
42
-
43
-
44
-
45
-
46
-
47
-
48
-
49
-
50
-
51
-
52
-
53
-
54
-
55
-
56
-
57
-
58
-
59
-
60
-
61
-
62
-
63
-
64
-
65
-
66
-
67
-
68
-
69
-
70
-
71
-
72
-
73
-
74
-
75
-
76
-
77
-
78
-
79
-
80
-
81
-
82
-
83
-
84
-
85
-
86
-
87
-
88
-
89
-
90
-
91
-
92
-
93
-
94
-
95
-
96
-
97
-
98
-
99
-
100
-
101
-
102
-
103
-
104
-
105
-
106
-
107
-
108
-
109
-
110
-
111
-
112
-
113
-
114
-
115
-
116
-
117
-
118
-
119
-
120
-
121
-
122
-
123
-
124
-
125
-
126
-
127
-
128
-
129
-
130
-
131
-
132
-
133
-
134
-
135
-
136
-
137
-
138
-
139
-
140
-
141
-
142
-
143
-
144
-
145
-
146
-
147
-
148
-
149
-
150
-
151
-
152
-
153
-
154
-
155
-
156
-
157
-
158
-
159
-
160
-
161
-
162
-
163
-
164
-
165
-
166
-
167
-
168
-
169
-
170
-
171
-
172
-
 173
173 -
 174
174 -
 175
175 -
 176
176 -
 177
177 -
 178
178 -
 179
179 -
 180
180 -
 181
181 -
 182
182 -
 183
183 -
184
-
185
-
186
-
187
-
188
-
189
-
190
-
191
-
192
-
193
-
194
-
195
-
196
-
197
-
198
-
199
-
200
-
201
-
202
-
203
-
204
 |
 |
