Casio EX-S2 Owners Manual - Page 15
Configuring Display Language and Clock Settings, To record an image
 |
UPC - 079767682644
View all Casio EX-S2 manuals
Add to My Manuals
Save this manual to your list of manuals |
Page 15 highlights
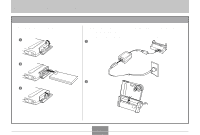
QUICK START GUIDE Configuring Display Language and Clock Settings (See page 32 for details.) To record an image 1 (See page 34 for details.) 4 1 2, 3, 4, 5 3 2 1. Press the power button to turn on the camera. 2. Rock the controller up or down to select the language you want (page 33). 3. Click the controller to register the language setting and advance to the clock settings. 4. Set the date and the time (page 33). 5. Click the controller to register the clock set- tings and exit the setting screen. 1. Press the power button to turn on the camera. 2. Align the mode selector with "REC". 3. Point the camera at the subject, and use the monitor screen or viewfinder to compose the image. 4. Holding the camera still, gently press the shut- ter release button. 15
-
 1
1 -
2
-
3
-
4
-
5
-
6
-
7
-
8
-
9
-
 10
10 -
 11
11 -
 12
12 -
 13
13 -
 14
14 -
 15
15 -
 16
16 -
 17
17 -
 18
18 -
 19
19 -
 20
20 -
21
-
22
-
23
-
24
-
25
-
26
-
27
-
28
-
29
-
30
-
31
-
32
-
33
-
34
-
35
-
36
-
37
-
38
-
39
-
40
-
41
-
42
-
43
-
44
-
45
-
46
-
47
-
48
-
49
-
50
-
51
-
52
-
53
-
54
-
55
-
56
-
57
-
58
-
59
-
60
-
61
-
62
-
63
 |
 |
