Casio EX-S2 Owners Manual - Page 18
USB Cradle, Bottom, Front - digital camera
 |
UPC - 079767682644
View all Casio EX-S2 manuals
Add to My Manuals
Save this manual to your list of manuals |
Page 18 highlights
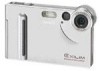
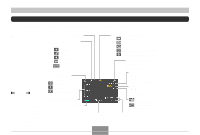
GETTING READY s Bottom FG F Connector cover G Memory card slot If you are not using a memory card, be sure to insert the dummy card into this slot to protect against dust and damage. Removing the Connector Cover H Be sure to replace the connector cover whenever the connector is not being used. H Connector * Connection of an LCD remote controller is supported by the EX-M2 only. USB Cradle Simply placing your CASIO digital camera onto the USB cradle lets you perform the following tasks. • Battery charging (page 24) • Automatic transfer of images to a computer (page 89) s Front 1 23 1 Camera connector 2 USB lamp 3 CHARGE lamp s Back 54 4 USB (USB port) 5 DC IN 5.3V (AC adaptor connector) 18
-
 1
1 -
2
-
3
-
4
-
5
-
6
-
7
-
8
-
9
-
10
-
11
-
12
-
 13
13 -
 14
14 -
 15
15 -
 16
16 -
 17
17 -
 18
18 -
 19
19 -
 20
20 -
 21
21 -
 22
22 -
 23
23 -
24
-
25
-
26
-
27
-
28
-
29
-
30
-
31
-
32
-
33
-
34
-
35
-
36
-
37
-
38
-
39
-
40
-
41
-
42
-
43
-
44
-
45
-
46
-
47
-
48
-
49
-
50
-
51
-
52
-
53
-
54
-
55
-
56
-
57
-
58
-
59
-
60
-
61
-
62
-
63
 |
 |

GETTING READY
18
F
G
F
Connector cover
G
Memory card slot
If you are not using a memory card, be sure to insert the
dummy card into this slot to protect against dust and
damage.
■
Bottom
H
Be sure to replace the
connector cover whenever
the connector is not being
used.
H
Connector
*
Connection of an LCD
remote controller is
supported by the EX-M2
only.
USB Cradle
Simply placing your CASIO digital camera onto the USB
cradle lets you perform the following tasks.
• Battery charging (page 24)
• Automatic transfer of images to a computer (page 89)
Removing the Connector Cover
1
Camera connector
2
USB lamp
3
CHARGE lamp
1
2
3
4
5
■
Back
4
USB
(USB port)
5
DC IN 5.3V
(AC adaptor connector)
■
Front