Casio KL 780 User Guide - Page 16
Text Effects - tapes
 |
UPC - 079767163716
View all Casio KL 780 manuals
Add to My Manuals
Save this manual to your list of manuals |
Page 16 highlights
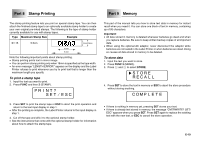
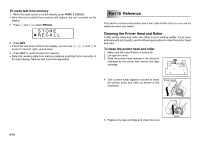
Using Auto Sizing (AUTO) 1. Input the text. 2. Press FUNC 4 (SIZE) to display the size setting menu. AUTO MANUA L 3. Make sure the pointer is aligned with AUTO and then press SET. Now the character size is automatically set. To specify character sizes (MANUAL) 1. Input the text. 2. Press FUNC 4 (SIZE) to display the size setting menu. 3. Use z to move the pointer to MANUAL and then press SET. - MANUA L - S I Z E : -3 3 4. Specify the character size you want. • Use c and v to move the underlining between the two dimensions. • To change a dimension, press z to increase it or x to decrease it. • Remember that the dimensions you can specify depend on the width of the tape loaded in the label printer (see table, above). 5. When the character size you want to specify is on the display, press SET to select it and return to the text display. Note • You could also perform the above procedure in reverse, specifying the character size first and then inputting the text. Text Effects There are three text effects that you can assign: shading, underlining, and boxed text. The following shows examples of each. Shading: Underlining: Boxed Text: Text effect changes are applied to printed text only. The appearance of the displayed text does not change, but the text effect indicators will show you when a text effect is being used. Important! • Any text effect specification you make is applied to all the characters on the display. You cannot make multiple specifications for specific characters. • You can use the Shading, Underline, and Box effects in combination with each other, and even specify all three at the same time. To specify a text effect 1. Input the text. 2. Press FUNC 5 (EFFECT) to display a menu of text effects. CANCE L SHAD I NG 3. Use z and x to move the pointer to the effect you want to use. 4. When the pointer is located at the effect you want to specify, press SET to select it and return to the text display. Note • You could also perform the above procedure in reverse, specifying the text effect first and then inputting the text. E-15
-
 1
1 -
2
-
3
-
4
-
5
-
6
-
7
-
8
-
9
-
10
-
 11
11 -
 12
12 -
 13
13 -
 14
14 -
 15
15 -
 16
16 -
 17
17 -
 18
18 -
 19
19 -
 20
20 -
 21
21 -
22
-
23
-
24
-
25
-
26
-
27
-
28
 |
 |
