Casio KL 780 User Guide - Page 22
Initial Power On Settings, Initializing the Label Printer, Bar Code Specifications - error
 |
UPC - 079767163716
View all Casio KL 780 manuals
Add to My Manuals
Save this manual to your list of manuals |
Page 22 highlights
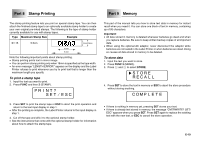
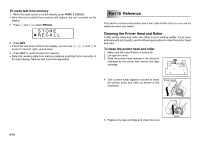
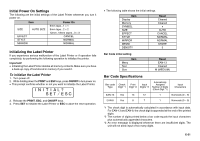
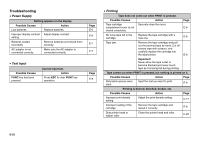
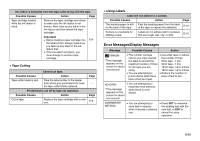
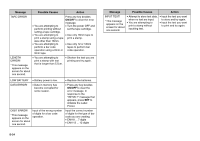
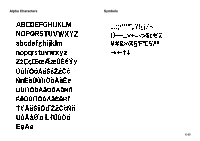
Initial Power On Settings The following are the initial settings of the Label Printer whenever you turn it power on. Item SIZE AUTO SIZE EFFECT STYLE MIRROR Power On 6mm tape...1 × 1 9mm tape...2 × 2 12mm, 18mm tapes...3 × 3 CANCEL NORMAL NORMAL Initializing the Label Printer If you experience serious malfunction of the Label Printer or if operation fails completely, try performing the following operation to initialize the printer. Important! • Initializing the Label Printer deletes all memory contents. Make sure you have a back-up copy of text stored in memory if you need it. To initialize the Label Printer 1. Turn power off. 2. While holding down the PRINT and ESC keys, press ON/OFF to turn power on. • This prompt confirms whether or not you want to initialize the Label Printer. I N I T I AL? SET ⁄ ESC 3. Release the PRINT, ESC, and ON/OFF keys. 4. Press SET to initialize the Label Printer or ESC to abort the reset operation. • The following table shows the initial settings. Item Display Memory SYMBOL SIZE EFFECT STYLE MIRROR MEMO DENSITY Reset Cleared , Cleared AUTO CANCEL NORMAL NORMAL STORE 3 Bar Code initial setting Menu Text Size Item Reset EAN-13 Cleared M (MEDIUM) Bar Code Specifications Bar code Type Check Digit *1 Print Digit *2 Input Digits *3 Automatically Assigned Number of Digits (Check Digit *1) Input Characters EAN-13 Yes 13 12 1 Numerals (0 ~ 9) EAN-8 Yes 8 7 1 Numerals (0 ~ 9) *1 The check digit is automatically calculated in accordance with input data. For EAN-13 and EAN-8, the check digit is appended at the end of the printed digits. *2 The number of digits printed below a bar code equals the input characters plus automatically appended characters. *3 An error message is displayed whenever there are insufficient digits. The unit will not allow input of too many digits. E-21
-
 1
1 -
2
-
3
-
4
-
5
-
6
-
7
-
8
-
9
-
10
-
11
-
12
-
13
-
14
-
15
-
16
-
 17
17 -
 18
18 -
 19
19 -
 20
20 -
 21
21 -
 22
22 -
 23
23 -
 24
24 -
 25
25 -
 26
26 -
 27
27 -
28
 |
 |
