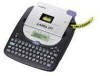
Casio KL 780 User Guide - Page 18
Mirror Image Printing, Print Density
 |
UPC - 079767163716
View all Casio KL 780 manuals
Add to My Manuals
Save this manual to your list of manuals |
Page 18 highlights
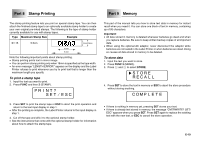
• An easy way to remove the backing from a tape and expose the adhesive surface is to bend the tape near one of its ends. This should cause the tape and its backing to separate, allowing you to pull them apart. Mirror Image Printing When you specify mirror image for text, it is printed in reverse image. Use mirror image when you plan to print on transparent tape, with the printing on the inside. When viewed through the transparent tape, the text will appear normal. You can also use mirror image printing when using iron-on transfer tape to print ironon transfers. Normal Mirror Image To turn mirror image printing on and off 1. Press FUNC and then 8 (MIRROR). NORMA L M I RROR 2. Press z or x to change the setting shown on the display between MIRROR and NORMAL. 3. When the mirror image printing setting is the way you want it, press SET to register it. • A mark appears next to the MIRROR indicator on the display when mirror printing is turned on. • After you turn printing on, input text and perform the print operation as you normally do to produce mirror image tapes. Print Density The print density setting controls how darkly figures are printed on your tapes. To adjust the print density 1. Press FUNC and then 9 (DENSITY). -DENS I TY- 1 2 -3 4 5 2. Use c and v to move the underlining to the density setting that you want. • The lightest setting is 1, while the darkest setting is 5. The standard setting is 3. 3. When the density setting is the way you want it, press SET to register it. E-17
-
 1
1 -
2
-
3
-
4
-
5
-
6
-
7
-
8
-
9
-
10
-
11
-
12
-
 13
13 -
 14
14 -
 15
15 -
 16
16 -
 17
17 -
 18
18 -
 19
19 -
 20
20 -
 21
21 -
 22
22 -
 23
23 -
24
-
25
-
26
-
27
-
28
 |
 |
