Casio KL 780 User Guide - Page 7
Part 2, Getting Ready - label tape
 |
UPC - 079767163716
View all Casio KL 780 manuals
Add to My Manuals
Save this manual to your list of manuals |
Page 7 highlights
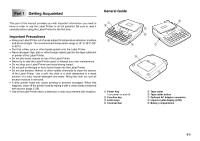
Label Printer Menus Label Printer operation is designed to be as simple as possible, thanks to onscreen menus that you can use to select the settings you need. Each menu is described in detail in the sections that follow in this manual, but note the following general points when using them. • The item that is underlined in a menu is the one that is currently selected. Currently selected item • Use c, v, x and z to move the underlining left, right, up and down and change the selected item. • Press SET to execute the underlined item, or ESC to exit the displayed menu (and return to the previous menu or screen) without selecting anything. • When you press SET to execute a menu item, the Label Printer either moves on to the next menu, or it executes the selected function and returns to the text input screen that you started from. Part 2 Getting Ready This part of the manual tells you how to load batteries and the tape cartridge, and how to perform other basic setups for the Label Printer. Important! • Be sure to read this section before attempting to use the Label Printer. Power Supply The Label Printer can be powered by six AA-size alkaline batteries or an optional AC adaptor (AD-A95100). Replacing Batteries A handy low battery power indicator lets you know when battery power is getting too low for proper operation. The message "LOW BATTERY" appears on the display if battery power is low when you perform any of the following operations. • Turn power on • Execute a print operation Whenever the "LOW BATTERY" message appears, press SET to clear it from the display. You should still be able to perform some Label Printer operations, but some power intensive operations (like printing) may become impossible if battery power is too low. In any case, you should replace batteries as soon as possible or switch to the AC adaptor as soon as possible after the "LOW BATTERY" message appears. Important! • All data stored in memory is deleted whenever batteries go dead and when you replace batteries. Be sure to keep written backup copies of all important data. • Batteries can burst or leak and damage your unit if you do not use them correctly. Note the following important points. • Be sure that the plus (+) and minus (-) sides of each battery are facing correctly. • Never mix batteries of different types. • Never leave dead batteries in the Label Printer. • Remove the batteries if you do not plan to use the Label Printer for a long time. • Replace the batteries in accordance with the battery life marked on the side of the battery. Warning! • Never use recharged batteries with the unit. • Do not expose batteries to direct heat, do not short circuit them, and do not try to take them apart. • Keep batteries out of the reach of small children. If swallowed, consult with a physician immediately. • Be sure to replace the batteries in accordance with the battery life printed on the side of the battery itself. E-6
-
 1
1 -
 2
2 -
 3
3 -
 4
4 -
 5
5 -
 6
6 -
 7
7 -
 8
8 -
 9
9 -
 10
10 -
 11
11 -
 12
12 -
13
-
14
-
15
-
16
-
17
-
18
-
19
-
20
-
21
-
22
-
23
-
24
-
25
-
26
-
27
-
28
 |
 |
