Casio WK 3000 User Guide - Page 68
Specifying Chords in the Normal, Specifying the Length of a Note, Track 1 Step Recording Variations
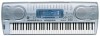 |
UPC - 079767312749
View all Casio WK 3000 manuals
Add to My Manuals
Save this manual to your list of manuals |
Page 68 highlights
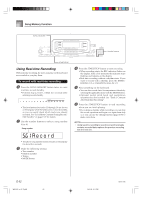
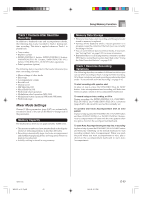
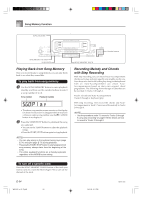
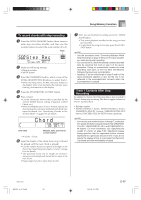
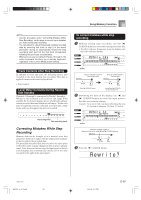
Song Memory Function Specifying Chords in the Normal Mode When the MODE button is set to Normal during step recording, you can specify chords using a method that is different from CASIO Chord and Fingered fingerings. This chord specification method can be used to input 18 different chord types using only two keyboard keys, so chords can be specified even if you don't know how to actually play them. Root input keyboard 1 Major 2 Minor 3 Augmented 4 Diminished 5 Suspended four 6 Seventh 7 Minor seventh 8 Major seventh 9 Minor major seventh Chord type input keyboard 0 Seventh flat five A Minor seventh flat five B Seventh suspended four C Diminished seventh D Minor add ninth E Add ninth F Minor sixth G Sixth H Six ninth To specify a chord, hold down the key on the root input keyboard that specifies the root, and press the key in the chord type input keyboard to specify the chord type. When inputting a chord with a specified bass note, pressing two keys of the root input keyboard causes the lower note to be specified as a bass note. Example 1: To input Gm7, hold down G on the root input keyboard and press the m7 key on the chord type input keyboard. (G) Hold down key to specify chord root. (m7) Press key to specify chord type Example 2: To input Gm/C, hold down C and G on the root input keyboard and press the m key on the chord type input keyboard. (C) (G) Hold down key to specify on bass and chord root. (m) Press key to specify chord type. Specifying the Length of a Note During step recording, the number buttons are used to specify the length of each note. Note lengths Use number buttons [1] through [6] to specify whole notes ( ), half notes ( ), quarter notes ( ), eighth notes ( ), 16th notes ( ), and 32nd notes ( ). Example: To specify a quarter note ( ), press [3]. Dots ( ) and triplicates ( ) While holding down the [7] (dot) or [9] (triplicate), use buttons [1] through [6] to input the lengths of the notes. Example: To input a dotted eighth notes ( ), hold down [7] and press [4]. Ties Input the first and then the second note. Example: To input , press [4] and then [8]. Next, press [5]. This note will be tied to the next note you input (16th note in this example). Rest Hold down [0] and then use number buttons [1] through [9] to specify the length of the rest. Example: To input an eighth note rest, hold down [0] and press [4]. • Pressing the [̈] CURSOR button inputs rests up to the beginning of the next measure. Track 1 Step Recording Variations The following describes a number of different variations you can use when recording to Track 1 using step recording. All of these variations are based upon the procedure described under "To record chords with step recording" on page E-65. To start accompaniment with an intro pattern In step 4, press INTRO/ENDING 1 or INTRO/ENDING 2 button after the SYNCHRO/FILL-IN NEXT button. To switch to a rhythm variation In step 5, press VARIATION/FILL-IN 1 or VARIATION/ FILL-IN 2 button immediately before inputting the chord. To insert a fill in In step 5, press VARIATION/FILL-IN 1 or VARIATION/ FILL-IN 2 button at the measure or beat immediately before the chord or beat where you want to insert the fill in. To insert an ending In step 5, press INTRO/ENDING 1 or INTRO/ENDING 2 button at the measure or beat immediately before the chord where you want to insert the ending. E-66 WK3100_e_61-73.p65 66 04.3.26, 0:11 PM 735A-E-068B
-
 1
1 -
2
-
3
-
4
-
5
-
6
-
7
-
8
-
9
-
10
-
11
-
12
-
13
-
14
-
15
-
16
-
17
-
18
-
19
-
20
-
21
-
22
-
23
-
24
-
25
-
26
-
27
-
28
-
29
-
30
-
31
-
32
-
33
-
34
-
35
-
36
-
37
-
38
-
39
-
40
-
41
-
42
-
43
-
44
-
45
-
46
-
47
-
48
-
49
-
50
-
51
-
52
-
53
-
54
-
55
-
56
-
57
-
58
-
59
-
60
-
61
-
62
-
 63
63 -
 64
64 -
 65
65 -
 66
66 -
 67
67 -
 68
68 -
 69
69 -
 70
70 -
 71
71 -
 72
72 -
 73
73 -
74
-
75
-
76
-
77
-
78
-
79
-
80
-
81
-
82
-
83
-
84
-
85
-
86
-
87
-
88
-
89
-
90
-
91
-
92
-
93
-
94
-
95
-
96
-
97
-
98
-
99
-
100
-
101
-
102
-
103
-
104
-
105
-
106
-
107
-
108
-
109
-
110
-
111
-
112
-
113
-
114
-
115
-
116
-
117
-
118
-
119
-
120
-
121
-
122
-
123
-
124
-
125
-
126
-
127
-
128
-
129
-
130
-
131
-
132
-
133
-
134
-
135
-
136
-
137
-
138
-
139
-
140
-
141
-
142
-
143
-
144
-
145
-
146
-
147
-
148
 |
 |
