Casio WK-6500 User Guide - Page 27
Press the L-16 SYNCHRO/ENDING button.
 |
View all Casio WK-6500 manuals
Add to My Manuals
Save this manual to your list of manuals |
Page 27 highlights
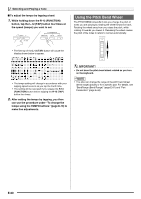
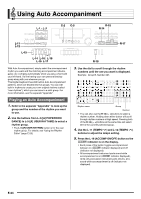
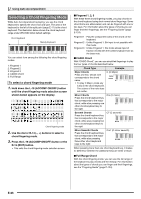
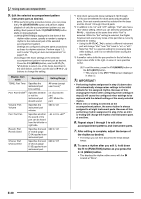
6. Press the L-16 (SYNCHRO/ENDING) button. • This enters synchro standby (Auto Accompaniment waiting for you to play a chord), with the F indicator flashing on the display. The flashing F indicator means that the normal Auto Accompaniment pattern is standing by. 7. You also can use the buttons described below to change to intro or variation pattern standby. To enter synchro standby for this pattern: Intro Variation Press this key: Display Indicator: L-13 (INTRO) button E flashing L-15 (VARIATION/ H FILL-IN) button flashing For details about intro and variation patterns, see "Modifying Auto Accompaniment Patterns" (page E-27). 8. Play the chord you want on the chord keyboard (left keyboard keys). • Auto Accompaniment will start playing when you play the chord. • To start percussion part play without playing a chord, press the L-17 (START/STOP) button. Example: To play a C chord Chord keyboard Melody keyboard Using Auto Accompaniment 10. When you are finished, press the L-17 (START/ STOP) button again to stop Auto Accompaniment. • Pressing the L-16 (SYNCHRO/ENDING) button instead of the L-17 (START/STOP) button will play an ending pattern before stopping Auto Accompaniment play. For details about ending patterns, see "Modifying Auto Accompaniment Patterns" (page E-27). • You can use the following procedure to adjust the volume level of the Auto Accompaniment, without affecting the volume of Digital Keyboard output. For details, see "AccompVol. (Auto Accompaniment Volume)" (page E-99). • You can change the size of the chord keyboard by using the split feature to move the split point (page E-17). The keyboard keys to the left of the split point make up the chord keyboard. • The chord root and type that corresponds to the keys you press appear in the chord area of the display. 9. Play other chords with your left hand as you play the melody with your right hand. • You can use "CASIO Chord" or other simplified chord fingering modes to play chords. For details, see "Selecting a Chord Fingering Mode" in the following section. • You can use the L-14 (NORMAL/FILL-IN) and L-15 (VARIATION/FILL-IN) buttons to modify accompaniment patterns. For details, see "Modifying Auto Accompaniment Patterns" (page E-27). E-25
-
 1
1 -
2
-
3
-
4
-
5
-
6
-
7
-
8
-
9
-
10
-
11
-
12
-
13
-
14
-
15
-
16
-
17
-
18
-
19
-
20
-
21
-
 22
22 -
 23
23 -
 24
24 -
 25
25 -
 26
26 -
 27
27 -
 28
28 -
 29
29 -
 30
30 -
 31
31 -
 32
32 -
33
-
34
-
35
-
36
-
37
-
38
-
39
-
40
-
41
-
42
-
43
-
44
-
45
-
46
-
47
-
48
-
49
-
50
-
51
-
52
-
53
-
54
-
55
-
56
-
57
-
58
-
59
-
60
-
61
-
62
-
63
-
64
-
65
-
66
-
67
-
68
-
69
-
70
-
71
-
72
-
73
-
74
-
75
-
76
-
77
-
78
-
79
-
80
-
81
-
82
-
83
-
84
-
85
-
86
-
87
-
88
-
89
-
90
-
91
-
92
-
93
-
94
-
95
-
96
-
97
-
98
-
99
-
100
-
101
-
102
-
103
-
104
-
105
-
106
-
107
-
108
-
109
-
110
-
111
-
112
-
113
-
114
-
115
-
116
-
117
-
118
-
119
-
120
-
121
-
122
-
123
-
124
-
125
-
126
-
127
-
128
-
129
-
130
-
131
-
132
 |
 |
