Casio WK-6500 User Guide - Page 8
Reading the Display - used keyboard
 |
View all Casio WK-6500 manuals
Add to My Manuals
Save this manual to your list of manuals |
Page 8 highlights
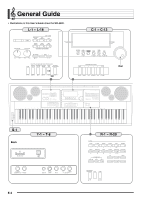
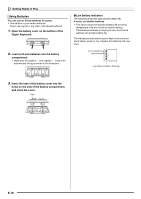
General Guide Reading the Display This section explains the contents of the Digital Keyboard's display screen. 1 2 45 6 3 1 Detailed information area This area displays a variety of information while the Digital Keyboard is being used. Use this area to confirm proper operation when changing values, when selecting a menu item, and when performing other operations. 2 Level meter area This level meter shows the volume level of the notes that are sounded when you play something on the keyboard or when Auto Accompaniment is played. There are a total of 32 parts, 16 each in Group A and Group B. The L indicator will be displayed in the lower left corner while Group A parts are being indicated by the level meter, while the M indicator will be displayed in the lower left corner while Group B parts are being indicated. For details about parts, see "How Parts are Organized" (page E-39). 3 Indicator areas The indicator area shows such information as the current mode (page E-7), the status of settings, the status of Auto Accompaniment, and other information. There are two types of indicators: text type indicators such as :, and pointer (K) type indicators. In the case of pointer type indicators, a setting or status is indicated by the location of the K next to fixed text along the sides of the display. For example, the location of the pointer (K) on the right side of the display in the sample below indicates REVERB. 6 Tempo, measure, beat area Tempo is shown as the current setting value, as beats per minute. Auto Accompaniment, the metronome (page E-19), and other playback is performed at the tempo shown here. The MEASURE and BEAT values are counted up as Auto Accompaniment, the metronome, or other playback progresses. Currently Selected Item Indication The item that is currently selected on a display screen is indicated by thick brackets (%) and by a large dot (0). The currently selected item is the one that is affected by the R-14 (-, +) buttons or dial operations. On this screen, "RHYTHM" is selected because it is enclosed by thick brackets. This indicates that the rhythm setting can be changed. On this screen, "Touch" is selected because the 0 is next to it. This indicates that the value to the right of "Touch", which is enclosed in thick brackets, can be changed. 4 Registration bank area This area shows the number of the currently selected registration bank (page E-62). 5Chord area This area shows the chord being played when Auto Accompaniment (page E-24) or music preset (page E-50) is being used. It also can display fraction chords by showing the chord root (C, G, etc.) and type (m, 7th, etc.). E-6
-
 1
1 -
2
-
 3
3 -
 4
4 -
 5
5 -
 6
6 -
 7
7 -
 8
8 -
 9
9 -
 10
10 -
 11
11 -
 12
12 -
 13
13 -
14
-
15
-
16
-
17
-
18
-
19
-
20
-
21
-
22
-
23
-
24
-
25
-
26
-
27
-
28
-
29
-
30
-
31
-
32
-
33
-
34
-
35
-
36
-
37
-
38
-
39
-
40
-
41
-
42
-
43
-
44
-
45
-
46
-
47
-
48
-
49
-
50
-
51
-
52
-
53
-
54
-
55
-
56
-
57
-
58
-
59
-
60
-
61
-
62
-
63
-
64
-
65
-
66
-
67
-
68
-
69
-
70
-
71
-
72
-
73
-
74
-
75
-
76
-
77
-
78
-
79
-
80
-
81
-
82
-
83
-
84
-
85
-
86
-
87
-
88
-
89
-
90
-
91
-
92
-
93
-
94
-
95
-
96
-
97
-
98
-
99
-
100
-
101
-
102
-
103
-
104
-
105
-
106
-
107
-
108
-
109
-
110
-
111
-
112
-
113
-
114
-
115
-
116
-
117
-
118
-
119
-
120
-
121
-
122
-
123
-
124
-
125
-
126
-
127
-
128
-
129
-
130
-
131
-
132
 |
 |
