Casio WK-6500 User Guide - Page 77
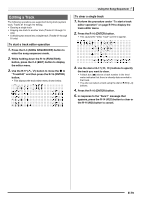
Editing a Song
 |
View all Casio WK-6500 manuals
Add to My Manuals
Save this manual to your list of manuals |
Page 77 highlights
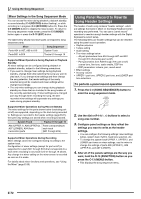
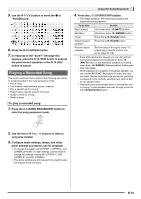
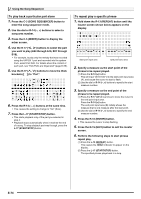
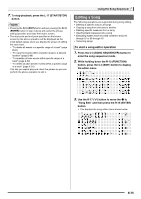
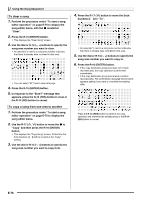
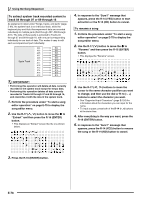
7. To stop playback, press the L-17 (START/STOP) button. • Pressing the R-15 (EXIT) button without pressing the R-16 (ENTER) button in step 4 above will cancel the phrase setting operation and close the locator screen. • The start point and end point specified on the locator screen by the above operation will be displayed as the initial default values when you display the screen of editing the next event. - "To delete all events in a specific range of a track" (page E-87) - "To copy the events within a specific range to a desired location" (page E-88) - "To quantize all note events within specific range of a track" (page E-90) - "To delete all pitch bender events within a specific range of a track" (page E-91) This lets you repeat play and check the phrase so you can perform the above operation to edit it. Using the Song Sequencer Editing a Song The following operations are supported during song editing. • Deleting a specific song or all songs • Copying a song from one area to another • Deleting specific measures from a song • Inserting blank measures into a song • Extracting system track recorded content to track 04 through 07 or 09 through 16 • Renaming songs To start a song editor operation 1. Press the C-3 (SONG SEQUENCER) button to enter the song sequencer mode. 2. While holding down the R-13 (FUNCTION) button, press the C-3 (EDIT) button to display the editor menu. 3. Use the R-17 (y) button to move the 0 to "Song Edit" and then press the R-16 (ENTER) button. • This displays the song editor menu shown below. E-75
-
 1
1 -
2
-
3
-
4
-
5
-
6
-
7
-
8
-
9
-
10
-
11
-
12
-
13
-
14
-
15
-
16
-
17
-
18
-
19
-
20
-
21
-
22
-
23
-
24
-
25
-
26
-
27
-
28
-
29
-
30
-
31
-
32
-
33
-
34
-
35
-
36
-
37
-
38
-
39
-
40
-
41
-
42
-
43
-
44
-
45
-
46
-
47
-
48
-
49
-
50
-
51
-
52
-
53
-
54
-
55
-
56
-
57
-
58
-
59
-
60
-
61
-
62
-
63
-
64
-
65
-
66
-
67
-
68
-
69
-
70
-
71
-
 72
72 -
 73
73 -
 74
74 -
 75
75 -
 76
76 -
 77
77 -
 78
78 -
 79
79 -
 80
80 -
 81
81 -
 82
82 -
83
-
84
-
85
-
86
-
87
-
88
-
89
-
90
-
91
-
92
-
93
-
94
-
95
-
96
-
97
-
98
-
99
-
100
-
101
-
102
-
103
-
104
-
105
-
106
-
107
-
108
-
109
-
110
-
111
-
112
-
113
-
114
-
115
-
116
-
117
-
118
-
119
-
120
-
121
-
122
-
123
-
124
-
125
-
126
-
127
-
128
-
129
-
130
-
131
-
132
 |
 |