Cisco AIR-RM1252G-A-K9= Hardware Installation Guide - Page 46
Mounting to a Network Cable Box
 |
UPC - 882658140860
View all Cisco AIR-RM1252G-A-K9= manuals
Add to My Manuals
Save this manual to your list of manuals |
Page 46 highlights
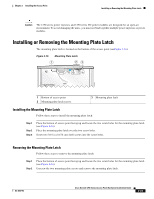
Mounting to a Network Cable Box Chapter 2 Installing the Access Point Step 3 Repeat Steps 1 and 2 to install the second box hanger on the right side of the mounting bracket. Refer to Figure Figure 2-13. Figure 2-13 Securing the Right Side Mounting Clip to the Mounting Bracket 276487 Step 4 Perform Steps 3 through 16 in the "Installing Option One" section on page 2-13. Mounting to a Network Cable Box Follow these steps to mount the access point on a network cable box. Step 1 Step 2 Step 3 Step 4 Position the mounting plate over the network cable box and align the appropriate mounting holes (See Figure 2-2) with the holes of your specific network box. Hold the mounting plate and insert two or 4 #6 or #8 pan head screws (to match network box configuration) through the mounting plate and into the corresponding threaded holes of the network box. Pull the access point cables out of the network box until there is about 1 foot of exposed cables protruding from the box. Attach the access point to the mounting plate (see the "Installing the Access Point to the Mounting Plate" section on page 2-24). 2-18 Cisco Aironet 1250 Series Access Point Hardware Installation Guide OL-8247-03
-
 1
1 -
2
-
3
-
4
-
5
-
6
-
7
-
8
-
9
-
10
-
11
-
12
-
13
-
14
-
15
-
16
-
17
-
18
-
19
-
20
-
21
-
22
-
23
-
24
-
25
-
26
-
27
-
28
-
29
-
30
-
31
-
32
-
33
-
34
-
35
-
36
-
37
-
38
-
39
-
40
-
 41
41 -
 42
42 -
 43
43 -
 44
44 -
 45
45 -
 46
46 -
 47
47 -
 48
48 -
 49
49 -
 50
50 -
 51
51 -
52
-
53
-
54
-
55
-
56
-
57
-
58
-
59
-
60
-
61
-
62
-
63
-
64
-
65
-
66
-
67
-
68
-
69
-
70
-
71
-
72
-
73
-
74
-
75
-
76
-
77
-
78
-
79
-
80
-
81
-
82
-
83
-
84
-
85
-
86
-
87
-
88
-
89
-
90
-
91
-
92
-
93
-
94
-
95
-
96
-
97
-
98
-
99
-
100
-
101
-
102
-
103
-
104
-
105
-
106
-
107
-
108
-
109
-
110
-
111
-
112
-
113
-
114
-
115
-
116
-
117
-
118
-
119
-
120
-
121
-
122
-
123
-
124
-
125
-
126
-
127
-
128
-
129
-
130
-
131
-
132
-
133
-
134
-
135
-
136
-
137
-
138
-
139
-
140
-
141
-
142
 |
 |
