Cisco SPA525G2 User Manual - Page 55
Adding a New Contact, Copying a Contact
 |
View all Cisco SPA525G2 manuals
Add to My Manuals
Save this manual to your list of manuals |
Page 55 highlights
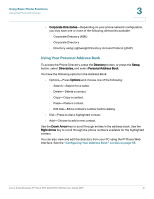
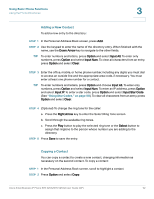
Using Basic Phone Functions Using the Phone Directories 3 Adding a New Contact To add a new entry to the directory: STEP 1 In the Personal Address Book screen, press Add. STEP 2 Use the keypad to enter the name of the directory entry. When finished with the name, use the Down Arrow key to navigate to the other fields. TIP To enter numbers and letters, press Option and select Input All. To enter only numbers, press Option and select Input Num. To clear all characters from an entry, press Option and select Clear. STEP 3 Enter the office, mobile, or home phone number, including any digits you must dial to access an outside line and the appropriate area code, if necessary. You must enter at least one phone number for a contact. TIP To enter numbers and letters, press Option and choose Input All. To enter only numbers, press Option and select Input Num. To enter an IP address, press Option and select Input IP. To enter a star code, press Option and select Input Star Code. (See "Using Star Codes," on page 88.) To clear all characters from an entry, press Option and select Clear. STEP 4 (Optional) To change the ring tone for the caller: a. Press the Right Arrow key to enter the Select Ring Tone screen. b. Scroll through the available ring tones. c. Press the Play button to play the selected ring tone or the Select button to assign that ringtone to the person whose number you are adding to the directory. STEP 5 Press Save to save the entry. Copying a Contact You can copy a contact to create a new contact, changing information as necessary on the second contact. To copy a contact: STEP 1 In the Personal Address Book screen, scroll to highlight a contact. STEP 2 Press Option and select Copy. Cisco Small Business IP Phone SPA 525G/SPA 525G2 User Guide (SIP) 52
-
 1
1 -
2
-
3
-
4
-
5
-
6
-
7
-
8
-
9
-
10
-
11
-
12
-
13
-
14
-
15
-
16
-
17
-
18
-
19
-
20
-
21
-
22
-
23
-
24
-
25
-
26
-
27
-
28
-
29
-
30
-
31
-
32
-
33
-
34
-
35
-
36
-
37
-
38
-
39
-
40
-
41
-
42
-
43
-
44
-
45
-
46
-
47
-
48
-
49
-
 50
50 -
 51
51 -
 52
52 -
 53
53 -
 54
54 -
 55
55 -
 56
56 -
 57
57 -
 58
58 -
 59
59 -
 60
60 -
61
-
62
-
63
-
64
-
65
-
66
-
67
-
68
-
69
-
70
-
71
-
72
-
73
-
74
-
75
-
76
-
77
-
78
-
79
-
80
-
81
-
82
-
83
-
84
-
85
-
86
-
87
-
88
-
89
-
90
-
91
-
92
-
93
-
94
-
95
-
96
-
97
-
98
-
99
-
100
-
101
-
102
-
103
-
104
-
105
-
106
-
107
-
108
-
109
-
110
-
111
-
112
-
113
-
114
-
115
-
116
-
117
 |
 |