Cisco SPA525G2 User Manual - Page 66
Creating and Using Speed Dials - vpn
 |
View all Cisco SPA525G2 manuals
Add to My Manuals
Save this manual to your list of manuals |
Page 66 highlights
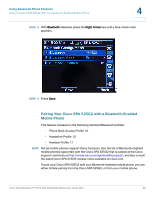
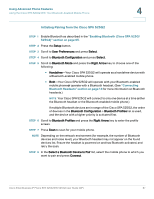
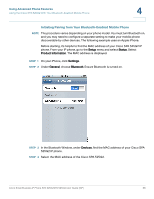
Using Advanced Phone Features Creating and Using Speed Dials 4 To connect to the VPN (if you have not chosen to automatically connect on startup): STEP 1 Press the Setup button. STEP 2 Scroll to Network Configuration and press Select. STEP 3 Scroll to VPN and press the Right Arrow key. STEP 4 Press the Down Arrow button to Connect and press the Right Arrow key to connect to the VPN. Viewing Your VPN Status To see if you are connected to the VPN: STEP 1 Press the Setup button. STEP 2 Scroll to Status and press Select. STEP 3 Scroll to VPN Status and press Select. Creating and Using Speed Dials You can configure different types of speed dials: • You can assigned unused line buttons on your phone to act as a speed dial. Depending on how your extensions are configured, you can have up to 4 speed dials on the line buttons. • You can create speed dials assigned to a number, that, when pressed on the keypad, dials the number assigned to it. You can have up to 8 of these speed dials. Each speed dial can be a phone number, IP address or URL. You can create and edit speed dials on the phone, or by using your PC and the IP Phone Web Interface. (See "Creating Speed Dials," on page 100 for web instructions.) Cisco Small Business IP Phone SPA 525G/SPA 525G2 User Guide (SIP) 63
-
 1
1 -
2
-
3
-
4
-
5
-
6
-
7
-
8
-
9
-
10
-
11
-
12
-
13
-
14
-
15
-
16
-
17
-
18
-
19
-
20
-
21
-
22
-
23
-
24
-
25
-
26
-
27
-
28
-
29
-
30
-
31
-
32
-
33
-
34
-
35
-
36
-
37
-
38
-
39
-
40
-
41
-
42
-
43
-
44
-
45
-
46
-
47
-
48
-
49
-
50
-
51
-
52
-
53
-
54
-
55
-
56
-
57
-
58
-
59
-
60
-
 61
61 -
 62
62 -
 63
63 -
 64
64 -
 65
65 -
 66
66 -
 67
67 -
 68
68 -
 69
69 -
 70
70 -
 71
71 -
72
-
73
-
74
-
75
-
76
-
77
-
78
-
79
-
80
-
81
-
82
-
83
-
84
-
85
-
86
-
87
-
88
-
89
-
90
-
91
-
92
-
93
-
94
-
95
-
96
-
97
-
98
-
99
-
100
-
101
-
102
-
103
-
104
-
105
-
106
-
107
-
108
-
109
-
110
-
111
-
112
-
113
-
114
-
115
-
116
-
117
 |
 |
