Cisco SPA525G2 User Manual - Page 65
Connecting to a Virtual Private Network VPN - vpn configuration
 |
View all Cisco SPA525G2 manuals
Add to My Manuals
Save this manual to your list of manuals |
Page 65 highlights
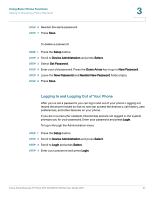
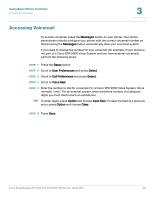
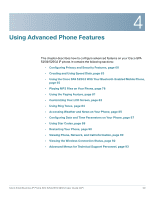
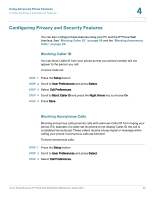
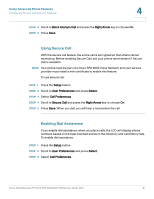
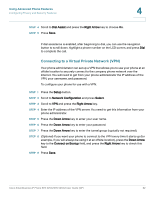
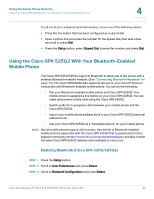
Using Advanced Phone Features Configuring Privacy and Security Features 4 STEP 4 Scroll to Dial Assist and press the Right Arrow key to choose On. STEP 5 Press Save. If dial assistance is enabled, after beginning to dial, you can use the navigation button to scroll down, highlight a phone number on the LCD screen, and press Dial to complete the call. Connecting to a Virtual Private Network (VPN) Your phone administrator can set up a VPN that allows you to use your phone at an offsite location to securely connect to the company phone network over the Internet. You will need to get from your phone administrator the IP address of the VPN, your username, and password. To configure your phone for use with a VPN: STEP 1 Press the Setup button. STEP 2 Scroll to Network Configuration and press Select. STEP 3 Scroll to VPN and press the Right Arrow key. STEP 4 Enter the IP address of the VPN server. You need to get this information from your phone administrator. STEP 5 Press the Down Arrow key to enter your user name. STEP 6 Press the Down Arrow key to enter your password. STEP 7 Press the Down Arrow key to enter the tunnel group (typically not required). STEP 8 (Optional) If you want your phone to connect to the VPN every time it starts up (for example, if you will always be using it at an offsite location), press the Down Arrow key to the Connect on Bootup field, and press the Right Arrow key to check this field. STEP 9 Press Save. Cisco Small Business IP Phone SPA 525G/SPA 525G2 User Guide (SIP) 62
-
 1
1 -
2
-
3
-
4
-
5
-
6
-
7
-
8
-
9
-
10
-
11
-
12
-
13
-
14
-
15
-
16
-
17
-
18
-
19
-
20
-
21
-
22
-
23
-
24
-
25
-
26
-
27
-
28
-
29
-
30
-
31
-
32
-
33
-
34
-
35
-
36
-
37
-
38
-
39
-
40
-
41
-
42
-
43
-
44
-
45
-
46
-
47
-
48
-
49
-
50
-
51
-
52
-
53
-
54
-
55
-
56
-
57
-
58
-
59
-
 60
60 -
 61
61 -
 62
62 -
 63
63 -
 64
64 -
 65
65 -
 66
66 -
 67
67 -
 68
68 -
 69
69 -
 70
70 -
71
-
72
-
73
-
74
-
75
-
76
-
77
-
78
-
79
-
80
-
81
-
82
-
83
-
84
-
85
-
86
-
87
-
88
-
89
-
90
-
91
-
92
-
93
-
94
-
95
-
96
-
97
-
98
-
99
-
100
-
101
-
102
-
103
-
104
-
105
-
106
-
107
-
108
-
109
-
110
-
111
-
112
-
113
-
114
-
115
-
116
-
117
 |
 |