Cisco WAP200 Administration Guide - Page 62
VLAN support - set dhcp
 |
UPC - 745883574452
View all Cisco WAP200 manuals
Add to My Manuals
Save this manual to your list of manuals |
Page 62 highlights
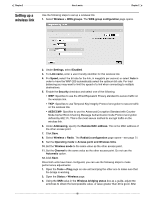
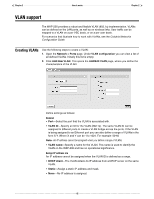
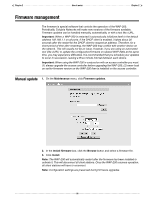
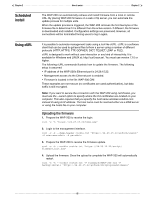
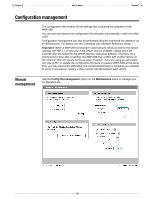
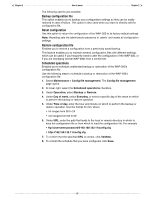
Chapter 2 How it works Chapter 2 VLAN support The WAP-200 provides a robust and flexible VLAN (802.1q) implementation. VLANs can be defined on the LAN ports, as well as on wireless links. User traffic can be mapped to a VLAN on a per-VSC basis, or on a per-user basis. For scenarios that illustrate how to work with VLANs, see the Colubris Networks Configuration Guide. Creating VLANs Use the following steps to create a VLAN: 1. Open the Network > Ports page. Under VLAN configuration you can view a list of all defined VLANs. Initially this list is empty. 2. Click Add New VLAN. This opens the Add/Edit VLAN page, where you define the characteristics of the VLAN. Define settings as follows: General • Port-Select the port that the VLAN is associated with. • VLAN ID-Specify an ID for the VLAN (802.1q). The same VLAN ID can be assigned to different ports to create a VLAN bridge across the ports. If the VLAN is being assigned to an Ethernet port you can also define a range of VLANs in the form X-Y. Where X and Y can be 1 to 1024. For example: 50-60 Note: An IP address cannot be assigned when you define a range of VLANs. • VLAN name-Specify a name for the VLAN. This name is used to identify the VLAN on the WAP-200 and has no operational significance. Assign IP address via An IP address cannot be assigned when the VLAN ID is defined as a range. • DHCP client-The VLAN obtains its IP address from a DHCP server on the same VLAN. • Static-Assign a static IP address and mask. • None-No IP address is assigned. 62
-
 1
1 -
2
-
3
-
4
-
5
-
6
-
7
-
8
-
9
-
10
-
11
-
12
-
13
-
14
-
15
-
16
-
17
-
18
-
19
-
20
-
21
-
22
-
23
-
24
-
25
-
26
-
27
-
28
-
29
-
30
-
31
-
32
-
33
-
34
-
35
-
36
-
37
-
38
-
39
-
40
-
41
-
42
-
43
-
44
-
45
-
46
-
47
-
48
-
49
-
50
-
51
-
52
-
53
-
54
-
55
-
56
-
 57
57 -
 58
58 -
 59
59 -
 60
60 -
 61
61 -
 62
62 -
 63
63 -
 64
64 -
 65
65 -
 66
66 -
 67
67 -
68
-
69
-
70
-
71
-
72
-
73
-
74
-
75
-
76
-
77
-
78
-
79
-
80
-
81
-
82
 |
 |
