Cisco WAP200 Administration Guide - Page 67
Backup configuration file, Reset configuration, Restore configuration file, Scheduled operations - default username and password
 |
UPC - 745883574452
View all Cisco WAP200 manuals
Add to My Manuals
Save this manual to your list of manuals |
Page 67 highlights
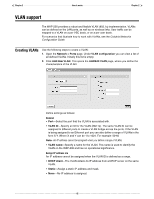
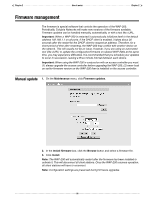
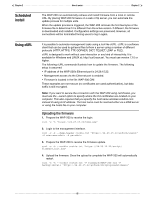
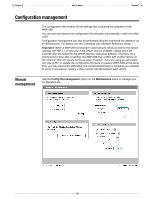
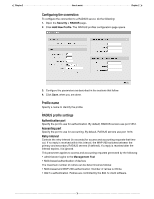
Chapter 2 How it works Chapter 2 The following options are available: Backup configuration file This option enables you to backup your configuration settings so they can be easily restored in case of failure. This option is also used when you want to directly edit the configuration file. Reset configuration Use this option to return the configuration of the WAP-200 to its factory default settings. Note: Resetting sets the administrator password to 'admin' and resets all configuration settings. Restore configuration file Enables you to restore a configuration from a previously saved backup. This feature enables you to maintain several configuration files with different settings, which can be useful if you frequently need to alter the configuration of the WAP-200, or if you are managing several WAP-200s from a central site. Scheduled operations Enables you to schedule unattended backup or restoration of the WAP-200's configuration file. Use the following steps to schedule a backup or restoration of the WAP-200's configuration file. 1. Select Maintenance > Config file management. The Config file management page opens. 2. At lower right, select the Scheduled operations checkbox. 3. Under Operation, select Backup or Restore. 4. Under Day of week, select Everyday, or select a specific day of the week on which to perform the backup or restore operation. 5. Under Time of day, enter the hour and minute on which to perform the backup or restore operation. Use the format hh mm, where • hh ranges from 00 to 24 • mm ranges from 00 to 60 6. Under URL, enter the path that leads to the local or remote directory in which to save the configuration file or from which to load the configuration file. For example • ftp://username:[email protected]/config.cfg • http://192.168.132.11/config.cfg 7. To confirm that the specified URL is correct, click Validate. 8. To commit the schedule that you have configured, click Save. 67
-
 1
1 -
2
-
3
-
4
-
5
-
6
-
7
-
8
-
9
-
10
-
11
-
12
-
13
-
14
-
15
-
16
-
17
-
18
-
19
-
20
-
21
-
22
-
23
-
24
-
25
-
26
-
27
-
28
-
29
-
30
-
31
-
32
-
33
-
34
-
35
-
36
-
37
-
38
-
39
-
40
-
41
-
42
-
43
-
44
-
45
-
46
-
47
-
48
-
49
-
50
-
51
-
52
-
53
-
54
-
55
-
56
-
57
-
58
-
59
-
60
-
61
-
 62
62 -
 63
63 -
 64
64 -
 65
65 -
 66
66 -
 67
67 -
 68
68 -
 69
69 -
 70
70 -
 71
71 -
 72
72 -
73
-
74
-
75
-
76
-
77
-
78
-
79
-
80
-
81
-
82
 |
 |
