Compaq 400338-001 HP J1473A 4-port, J1474A 8-port, J1475A Console Switch Rackm - Page 27
Editing Port Names and Addresses, Deleting an Existing Port
 |
UPC - 743172745156
View all Compaq 400338-001 manuals
Add to My Manuals
Save this manual to your list of manuals |
Page 27 highlights
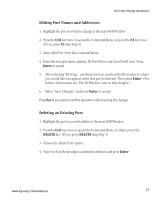
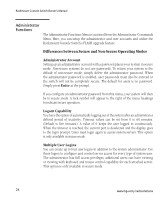
On-Screen Display Operations Editing Port Names and Addresses 1. Highlight the port you wish to change in the main OSD Window. 2. Press the Ctrl key twice to access the Command Menu or press the F2 key once. (If you press F2 skip Step 3) 3. Select 'Edit Port' from the Command Menu. 4. Enter the new port name, address, ID Dwell time and Scan Dwell time. Press Enter to accept. 5. After selecting "ID Setup", use the arrow keys, position the ID window to where you would like it to appear when this port is selected. Then press Enter. (For further information see 'The ID Window' later in this chapter.) 6. Select "Save Changes" and press Enter to accept. Press Esc at any point to exit this operation without saving the changes. Deleting an Existing Port 1. Highlight the port you wish to delete in the main OSD Window. 2. Press the Ctrl key twice to access the Command Menu or simply press the DELETE key. (If you press DELETE skip Step 3) 3. Choose the 'Delete Port' option. 4. Type Y or N at the prompt to confirm the deletion and press Enter. www.hp.com/racksolutions 21
-
 1
1 -
2
-
3
-
4
-
5
-
6
-
7
-
8
-
9
-
10
-
11
-
12
-
13
-
14
-
15
-
16
-
17
-
18
-
19
-
20
-
21
-
 22
22 -
 23
23 -
 24
24 -
 25
25 -
 26
26 -
 27
27 -
 28
28 -
 29
29 -
 30
30 -
 31
31 -
 32
32 -
33
-
34
-
35
-
36
-
37
-
38
-
39
-
40
-
41
-
42
-
43
-
44
-
45
-
46
-
47
-
48
-
49
-
50
-
51
-
52
-
53
-
54
-
55
-
56
-
57
-
58
-
59
-
60
-
61
-
62
-
63
-
64
-
65
-
66
-
67
-
68
-
69
-
70
-
71
-
72
-
73
-
74
-
75
-
76
-
77
-
78
-
79
-
80
-
81
-
82
-
83
-
84
-
85
-
86
-
87
-
88
-
89
-
90
-
91
-
92
-
93
-
94
-
95
-
96
-
97
-
98
-
99
-
100
-
101
-
102
-
103
-
104
-
105
-
106
-
107
-
108
-
109
-
110
-
111
-
112
-
113
-
114
-
115
-
116
-
117
-
118
-
119
-
120
-
121
-
122
-
123
-
124
-
125
-
126
-
127
-
128
-
129
-
130
-
131
-
132
-
133
-
134
-
135
-
136
-
137
-
138
-
139
-
140
-
141
-
142
-
143
-
144
-
145
-
146
-
147
-
148
-
149
-
150
-
151
-
152
-
153
-
154
-
155
-
156
-
157
-
158
-
159
-
160
-
161
-
162
-
163
-
164
-
165
-
166
-
167
-
168
-
169
-
170
-
171
-
172
-
173
-
174
-
175
-
176
-
177
-
178
-
179
-
180
-
181
-
182
-
183
-
184
-
185
-
186
-
187
-
188
-
189
-
190
-
191
-
192
-
193
-
194
-
195
-
196
-
197
-
198
-
199
-
200
-
201
-
202
-
203
-
204
-
205
-
206
-
207
-
208
-
209
-
210
-
211
-
212
-
213
 |
 |
