Compaq 400338-001 HP J1473A 4-port, J1474A 8-port, J1475A Console Switch Rackm - Page 28
The ID Window
 |
UPC - 743172745156
View all Compaq 400338-001 manuals
Add to My Manuals
Save this manual to your list of manuals |
Page 28 highlights
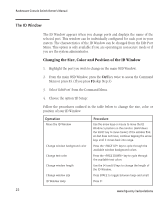
Rackmount Console Switch Owner's Manual The ID Window The ID Window appears when you change ports and displays the name of the selected port. This window can be individually configured for each port in your system. The characteristics of the ID Window can be changed from the Edit Port Menu. This option is only available if you are operating in non-secure mode or if you are the system administrator. Changing the Size, Color and Position of the ID Window 1. Highlight the port you wish to change in the main OSD Window. 2. From the main OSD Window, press the Ctrl key twice to access the Command Menu or press F3. (If you press F3 skip Step 3) 3. Select 'Edit Port' from the Command Menu. 4. Choose the option 'ID Setup.' Follow the procedures outlined in the table below to change the size, color or position of your ID Window. Operation Move the ID Window Change window background color Change text color Change window length Change window size ID Window Help Procedure Use the arrow keys or mouse to move the ID Window's position on the monitor. (Hold down the SHIFT key to move faster.) If the window flickers but does not move, continue tapping the arrow keys until it moves back into range. Press the key to cycle through the available window background colors. Press the key to cycle through the available text colors. Use the (+) and (-) keys to change the length of the ID Window. Press SPACE to toggle between large and small. Press F1 22 www.hp.com/racksolutions
-
 1
1 -
2
-
3
-
4
-
5
-
6
-
7
-
8
-
9
-
10
-
11
-
12
-
13
-
14
-
15
-
16
-
17
-
18
-
19
-
20
-
21
-
22
-
 23
23 -
 24
24 -
 25
25 -
 26
26 -
 27
27 -
 28
28 -
 29
29 -
 30
30 -
 31
31 -
 32
32 -
 33
33 -
34
-
35
-
36
-
37
-
38
-
39
-
40
-
41
-
42
-
43
-
44
-
45
-
46
-
47
-
48
-
49
-
50
-
51
-
52
-
53
-
54
-
55
-
56
-
57
-
58
-
59
-
60
-
61
-
62
-
63
-
64
-
65
-
66
-
67
-
68
-
69
-
70
-
71
-
72
-
73
-
74
-
75
-
76
-
77
-
78
-
79
-
80
-
81
-
82
-
83
-
84
-
85
-
86
-
87
-
88
-
89
-
90
-
91
-
92
-
93
-
94
-
95
-
96
-
97
-
98
-
99
-
100
-
101
-
102
-
103
-
104
-
105
-
106
-
107
-
108
-
109
-
110
-
111
-
112
-
113
-
114
-
115
-
116
-
117
-
118
-
119
-
120
-
121
-
122
-
123
-
124
-
125
-
126
-
127
-
128
-
129
-
130
-
131
-
132
-
133
-
134
-
135
-
136
-
137
-
138
-
139
-
140
-
141
-
142
-
143
-
144
-
145
-
146
-
147
-
148
-
149
-
150
-
151
-
152
-
153
-
154
-
155
-
156
-
157
-
158
-
159
-
160
-
161
-
162
-
163
-
164
-
165
-
166
-
167
-
168
-
169
-
170
-
171
-
172
-
173
-
174
-
175
-
176
-
177
-
178
-
179
-
180
-
181
-
182
-
183
-
184
-
185
-
186
-
187
-
188
-
189
-
190
-
191
-
192
-
193
-
194
-
195
-
196
-
197
-
198
-
199
-
200
-
201
-
202
-
203
-
204
-
205
-
206
-
207
-
208
-
209
-
210
-
211
-
212
-
213
 |
 |
