Compaq D51s Hardware Guide - Page 33
Removing the Optical Drive, drive out of the computer
 |
UPC - 890552632367
View all Compaq D51s manuals
Add to My Manuals
Save this manual to your list of manuals |
Page 33 highlights
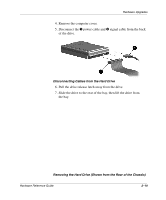
Hardware Upgrades 6. Disconnect the audio, signal, and drive power cables. The other end of the audio cable should remain connected to the audio connector on the system board. 7. Pull the drive release latch away from the drive 1. 8. Slide the drive toward the front of the drive cage 2, then lift the drive out of the computer 3. Removing the Optical Drive To replace the drive, reverse the removal procedures. ✎ When replacing the drive, transfer the four screws from the old drive to the new one. The screws take the place of drive rails. Hardware Reference Guide 2-21
-
 1
1 -
2
-
3
-
4
-
5
-
6
-
7
-
8
-
9
-
10
-
11
-
12
-
13
-
14
-
15
-
16
-
17
-
18
-
19
-
20
-
21
-
22
-
23
-
24
-
25
-
26
-
27
-
 28
28 -
 29
29 -
 30
30 -
 31
31 -
 32
32 -
 33
33 -
 34
34 -
 35
35 -
 36
36 -
 37
37 -
 38
38 -
39
-
40
-
41
-
42
-
43
-
44
-
45
-
46
-
47
-
48
-
49
-
50
-
51
-
52
-
53
-
54
-
55
-
56
-
57
-
58
-
59
-
60
-
61
-
62
-
63
 |
 |

Hardware Reference Guide
2–21
Hardware Upgrades
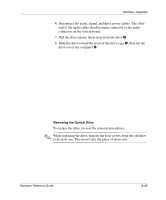
6. Disconnect the audio, signal, and drive power cables. The other
end of the audio cable should remain connected to the audio
connector on the system board.
7. Pull the drive release latch away from the drive
1
.
8. Slide the drive toward the front of the drive cage
2
, then lift the
drive out of the computer
3
.
Removing the Optical Drive
To replace the drive, reverse the removal procedures.
✎
When replacing the drive, transfer the four screws from the old drive
to the new one. The screws take the place of drive rails.