Compaq D51s Hardware Guide - Page 34
Installing an Optional Optical Drive, Installing Guide Screws in the Optical Drive
 |
UPC - 890552632367
View all Compaq D51s manuals
Add to My Manuals
Save this manual to your list of manuals |
Page 34 highlights
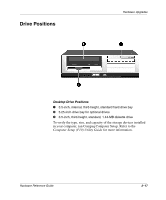
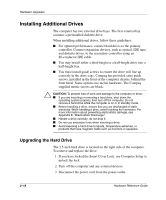
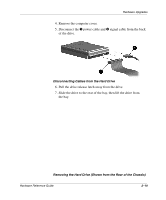
Hardware Upgrades Installing an Optional Optical Drive To install an optional optical drive: 1. Remove the optical drive if present. 2. Install two guide screws in the lower holes on each side of the drive. Ä CAUTION: Use only 3/16-inch or 5-mm long screws as guide screws. Longer screws can damage the internal components of the drive. Installing Guide Screws in the Optical Drive 3. Position the guide screws on the drive into the J-slots in the drive bay. Slide the drive toward the front of the computer. ✎ Ensure that the spring-loaded locking lever properly secures the drive. 2-22 Hardware Reference Guide
-
 1
1 -
2
-
3
-
4
-
5
-
6
-
7
-
8
-
9
-
10
-
11
-
12
-
13
-
14
-
15
-
16
-
17
-
18
-
19
-
20
-
21
-
22
-
23
-
24
-
25
-
26
-
27
-
28
-
 29
29 -
 30
30 -
 31
31 -
 32
32 -
 33
33 -
 34
34 -
 35
35 -
 36
36 -
 37
37 -
 38
38 -
 39
39 -
40
-
41
-
42
-
43
-
44
-
45
-
46
-
47
-
48
-
49
-
50
-
51
-
52
-
53
-
54
-
55
-
56
-
57
-
58
-
59
-
60
-
61
-
62
-
63
 |
 |

2–22
Hardware Reference Guide
Hardware Upgrades
Installing an Optional Optical Drive
To install an optional optical drive:
1. Remove the optical drive if present.
2. Install two guide screws in the lower holes on each side of the
drive.
Ä
CAUTION:
Use only 3/16-inch or 5-mm long screws as guide screws.
Longer screws can damage the internal components of the drive.
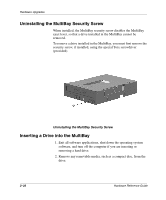
Installing Guide Screws in the Optical Drive
3. Position the guide screws on the drive into the J-slots in the drive
bay. Slide the drive toward the front of the computer.
✎
Ensure that the spring-loaded locking lever properly secures the drive.