Craftsman 21419 Operation Manual - Page 8
Bevel, Blade, Cleaning, Brush, Repair
 |
View all Craftsman 21419 manuals
Add to My Manuals
Save this manual to your list of manuals |
Page 8 highlights
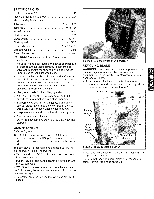
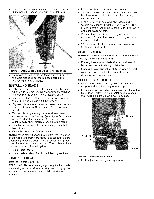
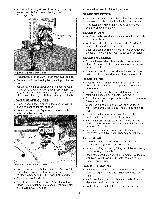
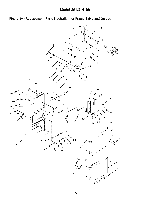
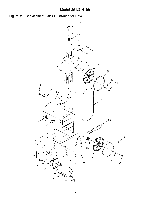
the portion of table which is to right of blade and before cut. Cut small corners by sawing around them. Saw to remove scrap until desired shape is obtained. BEVEL CUTTING Refer to Figure 10. • Perform bevel cutting by tilting table to desired degree. • Unlock table by loosening locking handle located on the backside of the unit (Key No. 14). • Tilt table to desired position by rotating knob (Key No. 18). • Lock table in position by tightening locking handle. MITER GAUGE = Use miter gauge for securing and holding workpiece at desired angle to produce angled cuts. Use scale to adjust gauge to desired angle. WARNING: Never use miter gauge and rip fence at the same time. The blade might bind in the workpiece. Operator could be injured and/or workpiece could be damaged. BLADE CLEANING BRUSH Refer to Figure 10. • Make sure that brush (Key No. 57) is in contact with blade to properly remove foreign particles from drive wheel. WARNING: Make certain that unit is disconnected from power source before attempting to service or remove any component. CLEANING • Keep machine and workshop clean. Do not allow sawdust to accumulate on band saw. • Keep wheels clean. Debris on wheels will cause poor tracking and blade slippage. • Keep mechanisms and threaded or sliding surfaces clean and free of foreign particles. • Operate band saw with a dust collector to minimize clean up. LUBRICATION • The shielded ball bearings are permanently lubricat- ed and require no further lubrication. • Small amounts of machine oil can be applied to belt tension mechanisms and threaded or sliding surfaces. • Occasionally apply a coat of paste wax to table top to keep it slick and corrosion free. KEEP BAND SAW IN REPAIR • If power cord is worn or cut in any way, have it replaced. • Replace any damaged or missing part. • Use parts list to order parts. 8
-
 1
1 -
2
-
 3
3 -
 4
4 -
 5
5 -
 6
6 -
 7
7 -
 8
8 -
 9
9 -
 10
10 -
 11
11 -
 12
12 -
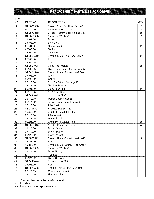 13
13 -
14
-
15
-
16
-
17
-
18
-
19
-
20
-
21
-
22
-
23
-
24
 |
 |