Craftsman 29906 Owners Manual
Craftsman 29906 - 14 in. Rear Tine Tiller Manual
 |
View all Craftsman 29906 manuals
Add to My Manuals
Save this manual to your list of manuals |
Craftsman 29906 manual content summary:
- Craftsman 29906 | Owners Manual - Page 1
engines. Before you start the engine, read and understand this Owner's Manual. IMPORTANT: Read and follow all Safety Rules and Instructions before operating this equipment. Sears, Roebuck and Co., Hoffman Estates, IL 60179 U.S.A. Visit our Craftsman website:www.sears.com/craftsman 423763 Rev. 1 - Craftsman 29906 | Owners Manual - Page 2
19 Troubleshooting 20 Illustrated Parts List 42 Sears Service Back Cover LIMITED ONE YEAR WARRANTY ON CRAFTSMAN TILLER For one (1) year from date of purchase, when this Craftsman Tiller is maintained, lubricated, and tuned up according to the operating and maintenance instructions in - Craftsman 29906 | Owners Manual - Page 3
trouble. • Stop the engine (motor) when leaving the operating position. • Take all possible precautions when leaving the machine unattended. Disengage the tines enclosure. • Always refer to the operator's guide instructions for important details if the tiller is to be stored for an extended period. - Craftsman 29906 | Owners Manual - Page 4
any problems you cannot easily remedy, please contact a Sears or other qualified Service Center. We have competent, well-trained technicians and the proper tools to service or repair this unit. Please read and retain this manual. The instructions will enable you to assemble and maintain your tiller - Craftsman 29906 | Owners Manual - Page 5
produced. They are also available at most Sears retail outlets and service centers. Some of these accessories may not apply to your tiller. ENGINE SPARK PLUG MUFFLER AiR FILTER GAS CAN ENGINE OiL STABiLiZER TILLER PERFORMANCE FURROW OPENER TILLER MAINTENANCE BELT SHEAR PiN CD HAiRPiN CLiP - Craftsman 29906 | Owners Manual - Page 6
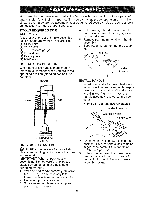
9/16" wrench gauge 4. Cut down right hand front and right hand rear corners of carton, lay side carton wall down. 5. Remove packing material from left hand is mentioned in this manual, it means when you are in the operating position (standing behind tiller handles). FRONT LEFT RIGHT Handle - Craftsman 29906 | Owners Manual - Page 7
Rod Shift Lever Indicator Flat Washer Handle Lock REMOVE TILLER FROM CRATE Handle Lock Gearcase Slot Lever \ 1. securely. 2. Make sure shift lever indicator is in "N" Rear Cartridge Bolt / Handle Base Pivot Bolt _oc nut INSERT CABLE Service and Adjustments section of this manual). 7 - Craftsman 29906 | Owners Manual - Page 8
YOUR TILLER READ THIS OWNER'S MANUAL AND SAFETY RULES BEFORE OPERATING YOUR TILLER. Compare the illustrations with your tiller to to shift transmission forward rotating till position, DRIVE CONTROL BAR - Used to engage tines, FUEL VALVE = Used to turn fuel off and on, gears, SHIFT LEVER - Craftsman 29906 | Owners Manual - Page 9
control bar and move shift lever indicator to "F" (forward) position. Engage drive control bar and tiller will move forward, REVERSE - WHEELS ONLY/TINES STOPPED 1. DO NOT STAND DIRECTLY BEHIND TILLER. 2. Release the drive control bar. 3. Move throttle control to "SLOW" position. 4. Move shift lever - Craftsman 29906 | Owners Manual - Page 10
tion you wish to turn, being careful to keep feet and legs away from tines. 6. When you have completed your turnaround, release the drive control bar and SPECIFICATIONS" on page 4 of this manual. All oil must meet A.RI. Service Classification SG- SL. . Tilt tiller back on its wheels and then re - Craftsman 29906 | Owners Manual - Page 11
while in storage. To avoid engine problems, the fuel system should be emptied fresh fuel next season. See Storage Instructions for additional information. Never use engine Tines will not readily penetrate dry, hard soil which may contribute to excessive bounce and difficult handling of your tiller - Craftsman 29906 | Owners Manual - Page 12
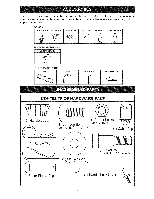
and grass. (-'_> ('h> ( ,_? /f "_> \ _i \ ,_" \ ri \/ .i (z', i _jz TINE SHEAR PINS The tine assemblies on your tiller are secured to the tine shaft with shear pins (See "TINE REPLACEMENT" in the Service and Adjustments section of this manual). If the tiller is unusually overloaded or - Craftsman 29906 | Owners Manual - Page 13
dirty or dusty conditions. SERVICE DATES GENERAL RECOMMENDATIONS The warranty on this tiller does not cover items that have been subjected to operator abuse or negligence. To receive full value from the warranty, the operator must maintain tiller as instructed in this manual. Some adjustments will - Craftsman 29906 | Owners Manual - Page 14
Operation section of this manual. Oil drain Level Oil Fill Plug Use only high quality detergent oil rated with API service classification SG-SL Select range expected before oil change. All oil must meet API service classification SG-SL • Be sure tiller is on level surface. • Oil will drain more - Craftsman 29906 | Owners Manual - Page 15
. Spark plug type and gap setting are shown in "PROD- UCT SPECIFICATIONS" manual. on page 4 of this TRANSMISSION Your transmission is sealed and will not require lubrication unless serviced. CLEANING Do not clean your tiller when the engine and transmission are hot. We do not rec- ommend - Craftsman 29906 | Owners Manual - Page 16
of removal, remove hairpin clip and clevis pin from left wheel. Pull wheel out from tiller about 1 inch. 1. Remove two (2) screws from side of belt guard. 2. IN GROOVE ON TOP OF IDLER PULLEY, NOTE POSITION OF BELT TO GUIDES. 4. Check belt adjustment as described below. 5. Replace belt guard. - Craftsman 29906 | Owners Manual - Page 17
exceeds 3-1/2 inches they should be replaced or straightened as necessary. • New tines should be assembled. Sharpened tine edges will rotate rear New Tine TJne Tin i _-3-1/2" Max Shear Pin ----._ Counter Tine Rotation Shear Pin Sharp Edge / Sharp Edge _ Hairpin Clip p Edge 12 Sharp Edges - Craftsman 29906 | Owners Manual - Page 18
high speed setting can be dangerous. If you think the engine-governed high speed needs adjusting, contact your nearest sears or other qualified service center which has the proper equipment and experience to make any necessary adjustments. TO ADJUST CARBURETOR The carburetor has been - Craftsman 29906 | Owners Manual - Page 19
TILLER 1. Clean entire tiller (See "CLEANING" in the Maintenance section of this manual). 2. Inspect and replace belts, if necessary (See belt replacement instructions in the Service and Adjustments section of this manual /or dirt in your gasoline will cause problems. • If possible, store your unit - Craftsman 29906 | Owners Manual - Page 20
TROUBLESHOOTING CHART: See appropriate section in manual unless directed to Sears service center PROBLEM Will not start CAUSE 1 Out of fuel. Clean engine air screen. 11 Clean/replace muffler. 12 Contact a Sears or other qualified service center. Engine overheats 1 Low oil level/dirty oil. 2 Dirty - Craftsman 29906 | Owners Manual - Page 21
TROUBLESHOOTING CHART: See appropriate section in manual unless directed to Sears service center PROBLEM Excessive bounce/ difficult handling Soil bails up or clumps CAUSE 1 Ground too dry and hard. 2 Wheels and depth stake incorrectly adjusted. 1 Ground too wet. Engineruns 1 Tine control is not - Craftsman 29906 | Owners Manual - Page 22
Por un (1) aflo, a partir de la fecha de compra, cuando esta Cultivadora Craftsman se mantenga, lubrique y afine seg0n las instrucciones para la operaci6n y el mantenimiento en el manual del dueflo, Sears reparar&, gratis, todo defecto en el material y la mano de obra. Esta Garantia no cubre - Craftsman 29906 | Owners Manual - Page 23
• Despues de pegarle a un objeto extraflo, pare el motor, remueva el alambre de la bujia, inspeccione la cultivadora cuidadosamente, para verificar si hay daflos, y repare el daflo antes de volver a arrancar y operar la cultivadora. • Tenga cuidado para evitar resbalarse o caerse. • Si la unidad - Craftsman 29906 | Owners Manual - Page 24
en el manual Ingles del dueSo.) ACUERDOS DE PROTECCK_N PARA LA REPARACION Congratulaciones por su buena compra. Su nuevo producto Craftsman® est& dia y noche o fijar en linea una cita para obtener el servicio. Sears tiene m&s de 12.000 especialistas profesionales en la reparaci6n, que tienen - Craftsman 29906 | Owners Manual - Page 25
Estos accesorios estaban disponibles cuando se produjo la cultivadora. Tambien est&n disponibles en la mayoria de las tiendas de Sears yen los centros de servicio. Algunos de estos accesorios tal vez no se apliquen a su cultivadora. MOTOR BUJ|A SILENCIADOR FILTRO DE AIRE LATA DE GASOLINA - Craftsman 29906 | Owners Manual - Page 26
de alambres (1) Destornillador (1) Medidor de presi6n de las Ilantas (1) Par de alicates (1) Llave de 9/16" POSICION DEL OPERADOR Cuando en este manual se mencionan los terminos "lado derecho" o "lado izquierdo" se refiere a cuando usted se encuentra en la posici6n de operaci6n (parado/a detr - Craftsman 29906 | Owners Manual - Page 27
mango en la mejor forma que le acomode al operador. (Vea "PARA AJUSTAR LA ALTURA DEL MANGO" en la secci6n de Servicio y Ajustes de este manual.) 27 - Craftsman 29906 | Owners Manual - Page 28
Estos simbolos pueden apareser sobre su cultivadora en la literature ducto, aprenda y comprenda sus significados. CONOZCA SU CULTIVADORA LEA ESTE MANUAL DEL DUENO Y LAS REGLAS DE SEGURIDAD CULTWADORA proporcionada con el proANTES DE OPERAR SU Compare las ilustraciones con su cultivadora para - Craftsman 29906 | Owners Manual - Page 29
La operaci6n de cualquier cultivadora puede hacer que salten objetos extraflos dentro de sus ojos, Io que puede producir daflos graves en estos. Siempre use anteojos de seguridad o protecciones para los ojos antes de hacer arrancar su cultivadora o mientras este labrando con ella. Recomendamos el - Craftsman 29906 | Owners Manual - Page 30
motor con aceite hasta el punto de rebose. Para conocer la capacidad aproximada, consulte ,,ESPECIFICACIONES DEL PRODUCTO,_ en la p&gina 4 de este manual. Todos los aceites deben cumplir con la Clasificaci6n de servicio del Instituto Americano del Petr61eo (American Petroleum Institute, API) SG-SL - Craftsman 29906 | Owners Manual - Page 31
arranque el motor. AI arrancar el mo- tor por pdmera vez o si el motor se qued6 sin combustible, ser& necesado jalar varias veces el arranque manual para que el combustible pase desde el tanque hacia el motor. 1. AsegOrese de que el cable de la bujia este conectado correctamente. 2. Coloque la - Craftsman 29906 | Owners Manual - Page 32
vea"CAMBIO DE LOS BRAZOS" en la secci6n de Servicio y Ajustes de este manual). Si la cultivadora esta muy cargada o atascada, las clavijas de seguro han por aquellas que aparecen en la secci6n de Partes de Repuesto en el manual Ingles del due_o. AJUSTE DE LAS RUEDAS PARA EL CULTIVO 1. Ponga bloques - Craftsman 29906 | Owners Manual - Page 33
del operador. Para recibir todo el valor de la garantia, el operador tiene que mantener la cultivadora segOn las instrucciones descritas en este manual. Hay algunos ajustes que se tienen que hacer en forma peri6dica para poder mantener su cultivadora adecuadamente. AI menos una vez cada estaci6n - Craftsman 29906 | Owners Manual - Page 34
NIVEL DEL ACEITE DEL MOTOR CON ACEITE" en la secci6n de Operaci6n de ese manual. Tap6n de Drenaje det aceite Nivet de Bouchon Aceite FILTRO DE AIRE Dele servicio de 25 horas de operaci6n o pot Io menos unavez al aflo si el tiller se utiliza menos 25 horas el aflo. Revise el nivel del aceite del - Craftsman 29906 | Owners Manual - Page 35
de bujfa y el ajuste de la separaci6n de los electrodos se muestran en ,,ESPE- CIFICACIONES DEL PRODUCTO_ en la p&gina 4 de este manual. LA TRANSMISION La transmisi6n est& sellada y no requerir& lubricaci6n a menos que se le realice mantenimiento. LIMPIEZA No limpie su cultivadora cuando el - Craftsman 29906 | Owners Manual - Page 36
CUIDADO DE LAS LLANTAS ,_PRECAUCI6N: Cuando monte las Ilantas, a menos que los talones esten asentados, si se inflan demasiado se puede producir una explosi6n. • Mantenga 20 libras de presi6n en las Ilantas. Si la presi6n de las Ilantas no es la misma, la cultivadora va a tirar hacia un lado. • - Craftsman 29906 | Owners Manual - Page 37
CAMBIO DE BRAZOS _I_,PRECAUCl6N: Los brazos son afilados. Use guantes u otra protecci6n cuando maneje los brazos. Si hay un brazo muy desgastado su cultivadora tiene que trabajar m&s y excava con menos profundidad. M&s importante aQn, los brazos desgastados no pueden cortar ni moler la materia org& - Craftsman 29906 | Owners Manual - Page 38
resultar peligroso. Si cree que es necesario ajustar la velocJdad alta de! regulador del motor, contActese con el centro de servicJo tecnico Sears m_.s cercano o con otro centro de servicJo tecnJco calificado que cuente con la experiencia y el equipo adecuados para realizar los ajustes necesarios - Craftsman 29906 | Owners Manual - Page 39
antes de almacenarlo en cualquier recinto privado. CU LTIVADO RA 1. Limpie toda la cultivadora (vea "LIMPIEZA' en la secci6n de Mantenimiento en este manual). 2. Inspeccione y cambie las correas, si es necesario (vea las instrucciones para el cambio de la correa en la secci6n de Servi- cioy Ajustes - Craftsman 29906 | Owners Manual - Page 40
IDENTIFICACION DE PROBLEMAS: Yea la secci6n apropiada en el manual a menos que este dirigido a un centro de servicio Sears. PROBLEMA No arranca No arranca con facilidad P_rdida de potencia CAUSA CORRECCION 1 Se acab6 el combustible. 2 La v&tvuta de combustible est& en la posici6n -OFF,, ( - Craftsman 29906 | Owners Manual - Page 41
IDENTIFICACION DE PROBLEMAS: Yea la secci6n apropiada en el manual a menos que este dirigido a un centro de servicio Sears. PROBLEMA CAUSA CORRECCION El motor recalienta 1 El nivet de aceite esta bajo/el aceJte esta sucio. 2 La rejilla de aire del motor esta sucia. 3 Et - Craftsman 29906 | Owners Manual - Page 42
HANDLES TILLER - - MODEL NUMBER 917.299060 4 / 27 \ 26 24 20 21 19 18 KEY PART NO. NO. 2 141406 3 110673X 4 127254X 5 6712J 6 189347 7 110641X 9 72010520 10 110646X 11 - Craftsman 29906 | Owners Manual - Page 43
TILLER - - MODEL NUMBER 917.299060 MAINFRAME, LEFT SIDE 7 6 9 65 37 67 34 31 30 38 _69 40 26 23 24 15 i i mainflame left 25 25 KEY - Craftsman 29906 | Owners Manual - Page 44
TILLER - - MODEL NUMBER 917.299060 MAINFRAME, RIGHT SiDE 15 II \\ 13 12 / / / 44 11 10 KEY NO. 2 5 7 I0 11 12 13 PART NO. 73970500 102332× 102173× - Craftsman 29906 | Owners Manual - Page 45
TRANSMISSION TILLER - - MODEL NUMBER 917.299060 12 11 10 9 14 6O 48 6 5 transmission 19. Lock 5/16-18 x 3-1/2 Sprocket Assembly w/Bearing (Includes Key Nos. 37 and 38) Bearing, Needle Sprocket, Tine Gear, Cluster, Red 1st & 2nd Gear, Reverse Shaft, Reduction (1st) Washer, Thrust Spacer 1.01x1.75 - Craftsman 29906 | Owners Manual - Page 46
TINE SHIELD TILLER - - MODEL NUMBER 917.299060 29 \ 23 // 24 27 i 26 7 8 29 tine shield 14 in rl KEY PART NO. NO. Washer, Lock 5/16 13 STD533112 Bolt, Carriage 5/16-18x 1-1/4 14 124343X Bracket, Shield Tine 16 73900400 Nut, Flange Lock 1/4-20 18 STD532512 Bolt, Cart. 1/4-20 x 1-1/4 Gr. - Craftsman 29906 | Owners Manual - Page 47
TILLER - - MODEL NUMBER 917.299060 TINE ASSEMBLY 6 / 1 i. i 11 i 3 2 q 10 49 9 tine_ipb_99_2 KEY NO. 1 2 3 4 5 6 8 PART NO. 4459J 132673 6554J 3146R 132721 73540600 74610616 DESCRIPTION Tine, Outer, LH. Pin, Shear Tine, Inner, L.H. Clip, Hairpin Assembly, Hub and Plate, L.H. Nut Crowntock - Craftsman 29906 | Owners Manual - Page 48
DECALS TILLER - - MODEL NUMBER 917.299060 17 8 1 9 10 16 15 KEY NO. 3 4 5 6 7 8 9 10 11 Indicator Decal, Console Decal, Warning, Rotating Tines Decal, Tine Depth Stake Decal, Tine, Shield, Warning Dom Decal, Engine AC Decal, Tine Shield Decal, Console, Control Manual, Owner's (Eng/Span) 48 - Craftsman 29906 | Owners Manual - Page 49
TILLER - - MODEL NUMBER 917. 299080 ENGINE, LCT -- MODEL NUMBER PLMHK14600124P-BPQE2 208cc SERVICE KIT BREAKDOWN 10 16 34 14 15 21 4 13 28 29 KEY NO. 1 2 3 4 5 6 7 8 9 10 11 12 13 14 15 16 17 PART NO. 420578 420579 - Craftsman 29906 | Owners Manual - Page 50
50 - Craftsman 29906 | Owners Manual - Page 51
51 - Craftsman 29906 | Owners Manual - Page 52
For the replacement parts, accessories and owner's manuals that you need to do-it-yourself. For Sears professional installation of home appliances and items like only) www.sears.corn To purchase a protection agreement (U.S.A.) or maintenance agreement (Canada) on a product serviced by Sears: 1-800- - Craftsman 29906 | Owners Manual - Page 53
engines. Before you start the engine, read and understand this Owner's Manual. IMPORTANT: Read and follow all Safety Rules and Instructions before operating this equipment. Sears, Roebuck and Co., Hoffman Estates, IL 60179 U.S.A. Visit our Craftsman website:www.sears.com/craftsman 423763 Rev. 1 - Craftsman 29906 | Owners Manual - Page 54
19 Troubleshooting 20 Illustrated Parts List 42 Sears Service Back Cover LIMITED ONE YEAR WARRANTY ON CRAFTSMAN TILLER For one (1) year from date of purchase, when this Craftsman Tiller is maintained, lubricated, and tuned up according to the operating and maintenance instructions in - Craftsman 29906 | Owners Manual - Page 55
trouble. • Stop the engine (motor) when leaving the operating position. • Take all possible precautions when leaving the machine unattended. Disengage the tines enclosure. • Always refer to the operator's guide instructions for important details if the tiller is to be stored for an extended period. - Craftsman 29906 | Owners Manual - Page 56
any problems you cannot easily remedy, please contact a Sears or other qualified Service Center. We have competent, well-trained technicians and the proper tools to service or repair this unit. Please read and retain this manual. The instructions will enable you to assemble and maintain your tiller - Craftsman 29906 | Owners Manual - Page 57
produced. They are also available at most Sears retail outlets and service centers. Some of these accessories may not apply to your tiller. ENGINE SPARK PLUG MUFFLER AiR FILTER GAS CAN ENGINE OiL STABiLiZER TILLER PERFORMANCE FURROW OPENER TILLER MAINTENANCE BELT SHEAR PiN CD HAiRPiN CLiP - Craftsman 29906 | Owners Manual - Page 58
9/16" wrench gauge 4. Cut down right hand front and right hand rear corners of carton, lay side carton wall down. 5. Remove packing material from left hand is mentioned in this manual, it means when you are in the operating position (standing behind tiller handles). FRONT LEFT RIGHT Handle - Craftsman 29906 | Owners Manual - Page 59
Rod Shift Lever Indicator Flat Washer Handle Lock REMOVE TILLER FROM CRATE Handle Lock Gearcase Slot Lever \ 1. securely. 2. Make sure shift lever indicator is in "N" Rear Cartridge Bolt / Handle Base Pivot Bolt _oc nut INSERT CABLE Service and Adjustments section of this manual). 7 - Craftsman 29906 | Owners Manual - Page 60
YOUR TILLER READ THIS OWNER'S MANUAL AND SAFETY RULES BEFORE OPERATING YOUR TILLER. Compare the illustrations with your tiller to to shift transmission forward rotating till position, DRIVE CONTROL BAR - Used to engage tines, FUEL VALVE = Used to turn fuel off and on, gears, SHIFT LEVER - Craftsman 29906 | Owners Manual - Page 61
control bar and move shift lever indicator to "F" (forward) position. Engage drive control bar and tiller will move forward, REVERSE - WHEELS ONLY/TINES STOPPED 1. DO NOT STAND DIRECTLY BEHIND TILLER. 2. Release the drive control bar. 3. Move throttle control to "SLOW" position. 4. Move shift lever - Craftsman 29906 | Owners Manual - Page 62
tion you wish to turn, being careful to keep feet and legs away from tines. 6. When you have completed your turnaround, release the drive control bar and SPECIFICATIONS" on page 4 of this manual. All oil must meet A.RI. Service Classification SG- SL. . Tilt tiller back on its wheels and then re - Craftsman 29906 | Owners Manual - Page 63
while in storage. To avoid engine problems, the fuel system should be emptied fresh fuel next season. See Storage Instructions for additional information. Never use engine Tines will not readily penetrate dry, hard soil which may contribute to excessive bounce and difficult handling of your tiller - Craftsman 29906 | Owners Manual - Page 64
and grass. (-'_> ('h> ( ,_? /f "_> \ _i \ ,_" \ ri \/ .i (z', i _jz TINE SHEAR PINS The tine assemblies on your tiller are secured to the tine shaft with shear pins (See "TINE REPLACEMENT" in the Service and Adjustments section of this manual). If the tiller is unusually overloaded or - Craftsman 29906 | Owners Manual - Page 65
dirty or dusty conditions. SERVICE DATES GENERAL RECOMMENDATIONS The warranty on this tiller does not cover items that have been subjected to operator abuse or negligence. To receive full value from the warranty, the operator must maintain tiller as instructed in this manual. Some adjustments will - Craftsman 29906 | Owners Manual - Page 66
Operation section of this manual. Oil drain Level Oil Fill Plug Use only high quality detergent oil rated with API service classification SG-SL Select range expected before oil change. All oil must meet API service classification SG-SL • Be sure tiller is on level surface. • Oil will drain more - Craftsman 29906 | Owners Manual - Page 67
. Spark plug type and gap setting are shown in "PROD- UCT SPECIFICATIONS" manual. on page 4 of this TRANSMISSION Your transmission is sealed and will not require lubrication unless serviced. CLEANING Do not clean your tiller when the engine and transmission are hot. We do not rec- ommend - Craftsman 29906 | Owners Manual - Page 68
of removal, remove hairpin clip and clevis pin from left wheel. Pull wheel out from tiller about 1 inch. 1. Remove two (2) screws from side of belt guard. 2. IN GROOVE ON TOP OF IDLER PULLEY, NOTE POSITION OF BELT TO GUIDES. 4. Check belt adjustment as described below. 5. Replace belt guard. - Craftsman 29906 | Owners Manual - Page 69
exceeds 3-1/2 inches they should be replaced or straightened as necessary. • New tines should be assembled. Sharpened tine edges will rotate rear New Tine TJne Tin i _-3-1/2" Max Shear Pin ----._ Counter Tine Rotation Shear Pin Sharp Edge / Sharp Edge _ Hairpin Clip p Edge 12 Sharp Edges - Craftsman 29906 | Owners Manual - Page 70
high speed setting can be dangerous. If you think the engine-governed high speed needs adjusting, contact your nearest sears or other qualified service center which has the proper equipment and experience to make any necessary adjustments. TO ADJUST CARBURETOR The carburetor has been - Craftsman 29906 | Owners Manual - Page 71
TILLER 1. Clean entire tiller (See "CLEANING" in the Maintenance section of this manual). 2. Inspect and replace belts, if necessary (See belt replacement instructions in the Service and Adjustments section of this manual /or dirt in your gasoline will cause problems. • If possible, store your unit - Craftsman 29906 | Owners Manual - Page 72
TROUBLESHOOTING CHART: See appropriate section in manual unless directed to Sears service center PROBLEM Will not start CAUSE 1 Out of fuel. Clean engine air screen. 11 Clean/replace muffler. 12 Contact a Sears or other qualified service center. Engine overheats 1 Low oil level/dirty oil. 2 Dirty - Craftsman 29906 | Owners Manual - Page 73
TROUBLESHOOTING CHART: See appropriate section in manual unless directed to Sears service center PROBLEM Excessive bounce/ difficult handling Soil bails up or clumps CAUSE 1 Ground too dry and hard. 2 Wheels and depth stake incorrectly adjusted. 1 Ground too wet. Engineruns 1 Tine control is not - Craftsman 29906 | Owners Manual - Page 74
Por un (1) aflo, a partir de la fecha de compra, cuando esta Cultivadora Craftsman se mantenga, lubrique y afine seg0n las instrucciones para la operaci6n y el mantenimiento en el manual del dueflo, Sears reparar&, gratis, todo defecto en el material y la mano de obra. Esta Garantia no cubre - Craftsman 29906 | Owners Manual - Page 75
• Despues de pegarle a un objeto extraflo, pare el motor, remueva el alambre de la bujia, inspeccione la cultivadora cuidadosamente, para verificar si hay daflos, y repare el daflo antes de volver a arrancar y operar la cultivadora. • Tenga cuidado para evitar resbalarse o caerse. • Si la unidad - Craftsman 29906 | Owners Manual - Page 76
en el manual Ingles del dueSo.) ACUERDOS DE PROTECCK_N PARA LA REPARACION Congratulaciones por su buena compra. Su nuevo producto Craftsman® est& dia y noche o fijar en linea una cita para obtener el servicio. Sears tiene m&s de 12.000 especialistas profesionales en la reparaci6n, que tienen - Craftsman 29906 | Owners Manual - Page 77
Estos accesorios estaban disponibles cuando se produjo la cultivadora. Tambien est&n disponibles en la mayoria de las tiendas de Sears yen los centros de servicio. Algunos de estos accesorios tal vez no se apliquen a su cultivadora. MOTOR BUJ|A SILENCIADOR FILTRO DE AIRE LATA DE GASOLINA - Craftsman 29906 | Owners Manual - Page 78
de alambres (1) Destornillador (1) Medidor de presi6n de las Ilantas (1) Par de alicates (1) Llave de 9/16" POSICION DEL OPERADOR Cuando en este manual se mencionan los terminos "lado derecho" o "lado izquierdo" se refiere a cuando usted se encuentra en la posici6n de operaci6n (parado/a detr - Craftsman 29906 | Owners Manual - Page 79
mango en la mejor forma que le acomode al operador. (Vea "PARA AJUSTAR LA ALTURA DEL MANGO" en la secci6n de Servicio y Ajustes de este manual.) 27 - Craftsman 29906 | Owners Manual - Page 80
Estos simbolos pueden apareser sobre su cultivadora en la literature ducto, aprenda y comprenda sus significados. CONOZCA SU CULTIVADORA LEA ESTE MANUAL DEL DUENO Y LAS REGLAS DE SEGURIDAD CULTWADORA proporcionada con el proANTES DE OPERAR SU Compare las ilustraciones con su cultivadora para - Craftsman 29906 | Owners Manual - Page 81
La operaci6n de cualquier cultivadora puede hacer que salten objetos extraflos dentro de sus ojos, Io que puede producir daflos graves en estos. Siempre use anteojos de seguridad o protecciones para los ojos antes de hacer arrancar su cultivadora o mientras este labrando con ella. Recomendamos el - Craftsman 29906 | Owners Manual - Page 82
motor con aceite hasta el punto de rebose. Para conocer la capacidad aproximada, consulte ,,ESPECIFICACIONES DEL PRODUCTO,_ en la p&gina 4 de este manual. Todos los aceites deben cumplir con la Clasificaci6n de servicio del Instituto Americano del Petr61eo (American Petroleum Institute, API) SG-SL - Craftsman 29906 | Owners Manual - Page 83
arranque el motor. AI arrancar el mo- tor por pdmera vez o si el motor se qued6 sin combustible, ser& necesado jalar varias veces el arranque manual para que el combustible pase desde el tanque hacia el motor. 1. AsegOrese de que el cable de la bujia este conectado correctamente. 2. Coloque la - Craftsman 29906 | Owners Manual - Page 84
vea"CAMBIO DE LOS BRAZOS" en la secci6n de Servicio y Ajustes de este manual). Si la cultivadora esta muy cargada o atascada, las clavijas de seguro han por aquellas que aparecen en la secci6n de Partes de Repuesto en el manual Ingles del due_o. AJUSTE DE LAS RUEDAS PARA EL CULTIVO 1. Ponga bloques - Craftsman 29906 | Owners Manual - Page 85
del operador. Para recibir todo el valor de la garantia, el operador tiene que mantener la cultivadora segOn las instrucciones descritas en este manual. Hay algunos ajustes que se tienen que hacer en forma peri6dica para poder mantener su cultivadora adecuadamente. AI menos una vez cada estaci6n - Craftsman 29906 | Owners Manual - Page 86
NIVEL DEL ACEITE DEL MOTOR CON ACEITE" en la secci6n de Operaci6n de ese manual. Tap6n de Drenaje det aceite Nivet de Bouchon Aceite FILTRO DE AIRE Dele servicio de 25 horas de operaci6n o pot Io menos unavez al aflo si el tiller se utiliza menos 25 horas el aflo. Revise el nivel del aceite del - Craftsman 29906 | Owners Manual - Page 87
de bujfa y el ajuste de la separaci6n de los electrodos se muestran en ,,ESPE- CIFICACIONES DEL PRODUCTO_ en la p&gina 4 de este manual. LA TRANSMISION La transmisi6n est& sellada y no requerir& lubricaci6n a menos que se le realice mantenimiento. LIMPIEZA No limpie su cultivadora cuando el - Craftsman 29906 | Owners Manual - Page 88
CUIDADO DE LAS LLANTAS ,_PRECAUCI6N: Cuando monte las Ilantas, a menos que los talones esten asentados, si se inflan demasiado se puede producir una explosi6n. • Mantenga 20 libras de presi6n en las Ilantas. Si la presi6n de las Ilantas no es la misma, la cultivadora va a tirar hacia un lado. • - Craftsman 29906 | Owners Manual - Page 89
CAMBIO DE BRAZOS _I_,PRECAUCl6N: Los brazos son afilados. Use guantes u otra protecci6n cuando maneje los brazos. Si hay un brazo muy desgastado su cultivadora tiene que trabajar m&s y excava con menos profundidad. M&s importante aQn, los brazos desgastados no pueden cortar ni moler la materia org& - Craftsman 29906 | Owners Manual - Page 90
resultar peligroso. Si cree que es necesario ajustar la velocJdad alta de! regulador del motor, contActese con el centro de servicJo tecnico Sears m_.s cercano o con otro centro de servicJo tecnJco calificado que cuente con la experiencia y el equipo adecuados para realizar los ajustes necesarios - Craftsman 29906 | Owners Manual - Page 91
antes de almacenarlo en cualquier recinto privado. CU LTIVADO RA 1. Limpie toda la cultivadora (vea "LIMPIEZA' en la secci6n de Mantenimiento en este manual). 2. Inspeccione y cambie las correas, si es necesario (vea las instrucciones para el cambio de la correa en la secci6n de Servi- cioy Ajustes - Craftsman 29906 | Owners Manual - Page 92
IDENTIFICACION DE PROBLEMAS: Yea la secci6n apropiada en el manual a menos que este dirigido a un centro de servicio Sears. PROBLEMA No arranca No arranca con facilidad P_rdida de potencia CAUSA CORRECCION 1 Se acab6 el combustible. 2 La v&tvuta de combustible est& en la posici6n -OFF,, ( - Craftsman 29906 | Owners Manual - Page 93
IDENTIFICACION DE PROBLEMAS: Yea la secci6n apropiada en el manual a menos que este dirigido a un centro de servicio Sears. PROBLEMA CAUSA CORRECCION El motor recalienta 1 El nivet de aceite esta bajo/el aceJte esta sucio. 2 La rejilla de aire del motor esta sucia. 3 Et - Craftsman 29906 | Owners Manual - Page 94
HANDLES TILLER - - MODEL NUMBER 917.299060 4 / 27 \ 26 24 20 21 19 18 KEY PART NO. NO. 2 141406 3 110673X 4 127254X 5 6712J 6 189347 7 110641X 9 72010520 10 110646X 11 - Craftsman 29906 | Owners Manual - Page 95
TILLER - - MODEL NUMBER 917.299060 MAINFRAME, LEFT SIDE 7 6 9 65 37 67 34 31 30 38 _69 40 26 23 24 15 i i mainflame left 25 25 KEY - Craftsman 29906 | Owners Manual - Page 96
TILLER - - MODEL NUMBER 917.299060 MAINFRAME, RIGHT SiDE 15 II \\ 13 12 / / / 44 11 10 KEY NO. 2 5 7 I0 11 12 13 PART NO. 73970500 102332× 102173× - Craftsman 29906 | Owners Manual - Page 97
TRANSMISSION TILLER - - MODEL NUMBER 917.299060 12 11 10 9 14 6O 48 6 5 transmission 19. Lock 5/16-18 x 3-1/2 Sprocket Assembly w/Bearing (Includes Key Nos. 37 and 38) Bearing, Needle Sprocket, Tine Gear, Cluster, Red 1st & 2nd Gear, Reverse Shaft, Reduction (1st) Washer, Thrust Spacer 1.01x1.75 - Craftsman 29906 | Owners Manual - Page 98
TINE SHIELD TILLER - - MODEL NUMBER 917.299060 29 \ 23 // 24 27 i 26 7 8 29 tine shield 14 in rl KEY PART NO. NO. Washer, Lock 5/16 13 STD533112 Bolt, Carriage 5/16-18x 1-1/4 14 124343X Bracket, Shield Tine 16 73900400 Nut, Flange Lock 1/4-20 18 STD532512 Bolt, Cart. 1/4-20 x 1-1/4 Gr. - Craftsman 29906 | Owners Manual - Page 99
TILLER - - MODEL NUMBER 917.299060 TINE ASSEMBLY 6 / 1 i. i 11 i 3 2 q 10 49 9 tine_ipb_99_2 KEY NO. 1 2 3 4 5 6 8 PART NO. 4459J 132673 6554J 3146R 132721 73540600 74610616 DESCRIPTION Tine, Outer, LH. Pin, Shear Tine, Inner, L.H. Clip, Hairpin Assembly, Hub and Plate, L.H. Nut Crowntock - Craftsman 29906 | Owners Manual - Page 100
DECALS TILLER - - MODEL NUMBER 917.299060 17 8 1 9 10 16 15 KEY NO. 3 4 5 6 7 8 9 10 11 Indicator Decal, Console Decal, Warning, Rotating Tines Decal, Tine Depth Stake Decal, Tine, Shield, Warning Dom Decal, Engine AC Decal, Tine Shield Decal, Console, Control Manual, Owner's (Eng/Span) 48 - Craftsman 29906 | Owners Manual - Page 101
TILLER - - MODEL NUMBER 917. 299080 ENGINE, LCT -- MODEL NUMBER PLMHK14600124P-BPQE2 208cc SERVICE KIT BREAKDOWN 10 16 34 14 15 21 4 13 28 29 KEY NO. 1 2 3 4 5 6 7 8 9 10 11 12 13 14 15 16 17 PART NO. 420578 420579 - Craftsman 29906 | Owners Manual - Page 102
50 - Craftsman 29906 | Owners Manual - Page 103
51 - Craftsman 29906 | Owners Manual - Page 104
For the replacement parts, accessories and owner's manuals that you need to do-it-yourself. For Sears professional installation of home appliances and items like only) www.sears.corn To purchase a protection agreement (U.S.A.) or maintenance agreement (Canada) on a product serviced by Sears: 1-800-
-
 1
1 -
 2
2 -
 3
3 -
 4
4 -
 5
5 -
 6
6 -
 7
7 -
8
-
9
-
10
-
11
-
12
-
13
-
14
-
15
-
16
-
17
-
18
-
19
-
20
-
21
-
22
-
23
-
24
-
25
-
26
-
27
-
28
-
29
-
30
-
31
-
32
-
33
-
34
-
35
-
36
-
37
-
38
-
39
-
40
-
41
-
42
-
43
-
44
-
45
-
46
-
47
-
48
-
49
-
50
-
51
-
52
-
53
-
54
-
55
-
56
-
57
-
58
-
59
-
60
-
61
-
62
-
63
-
64
-
65
-
66
-
67
-
68
-
69
-
70
-
71
-
72
-
73
-
74
-
75
-
76
-
77
-
78
-
79
-
80
-
81
-
82
-
83
-
84
-
85
-
86
-
87
-
88
-
89
-
90
-
91
-
92
-
93
-
94
-
95
-
96
-
97
-
98
-
99
-
100
-
101
-
102
-
103
-
104
 |
 |

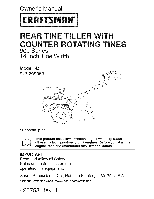
Owner's
Manual
CRRFT$14RH
°
TI
ETLL
COU
TE
ROTATI
900 Series
14 Inch Tine Width
G
IT
T
Model No.
917.299060
\
•
EspaSol,
p.
22
This
product
has
a low
emission
engine
which
operates
differently
from
previously
built
engines.
Before
you
start
the
engine,
read
and
understand
this
Owner's
Manual.
IMPORTANT:
Read and follow
all Safety
Rules
and Instructions
before
operating
this
equipment.
Sears,
Roebuck
and Co., Hoffman
Estates,
IL 60179
Visit
our
Craftsman
website:www.sears.com/craftsman
U.S.A.
423763
Rev. 1