DELPHI XpressRC User Guide - Page 16
mount. - xm radio
 |
UPC - 689604184554
View all DELPHI XpressRC manuals
Add to My Manuals
Save this manual to your list of manuals |
Page 16 highlights
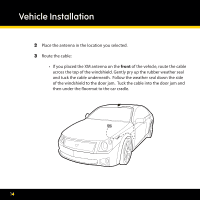
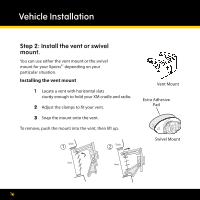
Vehicle Installation Step 2: Install the vent or swivel mount. You can use either the vent mount or the swivel mount for your XpressRC depending on your particular situation. Installing the vent mount 1 Locate a vent with horizontal slats sturdy enough to hold your XM cradle and radio. 2 Adjust the clamps to fit your vent. 3 Snap the mount onto the vent. To remove, push the mount into the vent, then lift up. Vent Mount Extra Adhesive Pad Swivel Mount 16
-
 1
1 -
2
-
3
-
4
-
5
-
6
-
7
-
8
-
9
-
10
-
 11
11 -
 12
12 -
 13
13 -
 14
14 -
 15
15 -
 16
16 -
 17
17 -
 18
18 -
 19
19 -
 20
20 -
 21
21 -
22
-
23
-
24
-
25
-
26
-
27
-
28
-
29
-
30
-
31
-
32
-
33
-
34
-
35
-
36
-
37
-
38
-
39
-
40
-
41
-
42
-
43
-
44
-
45
-
46
-
47
-
48
-
49
-
50
-
51
-
52
-
53
-
54
-
55
-
56
-
57
-
58
-
59
-
60
-
61
-
62
-
63
-
64
-
65
-
66
-
67
-
68
-
69
-
70
-
71
-
72
-
73
-
74
-
75
-
76
 |
 |

1µ
Step ±: Install the vent or swivel
mount.
You can use either the vent mount or the swivel
mount for your Xpress
RC
depending on your
particular situation°
Installing the vent mount
1
Locate a vent with horizontal slats
sturdy enough to hold your XM cradle and radio°
±
Adjust the clamps to fit your vent°
²
Snap the mount onto the vent°
To remove, push the mount into the vent, then lift up°
Swivel Mount
Vent Mount
Vehicle Installation
Extra Adhesive
Pad