DeLonghi ESAM6700 Owner Manual - Page 13
Changing The Menu Settings - display
 |
View all DeLonghi ESAM6700 manuals
Add to My Manuals
Save this manual to your list of manuals |
Page 13 highlights
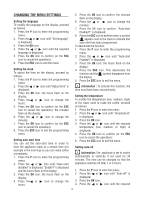
CHANGING THE MENU SETTINGS Setting the language To modify the language on the display, proceed as follows: 1. Press the P icon to enter the programming menu; 2. Press the or icon until "Set language" is displayed; 3. Press the OK icon; 4. Press the or icon until the required language is displayed; 5. Press the OK icon to confirm (or the ESC icon to cancel the operation); 6. Press the ESC icon to exit the menu. Setting the clock To adjust the time on the display, proceed as follows: 1. Press the P icon to enter the programming menu; 2. Press the or icon until "Adjust time" is displayed; 3. Press the OK icon: the hours flash on the display; 4. Press the or icon to change the hours; 5. Press the OK icon to confirm (or the ESC icon to cancel the operation): the minutes flash on the display; 6. Press the or icon to change the minutes; 7. Press the OK icon to confirm (or the ESC icon to cancel the operation); 8. Press the ESC icon to exit the programming menu. Setting auto-start time You can set the auto-start time in order to have the appliance ready at a certain time (for example in the morning) so you can make coffee immediately. 1. Press the P icon to enter the programming menu; 2. Press the or icon until "Auto-start disabled" is displayed; "Enable?" is displayed and the hours flash on the display; 3. Press the OK icon: the hours flash on the display; 4. Press the or icon to change the hours; 5. Press the OK icon to confirm: the minutes flash on the display; 6. Press the or icon to change the minutes; 7. Press the OK icon to confirm: "Auto-start Enabled?" is displayed; 8. Press the ESC icon to exit the menu: a symbol appears next to the clock to indicate that auto-start has been programmed. To deactivate the function: 1. Press the P icon to enter the programming menu; 2. Press the or icon until "Auto-start Enabled?" is displayed; 3. Press the OK icon: the hours flash on the display; 4. Press the ESC icon. This deactivates the function and the symbol disappears from the display. 5. Press the ESC icon to exit the menu. Information : To activate this function, the time must have been set previously. Setting the temperature To modify the temperature (low, medium, high) of the water used to make the coffee, proceed as follows: 1. Press the P icon to enter the menu; 2. Press the or icon until "Temperature" is displayed; 3. Press the OK icon; 4. Press the or icon until the required temperature (low, medium or high) is displayed; 5. Press the OK icon to confirm (or the ESC icon to cancel the operation); 6. Press the ESC icon to exit the menu. Setting auto-off Information: The appliance is set to switch automatically to stand-by if not used for 30 minutes. The time can be changed so that the appliance switches off after 1 or 2 hours. 1. Press the P icon to enter the menu; 2. Press the or icon until "Auto-off" is displayed; 3. Press the OK icon; 4. Press the or icon until the required 12
-
 1
1 -
2
-
3
-
4
-
5
-
6
-
7
-
 8
8 -
 9
9 -
 10
10 -
 11
11 -
 12
12 -
 13
13 -
 14
14 -
 15
15 -
 16
16 -
 17
17 -
 18
18 -
19
-
20
-
21
-
22
-
23
-
24
-
25
 |
 |
